Making a beautiful house above the well with drawings. House for a well (65 photos): functions, types, how to do it yourself. The need for construction for a well
Paying tribute to traditions or simply decorating a local area, the owners of suburban real estate decorate the wells with wooden houses of various shapes: from a simple extension roof with a door to a very solid log house resembling a gazebo. Dozens of firms offer luxurious products with carved elements in the form of animals and openwork ornaments, but it is much more pleasant to build an original house for a well with your own hands near the dacha. The walls of a bar or a wide roof also have a practical purpose: they protect the water in the well shaft from the ingress of debris that is carried by the wind. From a safety point of view, the house is also important: it serves as a barrier for children and animals.
Let's consider several projects of buildings made of wood - a natural, beautiful material that is very easy and pleasant to work with.
Whatever the project, the tool is always the same - the one that is needed for wood processing. So, before starting work, you should prepare:
- a circular saw, an electric plane (ideally, a woodworking machine on which you can quickly and easily prepare all the parts);
- hacksaw and jigsaw;
- a hammer;
- phillips screwdriver
- nail puller;
- level, pencil, tape measure (at least 3 m).

Any woodworking tool is suitable for building a well house
Having previously made the drawings of the house for and making simple calculations, you can prepare the material for construction in advance.
To erect a wooden structure you will need:
- timber (rounded, glued);
- edged board;
- fasteners (screws, nails);
- roof covering material (roofing material, shingles, slate);
- hinges, handle and latch (if equipped).
All wooden parts should be adjusted to size, sanded, treated with protective compounds. Antiseptic and varnished wood looks better and lasts longer.
Project No. 1 - a house with a gable roof
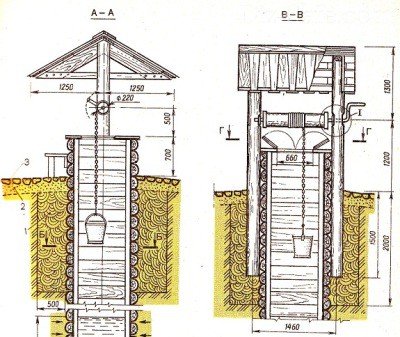
So, we are building a house-roof for a well or a well, from which water is supplied to the house using a pumping station. This is a small room to protect the head of the well rings, and a door is needed to control the pump operation, as well as to clean and disinfect.

Well house with a door, built in the form of a large roof
Frame construction
The main material for the frame is timber and edged board. Too voluminous parts will make the structure bulky, too thin - fragile, so it is worth staying at the average parameters: the section of the bar is 80 mm x 100 mm, the thickness of the board is 40 mm. It is necessary to prepare four racks 8 cm wide and four edged boards suitable for the lower and upper strapping, 12 cm wide.The boards are sawn off in advance to size, then the strapping parts are alternately nailed to the racks so that the result is a smooth and reliable frame. You should pay attention to the fasteners: the length of the nails should be such that they firmly connect the two parts - about 10 cm.

On the frame diagram, the attachment points of the upper and lower strapping to the posts are clearly visible
The frame is easiest to assemble in the following sequence: first, connect two posts with boards above and below, then fasten the remaining two posts in the same way, place both structures around the well shaft and finally connect them together with straps.
According to this project, you can build everything quickly and from scrap materials, since almost any of them - boards, beams - remain in the country during the construction of a house or a bath.
Roof structure and cladding
The construction of the roof should begin with the device of roof trusses - a rigid structure on which the crate will be attached. It is better to choose fairly strong boards (at least 3 cm thick), the length of which is 180 cm - the height of the structure will depend on the length of these boards. For the installation of the crossbars and jibs, a board of smaller thickness is required - 2.5 cm. The jibs should be 8 pieces, rafters - 6 pieces, crossbars - 3 pieces, each length - 30 cm.

The distance between the elements of the crate must be the same
Sequence of work:
- Having cut the rafters at an angle, their upper ends are connected together. Self-tapping screws are used as fasteners. Additionally, a crossbar attached 30 cm below the top point will help to fix the location of the rafters. It is better to perform all actions by putting the parts on the ground.
- A cut is made on the rafters in the place where they will be connected to the boards of the upper harness. Connect the frame and rafters with nails (12 cm long).

Connection diagram of rafters with the upper frame strapping
- Installation of rafters is reinforced by installing jibs. Roof trusses are connected using a kind of ridge - two boards, to which the crate is subsequently attached. The interval between the elements of the lathing is 13-15 cm. The protrusions above both walls of the structure are 10 cm.
- The constructed roof is covered with roofing material.
- Slate is mounted on roofing material with special fasteners. Places of corner joints are covered with wind boards.
Door installation
The door to the house is a kind of board board, which is made in a simple way. Planks 85 cm long and 15-20 cm wide are cut, folded one to one and fastened together with wooden bars with a cross section of 2.5 cm x 3 cm. Two bars are enough - one from below, the other from above. Self-tapping screws are used as fasteners, 4 pieces for each board. So that the door retains its shape when moving, and the boards do not "walk", another block is nailed diagonally - for rigidity.

The base and frame of the house are practically hidden under the roof, and the door is located above the base, above ground level
After sheathing the gables, the handle and the latch are nailed down, then the door is hung on the piano hinges. The final stage is the treatment of the boards from the outside with protective agents against mold and mildew, painting with varnish or special paint for wood to match the neighboring buildings.
Project # 2 - log house
The next creation is a log well house made in a classic rustic style. This well design can be seen in Russian villages. The rounded logs are folded in the form of a small log house - according to the size of a well, a wide roof is erected on top of two massive posts and a gate is installed to raise a bucket of water. The edges of the roof extend beyond the frame to prevent rainwater from entering the well. For stability, the racks are equipped with small supports, which also play a decorative role.

This building has three main parts: a log base, a gate and a wide roof
The protruding ends of the logs have curly cutouts, which also serves as a decoration for the structure. The roof is covered with a bright colored waterproofing material.
To build you need:
- rounded logs for felling, racks and gates (sizes are selected according to the diameter of the well);
- edged board for props and roof;
- roofing (slate, tile, roofing felt);
- material for a gate with a handle.

Diagram of a gate for a well with dimensions (they can be changed, but at your own peril and risk)
Project No. 3 - hexagonal blockhouse
This house is a variant of the previous building with some peculiarities. It differs in that the frame is not traditionally rectangular, but hexagonal. Roof slopes vary in length, so it has an asymmetrical appearance. The well is small in size, but its compactness makes it possible to use the structure with a lack of space. A practical and at the same time decorative element is a wooden wheel.

Decorative element - wooden wheel - for convenience can be replaced with a handle
This house can be used to decorate a shaft with a pump or simply to decorate the local area.
Characteristics of the structure:
- height - 220 cm;
- base diameter - 120 cm;
- for construction, a rounded beam with a diameter of 100 mm is required;
- gable roof covered with edged board;
- the tree is treated with a moisture-proof compound on all sides.
Drawing of a well with an equipped head and a house
Examples of decorating well houses
There are several ways to decorate the building. The traditional way of decorating wooden buildings is carving. A neat carved house for decorating a well in the classic Russian style is suitable for all summer cottages where wood was used in the construction of the main house.

The base and roof of the well house are decorated with carved elements painted in a contrasting color
Decorating is also done by painting the wood in different colors. Using impregnations or varnishes of different shades, you can give the structure completely opposite shades - from sunny yellow or bleached to dark brown, deliberately aged.
A selection of 6 unusual ideas for decorating a well in the country will also be useful:

Carved house for a well, decorated with a wooden figure of a bear
Sometimes an additional decoration is installed on the frame - a wooden or ceramic figurine of an animal.

House for a well with a decorative element - a wheel for a gate in the "marine" style
Of course, any dacha building is not just a decor, but also the embodiment of a person's views and taste, so every owner knows how to make a house for a well so that it is both practically useful and reflects the individuality of the owner.
Many summer residents and gardeners, and not only, always have one important problem, especially on a hot summer day. This is watering your crops and plants.
Someone, whenever possible, tries to have access to centralized water supply, while someone thinks about their own well on their site. At the same time, many do not even have any idea about how and where to dig a hole for a well.

In this case, you need to adhere to certain rules and a clear plan, you also need to rationally plan the entire process of work. Then you can independently dig the well yourself.

But, before starting work, you need to make a well diagram for yourself. All stages of work must be performed strictly according to the drawing of the well, which is considered the main project.
What features you need to know when digging a hole
Digging a deep hole for a well is still half the battle, it is important what kind of water is in the well. And it should be clean and transparent, without harsh and unpleasant odors, without the presence of foreign tastes, but this does not always happen.

Therefore, the most important is the place for digging a hole, and it is advisable to dig where there are deposits of groundwater. It is worth noting that groundwater can have different depths of flow underground, besides, the quality of water at different depths will be different.

The location of the well itself in relation to the house is also important for many owners of private houses, and therefore people try to dig a well as close to the building as possible, which is highly undesirable to do.

It is necessary to dig a well strictly in compliance with all safety rules and regulations, or you can turn to the services of professional specialists in this field who have everything you need to carry out this kind of work.

As a rule, only 3-4 qualified specialists can carry out digging a hole for a well.

It should be noted that groundwater can have different levels of deposits - from a minimum level of 15 meters to a maximum level of 50 meters. At the same time, you can face a very important problem, the fact is that in the process of digging a hole you can stumble upon a thick layer of earth made of clay, which is very difficult to dig, and stones also give special difficulty in this process. They are quite difficult to remove from the ground and transport them to the surface.

However, it happens that the earth's rock becomes very hard, and the stones are very difficult to extract from them to the surface, then sometimes the question is raised of stopping further work on the construction of the well with our own hands.

Of course, in this case, you can use a special technique that will facilitate the work of extracting the soil, but you still have to manually dig before the water appears in the well, while it is necessary to trim the walls for mounting round concrete rings that go down into the pit.

But at the same time, it often happens that it is not always possible to drive special equipment into hard-to-reach places to facilitate the work process.

How to determine the optimal location for a well
As a rule, the determination of groundwater is based on the presence of wells in the immediate environment of neighbors, they can always specify the depth of the well, however, at a distance of only 1 km, groundwater can have different depths.
In exceptional cases, it is necessary to punch an exploration well for the presence of groundwater, but this method of determining water is very complicated, but this method is considered the most effective in determining the presence of groundwater.

How to choose the right time to dig a hole
Determining the time required to dig a hole for a well is also not an unimportant detail, because the presence of the taste of water depends on it. So, for example, it is not advisable to dig the frozen ground during the cold and frost seasons, but at the same time, water does not come in the lower layers.
Note!


It is not recommended to dig a hole during the thawing of the snow cover, as well as during the flood, this is due to the fact that in the lower layers the soil is still well frozen, while its upper layers are in excess of moisture.

The most optimal option for the time when it is necessary to dig a hole for a well is the end of winter and the beginning of spring, since it is during this period that the groundwater is at its lowest point.

Thus, you can find the most necessary depth for your site.

Well construction safety
Considerable importance must be given to safety precautions when creating a well. And it is necessary to follow all the rules not strictly, because there is a great risk of getting some kind of serious injury or damage during work.
Note!


- it is necessary to work in personal protective equipment, and this is a helmet, gloves and overalls.
- you need to make sure that the inventory tool with which you will have to work is working.
- observe attentiveness and caution, do not rush.
- when removing soil, use a strong bucket, which must be hooked onto a carabiner with a rope, in no case should the bucket with the soil be tied to an ordinary knot, since there is a high probability of the bucket breaking and falling to the bottom.
- you cannot go down to the bottom of the pit without a safety rope, this is necessary in case the digger below gets any serious damage or methane poisoning, then an urgent and quick evacuation of the victim will be needed.
Digging a mine
Almost every well pit, without exception, is dug vertically into the bottom along a section of about two meters, no more. The overall dimensions of the pit are set along the circumference of the concrete rings with a small margin.

The process of creating a well can be performed by a team of no more than 4 people, where you can alternately change in the process.

Of no small importance is the pit for the installation of the very first concrete ring, while the walls in the pit should be flat and slightly rounded, and the bottom itself should have a flat surface.

After installing the first ring, they dig further under it, after which they put the second ring on it and under their weight they will sag. And so do it until the first water appears, and then the dirty water itself must be removed from the pit.

Note!

As soon as the water begins to rapidly fill the pit, you must immediately stop work and leave the well pit.
The connection of concrete rings is as follows. Each ring contains special steel rods, as well as hinges, which are connected with connecting bolts.

In the process of the arrival of water at the bottom of the pit, it is recommended to tightly lay small stones of medium size, after which, to level the floor of the mine, it is covered with fine gravel or crushed stone. At the same time, they can perform a peculiar role of a cleaning filter, so that soil particles do not come across when lifting a bucket of water to the surface.


Not the least importance should be given to the removal or removal of the soil raised to the surface. Then you can start making the head, which can be made in any form.

At the same time, recently it is considered very popular to have a beautiful and unique head that can decorate your yard as a decorative element.

Therefore, if you are planning to make a well in the country with your own hands, then you will have to put in a lot of time and effort, but the end result is worth it.

If, for some reason, you have any difficulties, then in this case you can ask for the help of professionals. Also in this article there are many illustrated bright photos of the well, perhaps you will have something to your liking.

Diy well photo


A house for a well will not only decorate its appearance, but also protect it from harmful factors. As a rule, wood is used for its manufacture.
There are a lot of design design variations, but the arrangement is almost identical. The only difference is in size, shape and decoration details.

Why do you need a well house
There are many offers on the market for the sale of finished products. But their cost is quite high, so often summer residents build a shelter for a well on their own.

The main task of the house is to protect the water in the well from dirt, sun, insects, animals, precipitation of chemicals that are used to spray plants. In winter, the building will not let the water freeze with ice.

Construction tools
Woodworking machine or electric plane.
- Circular saw.
- Electric jigsaw.
- Hand saw.
- Dergach for nails.
- A hammer
- Phillips screwdriver.
- Level.
- Measuring tape.
- Processed board.
- Processed log.
- Fasteners components.
- Roof material.
- Door and latch to it.
- A pen.
- Hinges.


House with a gable roof.
This version of a well house is easy to build with the help of available tools.

Frame
To build a house you need boards and beams. It is necessary to correctly size the parts. If they are fragile, the house will not withstand strong winds.
Too large elements will make the house look bulky. The best format is a board thickness of 4 cm, a beam profile of 8x10 or 10x10 cm, a board width of 1.2-1.5 cm.

The structure should be composed of four racks of timber and four boards.
The boards are pre-cut to fit the parameters of the well, then all the parts are nailed one after another to the supporting posts. The length of the nails for fastening is 1 cm.

Algorithm of work: we fasten the first two support posts with the help of boards from below and from above. Then we also connect the rest of the racks. We install the structure around the circumference of the well. We connect all the details with strings.

Upholstery and roof
The preparation of the roof must be started with the installation of structures used to fasten the lathing. The trusses are made of boards with a thickness of at least 0.3 cm. The length of the boards is at your discretion.

The thickness of the boards for jibs and beams should be 2.5-3 cm. It is necessary to make 6 rafters, 3 beams and 8 jibs. The rafter parts are cut at an angle. The upper ends of the product are connected with self-tapping screws.

Crossbars are suitable for additional strengthening of the stril. They are located 30 cm below the place where the rafters are connected. Make cutouts in the places where the rafters and boards are fastened. To connect the rafters to the frame, nails 12 cm each are used.

The fixation will also strengthen the fastening of the elements with the help of jibs. To connect, you must use 2 boards.
The sheathing boards should be in increments of about 15 cm. The overhangs above the walls of the building are 10 cm. The finished roof is covered with roofing felt, in addition a finishing material is applied on top. In the end, all that remains is to cover the joints in the corners with wind boards.

Door

The well door usually consists of planks. Boards must be cut with a thickness of 1.5-2 cm and a length of up to 0.9 cm.
The boards are connected to each other using bars 0.3x0.25 cm. Two bars are enough - fix one on top, and the second on the bottom. Self-tapping screws will help to fasten the elements (there are 4 screws for 1 board).

Attaching an additional diagonal bar will increase the rigidity of the product. You need to sheathe the gables, attach the handle and latch, hang the door on the hinges.
It is imperative to treat the outside of the structure with an antiseptic and varnish. You can paint the door with a waterproof paint before varnishing.

Log house
This design looks very cozy and unusual. To build it, you need the following:
- The logs are rounded.
- Roof boards and props.
- Finishing roof covering.
- Material for collar with handle.

The processed timber must be folded into a blockhouse according to the size of the well, connected in any way. Put two large supports from a wooden bar.
Tighten up the racks of the house to make it more firm. Arrange the roof structure on the support posts at the top. The roof is installed in the same way as in the previous version of the well.


Hexagon house
The only difference from the previous version is that the shape of the house is hexagonal. This shape is very convenient for small wells and small areas, as it saves space well.
The construction steps are the same as in the previous options. A beam of 10 cm is well suited for construction.

The roof can be equipped with a board - it looks very unusual and beautiful. The wooden structures of the house are subject to mandatory antiseptic treatment.

House decor
There are several commonly available options for decorating a well house. For example, different types of carving, creative coloring, decoration using figurines.

Each gardener himself can come up with an unusual design of a house for a well, which will decorate the backyard and demonstrate the tastes of the owner.

Photo of houses for a well


The owners of private houses and summer cottages often strive to create the most comfortable atmosphere in their yard and use a variety of decorative elements for this. Do not bypass and. He is ennobled with the help of a house. But the house is not only a decorative element. It performs an important function - it protects the contents of the well from the penetration of various sources of pollution. We bring to your attention detailed instructions (with drawings and sizes of parts) for creating a house with your own hands (photos and videos are attached).
Since the water from wells is used exclusively for drinking, it must not be contaminated. That is why the wells are equipped with special houses that prevent rain and melt water from entering them. These waters can contain debris, various types of waste, such as animal feces, bacteria, fertilizers and just dirt.
In addition, the house will become an excellent protection from strangers, if you close the house door with a lock (for example, if the well is located outside your house, and you would not like strangers to use it), and also protect young family members from possible threats ...
 Wooden well house
 In general, well houses can be divided into two types: open and closed. The first option can be attributed to the budget. In this case, it is enough to finish the ring of the well with stone / wood, but metal or wood is suitable for the canopy and cover (depending on how much you are ready to "generous"). There is only one caveat - in winter, the water in such a well will most likely simply freeze.
If you plan to use drinking water from a well in winter, then you should take care of the insulation of the well house.
Council. When choosing a design for a well house, follow one rule: its appearance should correspond to the style of the residential building and the design of the site.
Some people use wood to cover the roof of the house, others prefer metal. Let's say right away - if you use a tree, then at least once a year you will need to update its protective coating, otherwise the material will darken and take on a rather unsightly look. If you do not want to fool yourself with caring for wood, then give preference to metal.
Construction process
Consider the simplest model of a well house, which is quite easy to make with your own hands.
Preparation of tools and materials
Whichever project you choose, it is important to make sure that not only all the necessary materials are at hand in sufficient quantities, but also the necessary tools:
- hacksaw or jigsaw;
- woodworking machine (if it is not at hand, then a circular saw is quite suitable);
- a hammer;
- screwdriver;
- level, tape measure;
- edged boards;
- timber;
- slate;
- self-tapping screws, etc.
When choosing suitable materials, do not forget that the design of the house should not "get out" from the overall picture: the house and the plot. The type of wood or stone must match the materials used to decorate the house. You can use the remnants of building materials or buy similar ones that were used to build the house.
 Building a house for a well
 Erection of the frame and roof
Before starting construction work, it is necessary to carry out all measurements and make a drawing of the future house, or find photos of ready-made drawings on the Internet. Remember that even the simplest structure should contain the following elements: frame, gables and cladding, post, ridge, gate and roof slopes.
It is worth noting that many do not use a frame - they put the roof directly on the well ring. But for a more complete and aesthetic look, it is better to choose a frame structure, especially since it is quite simple to build it. Let's consider step by step the process of creating a wireframe:
- We make all the necessary measurements. Be sure to measure the outer diameter of the well ring.
- We proceed to sawing the boards and beams: we prepare 4 racks 10 cm wide and the same number of strapping boards (about 14 cm wide).
Council. Do not use both a massive beam and a board - the structure will turn out to be very cumbersome, and very thin - the structure will, on the contrary, turn out to be fragile and unreliable.
- After you finish washing down, attach the harness details with self-tapping screws to the uprights. Please note that self-tapping screws must firmly connect all the parts to each other, so use fasteners at least 10 cm long.
- We make rafter trusses (we use solid boards, about 4-5 cm wide and at least 1.6-1.8 m long), we use 8 jibs and 3 crossbars. So, we cut the rafters (you can at an angle), at the top we connect them to each other with self-tapping screws.
- On the rafters, we make small cuts in the attachment points with the upper garter and attach them to the frame.
- We install jibs, thereby strengthening the structure. We connect the finished roof trusses with a ridge of two boards.
- We lay roofing material on the finished roof, mount slate on top. We close the corner joints with wind boards.
Part preparation: door and gate
For the gate (spindle) we need a piece of log. Its length should be 4 cm less than the distance between the posts. In the center of the ends, it is necessary to drill two holes about 5 cm deep. At the ends of the gate, we fix metal plates with self-tapping screws.
We insert a metal rod about 10 cm long into the left hole in the end (its part should protrude outward), into the right hole - a bent rod so that it is convenient to grip it with your hands.

We make holes in the racks, insert the bushings there and thread the ends of the gate rods. Be sure to lubricate the bushings with grease to prevent squeaking.
It is as easy as shelling pears to make a door for the house: we only need a few boards about 20 cm wide (the length is chosen based on the overall dimensions of the house), from which we will make some kind of shield. We connect the boards to each other with small blocks about 2.5-3 cm wide (two will be quite enough). To stiffen the door, fix an additional bar diagonally. It remains only to attach a handle, a latch to the door and put the door on its hinges.
The final stage is the treatment of the entire structure with special protective compounds that will preserve the appearance of the house and prevent wood from rotting.
We examined with you in detail the process of creating a well house with our own hands using the minimum amount of materials and tools. We wish you inspiration and high-quality work results. Good luck!
House for a well: video
Making a shelter for a well in the form of a house, the need for such protection, design features of the structure, planning, preparation and technology of work.
The need to protect the well

After the completion of the construction of a well, usually intended not only for irrigation, but also for collecting drinking water, it becomes necessary to protect it from negative external influences. One of its options is to build an open or closed canopy over it in the form of a house.
Such a structure is capable of performing a number of functions:
- Eliminate the possibility of clogging of well water with leaves from trees, debris, chemicals for spraying green spaces and dust;
- Protect it from heating by the sun in the summer heat, which reduces its quality;
- Prevent its freezing at subzero air temperatures in winter;
- Close access to the well dangerous for children and animals;
- Serve as a decorative element of the site, emphasizing its individuality.
Features of the construction of a house for a well

Well sheds come in various shapes. The simplest of them is a shield on racks that covers the top of the neck of the structure; a structure in the form of a log house looks more solid. The roof of a well house can be made with a single-slope, ribbed umbrella type or gable. Its slope can be steep and not very.
The doors of closed sheds are usually located on two opposite sides of structures or only on one of them. They are flap, sliding and solid.
It is advisable to select the material for the roof such that, in color or texture, it is in harmony with other elements of the decorative design of the site. The roof of a canopy, for example, can be simply painted in a suitable color or trimmed with soft tiles.
After erecting the walls of the house for the well, their facing with artificial stone or mosaic will look beautiful. The log structure of the canopy will give the source a unique rustic flavor. When creating a frame system, its racks can be decorated with tree bark, and flowers can be planted nearby. The wooden roof of the well with carvings looks great.
Most of the details for the decoration of the well are completely optional. The materials left after the repair or construction of the house are quite suitable for this purpose: fragments of tiles, remnants of paint, granite rubble, and so on.
Preparatory work

Before getting down to work, you need to think over the design of the future house, taking into account the general style of the site design. The materials used in the construction process of the structure should be beautifully combined with the exterior decoration of the rest of the yard buildings. Most often, a well shed is made from logs, the remains of a bar or planks. Such materials may be the most affordable, especially after the completion of capital construction on your site. In extreme cases, the missing quantity can be brought from the store.
For convenient work around the well, it is necessary to create a platform. To do this, the place of its location should be cleaned of grass, level the surface of the soil, fill the site with rubble 15-20 cm thick and tamp it. When the place for work is ready, you need to measure the diameter of the outer ring of the concrete shaft, as it largely determines the size of the well house.
As an illustrative example, we will describe the manufacture of a gable closed canopy from a bar and boards. For such a design, the following materials will be needed:
- Four beams 50x50 mm long 840 mm for the roof rafters of the house;
- One meter beam 50x50 mm for its ridge and four beams of the same length, but with a section of 100x100 mm for the base of the frame structure;
- Two meter beams 100x50 mm for fixing the rafters;
- Two beams 100x50 mm for columnar supports;
- A log with a diameter of 250 mm and a length of 900 mm for the manufacture of a well gate;
- Board 30x300 mm and 1 m long for a stand for buckets;
- Boards 20x100 mm for the installation of roof slopes and installation of gables;
- Steel corners - 4 pcs.;
- - metal rod 20 mm long, 200-300 mm long;
- L-shaped workpiece 400x350x250 mm in size from a rod;
- Steel bushings - 2 pcs.;
- Steel washers with holes Ø 26 mm;
- Door hinges - 2 pcs., Latch and handle;
- Soft roof tiles;
- Chain and bucket.
The set of accessories for work should include:
- Circular saw and electric jigsaw, required for fast processing of wooden construction parts;
- Perforator for making holes in the wall of the well when attaching wooden canopy posts;
- Hammer, screwdriver, tape measure, pencil and building level.
How to make a house for a well
The construction of the house includes the manufacture of a wooden frame, the installation of gates, doors and the installation of the roof. When creating a structure, you must proceed in the order described below.
Frame fabrication

The distance between its sides in our example should correspond to the outer width of the well. The construction is based on a wooden frame. For its manufacture, you need to use a beam of 50x100 mm. It is more convenient to assemble the frame and the entire frame on the site near the well.
To the finished frame, you should attach two vertical posts made of 50x100 mm timber and 720 mm long, and then connect their free ends with a ridge bar 50x50 mm.
After that, it is necessary to install the rafter bars, connecting them with the corners of the base of the frame with the top of the racks. For a snug fit of these bars, the ends of the racks must be cut from above and on both sides at 45 degrees.
From the side of the future location of the door, a board 300-400 mm wide must be nailed to the base of the frame, on which you can then put buckets when collecting well water.
On the other sides, boards should be filled, but of a smaller width. They are designed to provide strength and hold the fabricated structure on the well.
The finished frame of the house must be bolted to the concrete head. To do this, holes should be drilled in the canopy racks and the head of the well, and after aligning them, insert the bolts, tightening them with nuts.
How to install the gate

To do this, take a log, remove the bark and grind its surface. The length of the workpiece should be 5 cm less than the step between the vertical posts of the house. In this case, the edge of the gate will not touch them during operation.
Along the edges, the log should be wrapped with coils of wire or a clamp. This will preserve the round shape of the gate during its operation.
In the center of the ends of the workpiece, you need to make two 20 mm holes 5 cm deep and fix their edges using metal washers. Then, during rotation on the axis, the gate seats will not collapse.
Similar holes must be made in the canopy posts at the appropriate height for the gate and metal bushings must be inserted into them.
Then, a steel rod 200 mm long must be driven into the hole of the workpiece on the left, and a handle on the right. When all the metal parts are installed on the gate, it should be fixed on the posts, attach a chain, and hang a bucket to it for collecting water.
How to make a door

First you need to choose a side of the frame and fix three 50x50 mm bars on it, defining the opening. In accordance with its dimensions, the door should be assembled using identical boards, which must be carefully adjusted to each other, and then fastened with bars along the edges of the canvas and its diagonal.
It is more convenient to perform this work on a flat area near the well. The door should be slightly smaller than the internal dimensions of its opening. Then it will not cling to the wooden parts of the box.
After assembly, it is necessary to attach steel hinges to the door, install it on the frame of the house and fix it with nails or screws.
From the outside, you need to install a latch on the door and provide it with a handle. After checking the operation, the door should open and close easily, without clinging to anything.
Roof installation

When making a house for a well with your own hands, building a roof is the most responsible task. After all, it is this structural element that will serve as the main protection of the water source from bad weather and debris.
For the device of the roof, the slopes of the frame and its gables must be sheathed with boards, and the outermost of them should slightly go beyond the contour of the structure. The visor obtained in this way will cover the pediments, and they will not get wet.
After cladding, the roof must be covered with a waterproofing layer. It can be roofing material or other material with similar properties. There is no need to hide gables under such insulation. Usually they are covered with a special water-repellent primer, and this is enough. A waterproofing device on the roof will greatly extend the life of the entire structure.
Soft shingles can be used as a roof topcoat. It is lightweight and quite suitable for this purpose. It is not recommended to use a slate for a wooden frame of a well house. Under its weight, the structure can twist and even collapse after a certain time.
Decorative finishing of a house for a well

This is the final stage in the manufacture of a well house. Countless finishes can be found in the photos presented on the Internet. We will list the most accessible ones for self-execution.
They look great on the backyard of the shelter of wells made of wooden log cabins or with a finish that imitates solid logs. Such houses are especially good in combination with a grass lawn. The effect can be enhanced by laying large stones around the base of the well.
Wood carving is also an excellent decoration for a man-made source of drinking water. A carved house, lovingly made in the Russian style, looks beautiful in any dacha.
If you prefer a rustic flavor, you can make a shelter for a krinitsa in a folk style. Here the house is decorated with tiles.
Painting a building in different colors is an easy but effective way to decorate. By choosing the right paint, you can give the well house almost any shade - make it clean whitewashed, give it an aging effect, etc.
Shelters in the form of a log house above the well can be decorated with wooden or ceramic figurines depicting people or animals.
How to build a house for a well - watch the video:
The most important thing to always remember before making a house for a well is its main function, which is to maintain the purity and quality of water. Good luck with your work!


