Do-it-yourself budget bath. Mini-bath for a summer residence: materials, varieties, budgetary and economical projects The cheapest and fastest way to build a bath
Sometimes you really want to leave the hustle and bustle of the city, and go to the country. Silence, walking, doing what you love - what could be better! If comfort is provided at the dacha, you want to come again and again. One of the most comfortable living conditions in the country is a bathhouse.
Construction can, of course, be entrusted to professional builders. However, it is quite possible to build and equip a bathhouse at a summer cottage on its own. This saves you from additional expenses and allows you to carry out finishing and improvement in full accordance with your desires and preferences. Therefore, this task is not easy, but it is quite within the power of a novice builder. A bathhouse built with his own hands will delight the owners even more. So, how do you build a bath yourself?

Firstly, as with any construction, you first need to decide on the project and on the materials from which the bath will be built. The choice of the main material for construction depends on the geographical location and operating conditions, as well as on its own capabilities.
Baths are made of bricks, aerated concrete and other stone materials, some prefer frame baths, however, many novice builders prefer to build a bath from wood. This lightweight and durable material does not require the construction of a serious and expensive foundation, but it has excellent characteristics. With proper care, the bath will not be a hassle to operate.
And of course, preference should be given to a timber - a bath made of this material will retain all the advantages of a wooden structure and will save you from problems and additional costs that may arise when building walls from logs. Erection of walls from a bar is similar to working with a designer - it can have different geometric dimensions and sections (rectangle, square, semicircular), and also, in the case of a profiled bar, there are grooves for fastening. It is easy and convenient to build from a bar - what could be better for a novice builder!
How to choose a place to build a bath.
One of the most important points is the choice of the location of the future building. The site must comply with both existing legislation and ease of use. When choosing, basic recommendations can help:
- if there is a reservoir nearby - do not place the bath too close to it, as the building will be threatened by flooding;
- it is necessary to decide how the bathhouse will be located relative to the house: a separate building or will be attached to it, since each option has its positive and negative sides;
- it is believed that it is better to build a bath in the backyard, in relative seclusion;
- it is imperative to provide for mandatory ventilation during construction, as well as provide for wastewater disposal;
- it is highly discouraged to determine the location next to a nearby road;
- when placing a building, it is necessary to take into account the cardinal points and the direction of the wind: the best place is the southern part of the site, protected from the wind, so that it does not interfere with vacationers, it is better to have windows facing west;
- it is desirable that the bath be located at some distance from other buildings, and if it is an extension to the house, it is imperative to observe fire safety rules during construction, as, incidentally, when erecting a detached building;
- when determining the location of the bath and its size, it is necessary to observe the distances from the boundaries of the site established by the rules, so that the neighbors do not experience discomfort in the future and do not make claims to the owner;
- it is recommended to keep the distance to the water intake (well or well) - no more than 20 meters.

At the beginning of construction, it is highly desirable to make a project, which should, among other things, determine the optimal building area.

It is believed that the estimated area for 1 person should be approximately 5 sq. M. Thus, if the expected number of visitors to the bath is 4 people, its total area should not be less than 20 sq. M.

The minimum composition of the premises is as follows: a steam room, a washing room, a rest room and a dressing room. It is important to determine the most convenient location of these rooms relative to each other, as well as their geometric dimensions.

First you need to complete several diagrams and drawings:
- general plan of the building;
- drawings of each room separately;
- foundation arrangement diagram;
- the scheme of the roofing device;
- plan of fastening and laying out the timber;
- plan for the arrangement of the floor and ceiling of the bath;
- installation diagram of the furnace, taking into account its structural features.

All the necessary drawings can be done independently, as well as found in many open sources. As a rule, timber baths have similar designs and you can easily choose the most suitable one. If you wish and have the necessary budget, you can order the design to a professional architect or builder.

The choice of building materials.
Below is a list of materials that will be needed to build a bath from a bar:
a) timber 150x150 mm, although it is possible to use a timber with a section of 100 mm or 200 mm;

b) floorboard (an edged board 150x50 mm 4 meters long is excellent);

c) boards made of hardwood for the ceiling (usually lining with a width of 100 mm and a thickness of 20 mm or more is used);

d) material for wall decoration (as a rule, the same lining is used);

e) material for vapor barrier (an excellent option would be to use a vapor barrier film);

f) waterproofing (it is advisable to use penofol, although plastic film is suitable);

g) ceiling insulation (mineral wool materials are a good option);

h) sheet asbestos for insulation of wooden structures from temperature effects, including for walls near the stove and elements located near the chimney;

i) cement, sand and crushed stone for the foundation (recommendation - cement should be purchased before starting construction);

j) roofing material for the roof, which can be selected based on personal preferences and, most importantly, that it fits organically into the surrounding roofs of other buildings;


l) insulation for the intervening space (it is better to use jute, although moss or tow are perfect).

The best time to start construction is in spring, since after the completion of the main construction work, it is necessary for the timber to dry out and shrink. This requires at least 6 months.
Do-it-yourself bath - step by step instructions.
Step I - preparation of the site for construction.
Before starting construction, it is necessary to clear the site - remove bushes, stumps, remove debris and everything that will interfere with the work on the foundation.


Step II - building the foundation.
It is best to build a bath from a bar on a columnar foundation, which is inexpensive and great for the construction of small wooden and frame buildings.

When constructing it, you first need to dig the estimated number of holes for the installation of supports. Their number is calculated as follows - the supports must be installed in the corners of the building and at the intersection of the walls, as well as with a certain step along their perimeter.

The step is chosen taking into account the type of soil and the estimated total weight of the structure. The depth of the holes should be 1-1.5 meters, although depending on the depth of freezing of the soil in a given area, it can change. To complete this type of foundation, in addition to the materials listed above, asbestos-cement pipes and fittings will be required.

At the bottom of the pit, it is necessary to fill in a mixture of sand and crushed stone 10-15 cm thick. Then install an asbestos-cement pipe of the required length in it, strictly vertically, and fix it. Several reinforcement bars should be placed inside the pipe.

After that, pour concrete mortar into the pipe and into the free space between the walls of the pit and the pipe.


After pouring the solution, you need to wait a few days, and then lay out a wall half a brick thick between the posts.

Step III - erection of walls and roofing.
The traditional material for the construction of bath walls is a bar of 150x150 mm in size. Before laying the first crown, it is imperative to put waterproofing on the foundation. The lower part of the crown must be treated with an antiseptic. Most often, the timber is laid out in the "paw" method.


The first crown must be carefully aligned geometrically - all angles must be exactly 90 degrees. After the first crown has been erected, they begin to lay the beams for the set of walls. When laying out the walls, you need to make openings for future doors and windows and be sure to insulate each row with the selected thermal insulation material.

To connect the crowns, pins are used - metal or wooden pins.
After the walls are removed, the roof is installed. Depending on the selected roof shape, it is necessary to fix the rafters, which are attached to the upper rim with brackets.

When installing a pitched roof, the rafters are fixed either with two external, or one external and one internal supports. When erecting a gable roof, it is necessary to reliably support the rafters from the bottom on the wall, and connect them together from above to form a roofing ridge.
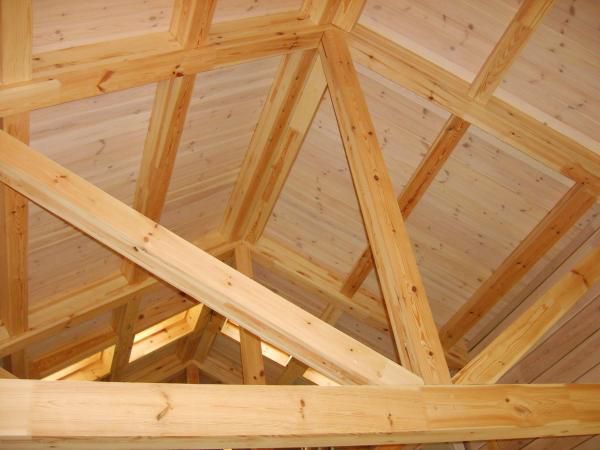

Sheathing boards are attached to the fixed rafters, then they are laid with hydro and vapor barrier, insulation.

The installation of the roof is completed by the installation of the selected roofing material.

Step IV - interior finishing work.
Interior finishing should be started with a communications device - sewerage, water supply, electricity. You should worry about the sewage system even during the design and construction of the foundation.

It is necessary to dig a drainage well next to the future bath, into which a sewer pipe buried in the ground with a slope enters for draining out of the washing department.

After the installation of the sewage system, a clean floor is made, which is made of wood or concrete. The concrete floor is more durable, most often it is tiled with tiles or porcelain stoneware.
If a wooden floor is chosen for interior decoration, it is usually made leaking. To do this, floor boards are nailed to the installed logs with a small gap, or a small drain hole is arranged in the floor, closed with a grate.

In this case, the floor must be made with a slight slope towards the drain. Then the water that gets into the drain will be discharged through the sewer pipe into the drainage well.

After the installation of the sewage system, it is necessary to carry out insulation, waterproofing and vapor barrier of the walls and ceiling using appropriate materials, to conduct electricity and water supply.

After installing windows and doors, then finishing the room with the help of, for example, lining.

After finishing the finishing, you need to install the necessary electrical appliances.

Step V - installing the oven and shelves.
There are a great many options for placing shelves, you just need to comply with the recommended sizes and the fact that they should be made of hardwood. The installation principle is simple - a stable frame is mounted, usually from a bar, and boards are attached to it.
The oven must be installed in full compliance with fire safety requirements. Wooden structures must be insulated from the high temperatures of the operating stove and chimney. In case of a large weight of the furnace, its installation must be carried out on a specially equipped foundation. This is determined on a case-by-case basis, depending on the selected oven.

The stove is chosen according to the preferences of the owner. It can be a traditional wood-burning stove, a metal wood-burning stove or an electric stove, sometimes it is advisable to choose a gas stove for a bath.
Step VI - choosing accessories
There are many bath accessories.

The main ones are:
- brooms (oak, birch and others);
- containers (buckets, basins);
- wooden ladle for adding water;
- wooden floor slats and much more.

Additional individuality can be added by the interior decoration of the premises, which remains at the discretion of the owner - here, depending on desires and financial capabilities, you can give free rein to your imagination.

It should be added that all the listed accessories can be made by yourself. The bathhouse is a great place to spend time in a pleasant, friendly company or with your family. It will be much more pleasant to realize that all this is done by hand, including useful and necessary devices: for example, hangers, lamps or ventilation grilles.
Enjoy Your Bath!
Video about building a bath yourself.
A trip to the dacha is a joyful event, since there you can take care of the garden or landscaping the site, and then relax, steam in the bath, provided that it is there. We will tell you how to properly make a bathhouse in the country with your own hands, demonstrate drawings, diagrams and photo instructions. It takes a lot of work, but it's worth it.
In your imagination, you probably already see how you approach the bathhouse, open the door and find yourself in a warm and cozy dressing room, and then into the steam room. Yes! This is how it will be, but a little later. First you need:
- choose a suitable project;
- get acquainted with the stages of construction;
- purchase building material;
- build a bathhouse and bring all communications;
- perform interior decoration and only then take a steam bath.
If, after reading the introduction, you still have a desire to make a bathhouse in the country, then we will continue the topic, considering all the stages of construction.
Choosing a place for the construction of a bath
Often, summer cottages are not large, but in addition to personal preferences and convenience, there are norms that must be adhered to. Let's look at preferences first.
- It would be better to put the bath on a hill, which will greatly simplify the organization of water drainage.
- It is good when the bath is located next to a pond or river.
- The rays of the setting sun, penetrating into the steam room through the window, will relieve stress, but at the same time it must be done so that the entrance to the bath is clearly visible from the window of the country house. So you can watch the heating bath and children, especially when a swimming pool is built in front of the entrance.
- The bath can be made in the form of an extension to the house.
To avoid conflict situations with the authorities or neighbors, you must comply with the requirements of SNiP 30-02-97. Paying attention to section 6, paragraphs 6, 7 and 8, you will find comprehensive information on the placement of the building on the site, but we will give only those numbers that you need in order to choose the optimal place for the bath.
Given the fire safety measures for buildings located on opposite sides of the passage, you must adhere to the distances indicated in the table:
|
The material from which the supporting and enclosing structures are made |
Distance, which directly depends on the material used in the construction of the structure |
|||
|
The same buildings using wooden elements |
||||
|
Wooden and similar structures |
||||
As for the requirements regarding the distances to the neighboring site, they are also unambiguous.
It is also important to take into account the requirements for the location of buildings on your site - from the garden house, shower, bath and sauna must be at a distance of at least 8 m.
By the way, failure to comply with these norms can lead to litigation with a neighbor and the demolition or transfer of the bath to another place.
Bath project
When choosing a bath project, it is important to consider the material from which it will be built. There can be several types of buildings:
- Frame bath.
- Wooden bathhouse (made of timber or rounded logs).
- Bath made of bricks, stones or blocks.
- Wood concrete structure.
Having decided on the material, when choosing a project, make sure that it suits you according to all criteria.


Material selection
So, having chosen a suitable project, in accordance with its requirements, you need to prepare building materials.
- Most often, summer residents prefer to build frame structures, since they are the cheapest and successfully cope with their task. In addition, due to the low weight of such a structure, you will not have to spend a lot on the foundation either.
- The most favorite buildings are wooden ones. The cost of such a building will be slightly higher, and the foundation will need to be made stronger, in contrast to the frame structure. A good wooden bathhouse built in the country does not need insulation.
- Stone and brick are not often used to build a bathhouse in the country. This is due to the fact that such a heavy structure needs a strong foundation, and the walls freeze during long absences and such a bath needs to be heated for a long time. The exceptions are buildings made of foam and gas blocks. The requirements for the strength of the foundation are not so high, the walls are warm, but it is important to take into account that this building material is very hygroscopic, therefore it must be protected from moisture.
- Arbolite is also often used in the construction of baths. Walls can be monolithic or made of blocks. The structure is warm, durable and inexpensive.
Wall materials
Since our article deals with several possible options for the use of various building materials, we will consider them separately.
Frame structure

The walls of such a bath are made in a lattice structure. For the walls of the frame you will need:
- A bar of various sections, the size and quantity of which is indicated in the project.
- Insulation material with high thermal insulation qualities for filling the frame. Again, you need to adhere to the requirements regarding the use of one or another insulation material, but here you need to take into account that the documentation often indicates one type of material, but not all possible ones. If the specified material is too expensive, then you can refer to the forums to clarify what is acceptable in your area.
- Material for covering the frame from the outside and from the inside. Most often, OSB boards, edged boards, siding or block houses are used for the outer cladding of a building, while lining is used from the inside.
Wooden bath

For the construction of walls can be used:
- Natural debarked wood.
- Edged timber.
- Profiled timber.
- Glued laminated timber.
- Rounded log.
Bath made of brick, stone or blocks
The walls of such a bath can be made of the following materials:
- Brick (ceramic or silicate).
- Stone (quarry, limestone, shell rock).
- Block (foam, slag, gas blocks).
Wood concrete structure

If there is an opportunity to inexpensively purchase sawdust (or maybe there are some), then at home it is quite possible to make arbolite blocks of fairly high quality. Also, this building material in the form of ready-made blocks is on sale. Walls are built very quickly. Another advantage of using wood concrete is the ability to manufacture monolithic walls by pouring cement-bonded mortar into the formwork.
Materials for the ceiling in the bath
The dressing room and the rest room are warm rooms, therefore it is recommended to use materials with low thermal conductivity - aspen, linden or alder.
For lining the ceiling of the steam room, it is preferable to use a wooden lining, as it is able to withstand high temperatures. Pine or spruce products cannot be used in this room; when heated, resin begins to emit from this wood. Also, you can not hem the ceiling with fiberboard and chipboard sheets, since moisture and high temperature contribute to the release of vapors that can harm human health.
Materials for insulation and vapor barrier
It is advisable to carry out external insulation only on the condition that the bath is heated. It is unlikely that someone will make such a luxury in the country, so we are considering materials for the internal insulation of an unheated bath.
The frame bath does not need to be insulated, since the thermal insulation is embedded inside the structure. In a wooden bath, you need to make a crate into which the insulation will be inserted. Other types of baths require insulation made using a more sophisticated technology.
To complete the work, you will need mineral wool, the thickness of which is selected depending on the material used in the construction of the bath and climatic conditions. Usually a layer of at least 50 mm is laid. Insulation can be in the form of mats or in rolls.
When it comes to vapor barrier, it is important to know that it is not waterproofing. Each has its own purpose. Even an inexpensive vapor barrier will do its job, while improperly used waterproofing can negate all the work.
What you need to pay special attention to is not to buy a fake.
Decoration Materials
Since we are talking about a bathhouse in the country, we will not talk about chic types of finishes. The best option would be to use wood: lining or similar facing materials.
As for the exterior decoration, it can be any material that is used for house cladding. If the bathhouse is made of rounded logs, then it would be unreasonable to cover the already beautiful facade with something else.
Bath construction
Now let's look at how the construction of a bathhouse in the country can be done with our own hands. It is clear that the work will be easier to complete with an assistant, which may be one of the family members. At the initial stage of the work, some assignments can be given to children. Of course, they will not do everything and not as quickly as they would like, but if they feel that they are needed, they will then be more careful with the bathhouse built with their participation.
But let's be realistic, small children will help a little, and if you build it alone, it will be a long-term construction, especially since you simply won't be able to do some work alone. As you read the article, you will see when and how many assistants you may need - this will help you plan everything.
Markup
So, the plan has been chosen, the location has been decided, now we will proceed to the marking on the ground. To do this, in accordance with the scale indicated in the project, transfer the contour of the bath to the area. In the place where the corner of the building will be, a long peg (or reinforcement) is hammered, and the lengths of two walls located at an angle of 90 ° are measured from it. The next pegs are hammered there, and the distances of other walls are measured from them. Finally, the last - fourth peg is hammered.
Now that there is a designated perimeter of the future structure, you need to check how straight the corners are. To do this, you need to perform a check along the axes - measure the distance from one peg to another. The received data must match. If this is not the case, then the plane must be shifted by "shortening" the longest axis. After that, it will be necessary to check not only the axes, but also other dimensions, and, if necessary, correct again.
If the foundation is strip, then a slight discrepancy can be left, but for a pile or column foundation, the markings must be very accurate.
This is how we marked the dimensions of the bath in accordance with the design data. Further markup is performed depending on what the foundation will be. You can learn more about this from the table.
|
Foundation type |
Where is markup applied and how is it done |
|
|
This type of foundation, due to its high cost, is done only in those cases when it cannot be done without it. The marking is carried out according to the size of the building or a little larger when it is necessary for the foundation to be wider and longer than the bath. |
|
Tape
|
A very common type of foundation. Relatively inexpensive and durable. The marking is carried out in such a way that the concrete-filled tape runs along the perimeter of the building and under the partitions. |
|
Columnar
|
This type of foundation is also often found. It is mainly used for mounting wooden structures on it. Depending on the dimensions of the bath, the marking is carried out according to the number of produced supports. |
|
Screw
|
It is believed that this type of foundation is new, but this is an erroneous conclusion based on the fact that it has recently been used in civil engineering. The screw foundation has stood the test of time, as the military began to use it for a long time. The advantage of the foundation on screw piles is the speed and simplicity of its installation. The second advantage is that there is no need to do earthwork, so the site will remain clean. In addition, it can be used to build a bathhouse even on a site with a significant slope. The marking is done according to the number of piles and no deviation to the side is allowed. |


Weigh the pros and cons, and then make the final decision regarding the choice of the type of foundation.
Pouring the foundation
The manufacture of a shallow strip foundation is acceptable under the following conditions:
- The soil on the site is dry and non-flowing.
- The groundwater level is quite low.
- In winter, frosts are not very strong.
- The structure is not heavy.
Do not try to guess the type of foundation for a heavy structure. If you are not sure, then invite specialists who, after completing the appropriate checks, will give an accurate answer.
Let's start with a simpler and most often made shallow foundation for a bath.
- We have external markings, now we need to carry out the internal ones, taking into account that the foundation should be at least 50 cm wide and should protrude beyond the structure by 510 cm on each side. Therefore, if the bath is 3 × 4 m, then the largest size along the outer perimeter will be 3.2 × 4.2 m.
- It is important to take into account the installation site of the furnace and at the same time make the foundation for it.
- For convenience, in the corners, you need to install wooden structures similar to benches. They need to be set in one plane along the height of the future formwork and a measuring cord should be attached to them. How to do this is shown in the illustration.

- It is necessary to remove the fertile topsoil and move it aside, then dig a trench, from which the clay can then be used as a bedding.
- As for the depth of the trench, in some cases it can be 35 cm. Much depends on the depth of freezing and the soil itself. You need to get to the bottom of a strong clay layer and in no case stop on the ground. Therefore, most often the depth is in the range of 50 - 60 cm.
- The bottom of the trench must be leveled by checking its levelness with a level.
- Now it's the turn of the sand bed. It is necessary to pour a layer of sand inside the trench, at least 15 cm thick, moisten with water and tamp well. For this, it would be more convenient to use a vibratory rammer, but it is also possible manually, using a weighty bar with handles nailed to it.
- The next layer is filled with crushed stone of the middle fraction and is also carefully rammed.
- Now it is the turn of the formwork, the height of which should reach the stretched cord. It can be made from scrap materials or timber harvested for other purposes, since this temporary structure will be disassembled soon after the foundation is poured. Ready-made shields must be installed along the trench and secured well, otherwise the poured concrete can move them.

- In order not to stain the boards, and so that the concrete does not flow out through the cracks, the formwork is closed from the inside with plastic wrap, which must be fixed with a stapler or thin nails.
- Now you need to make a frame from metal or plastic reinforcement, fastened with knitting wire.
- The fabricated frame should not reach the edges of 5 cm. It must be carefully lowered into the trench so as not to tear the film protecting the formwork. To raise the frame above the bedding, you need to put pieces of granite under it, since, unlike brick, it will not crumble under the influence of moisture.
- If any communications pass through the foundation, then holes need to be left for them, in which the sleeves will help, as shown in the photo above. The same applies to the manufacture of products.
- Plan your time to fill the foundation with concrete in a day, since breaks are not allowed here - then the tape will not be monolithic. It is convenient to deliver concrete with a mixer and pour it directly from it, otherwise it will have to be kneaded in a concrete mixer, on the basis that 1 bucket of M400 cement is required, 3 of sand, and 5 buckets of crushed stone (or gravel).
- The concrete-filled foundation should be compacted with a vibrator or pierced. After shrinkage, you need to add a little concrete and level the site. If the foundation is being made for a wooden house, then the foundation bolts must be fixed in the uncured concrete.
- Formwork can be removed not earlier than in a week.
It should be remembered that concrete has not yet gained its full strength, therefore, it must be handled with care or wait 28 days, and only then build a bath.
Video: building a foundation for a bath
Wall masonry
When building a bath from blocks, stone or bricks, you need to level the foundation with a cement-sand mortar according to the level, and lay roofing material on it, folded in half. Laying starts from the corners. Having installed the first blocks on the cement-sand mortar, you need to make sure that they are in the same plane and only after that a twine is pulled along the upper outer edge, which serves as a guide for laying a whole series of building materials.
When laying the next row, the masonry mixture may differ: a wall of bricks and shell rock is erected on a cement-sand mortar, while mixtures recommended by the manufacturer are used for laying lightweight blocks.
Having installed jumpers over the doors and windows, you need to install the formwork on top and make an armored belt, fixing the foundation bolts in it for the subsequent fastening of the Mauerlat board. After the concrete has hardened, you can start making the roof.
Bath frame construction
The basis of such a bath is a wood frame, which is insulated and sheathed with various types of finishing materials. You need to choose quality materials and follow the sequence of their installation.
For the manufacture of the frame, boards will be needed from well-dried larch, aspen or linden, because this wood has a low thermal conductivity. Manufactured shields will be resistant to deformation.
On the foundation, a frame of the lower strapping is made from a bar of 100 × 100 mm. At the ends of the bars, you need to make cuts in half the thickness and fasten them to each other with self-tapping screws. If bars 50 × 100 mm are used, then the frame can be assembled end-to-end using metal corners. The dimensions of the bar used depend on the type of foundation, design and size of the bath.

- At the next stage, the end strapping board is installed, and the floor logs are already attached to it. A beam of 50 × 100 mm is used.
- On the opposite side, the logs are cut so that a second end strapping board can be installed.
- The logs need to be arranged so that the prepared insulation becomes close between them, then the end strapping boards are nailed.
- The frame of the walls is assembled from a bar of 50 × 100 mm, and then installed in their places, all parts are fastened into a single structure.
To ensure the vapor barrier of the frame bath, it is necessary to use a vapor barrier film, which will avoid the accumulation of moisture inside the frame. Mineral wool or fiberglass is used as an insulating material. They are able to provide a high level of sealing without disrupting natural air exchange.
It is preferable to carry out insulation and wall cladding after roof installation. This approach will protect wood and insulation from getting wet.
Floor

If in a frame bath all that remains is to insulate the floor and lay a floorboard, then for other buildings you will have to work harder - you need to install logs, make a rough floor, fix a vapor barrier, lay insulation, perform waterproofing, lay a floorboard, which will have to be changed in a few years. Considering that the dacha at the dacha will not dry out thoroughly due to the lack of time for this, because after the weekend it will be necessary to hastily leave for the city, then if there is such an opportunity, it would be preferable to make a concrete floor and tile it with tiles. Wooden boards are laid on it, which can be taken out to dry in the shed and calmly go home.

It is clear that for a frame and other structure installed on a columnar or pile foundation, only a wooden floor with insulation is acceptable. More details about this process are described in the next two videos.
Video: how to install floor beams, make insulation and ensure drainage in the bath
Roof construction
There should be a reliable roof over any bath, but the options for its creation may be different. In any case, you need to install waterproofing, and then thermal insulation, think about the type of roof and the choice of a suitable roofing material. Without waterproofing, steam will easily penetrate into the attic, and, settling on beams and rafters, will contribute to their rapid destruction. In addition, the condensate formed on the roofing material will begin to drain onto the insulation, which will affect the properties and durability of the latter.
The type of terrain has a great influence on the choice of the type of roof, since the technical parameters of the structure must be taken into account.
- So, in a holiday village, especially when it is located among tall trees, you can safely make a high gable roof.
- If the cottage is located in the steppe zone, blown by all winds, then the slope for the roof must be made minimal.
- With small dimensions of the bath and insignificant snow load, the roof can be made shed. The same roof is most often made in a bathhouse attached to the house.
Video: how to make a bath roof
Interior and exterior decoration
Although wood is most commonly used for interior decoration, not all wood is suitable for this purpose. It is necessary to choose the right material, especially for a steam room, in which a high temperature is created at high humidity. It should be said right away that you cannot use pine sawn timber, as well as fiberboard, chipboard and linoleum for finishing this room. Therefore, you need to purchase larch or linden lining.
As for other rooms, the conditions there are not so extreme, therefore, there are no such high requirements for the material used - what cannot be used in a steam room is perfect for a rest room and a dressing room. The pine lining in the dressing room will exude a pleasant aroma and create a feeling of comfort.
Decorating a wooden and brick bath with clapboard is almost the same. First, the crate is attached to the wall, and the lining is already attached to it. An exception is the steam room, in which there must be a heat-reflecting foil under the crate.
Exterior decoration is carried out not only to make the bath beautiful, but also to protect it. To decorate the bath from the outside, you can use the following materials:
- Imitation of a bar.
- Siding.
- Lining.
- Block house.
- Facade tiles.
- Paint.
You just have to choose the right material and finish the facade.
Bath ventilation
Sometimes there is still such an opinion that good ventilation in the steam room is useless, since all the heat comes out through it, and it is made very weak, or it is absent altogether. But there is another extreme, when the ventilation process is not controlled, and the heat escapes from the bath. In such a steam room it is very hot upstairs, and the legs are freezing.
In fact, during the adoption of bath procedures, the air in the room must be renewed 2-3 times per hour, but this is not enough, since ventilation must be done correctly. Usually the inlet is located at the bottom near the boiler, and the exhaust outlet is under the ceiling on the opposite side. While the steam room is warming up, the exhaust window is closed. Then it opens, and warm air begins to rapidly leave the room. As a result, the steam room becomes cool and uncomfortable. You can make ventilation as in the diagram.

Such a device allows you to keep warm air under the ceiling, and half-cooled air comes out through the hole located below (B), so it will be comfortable in the steam room. When the steam room needs to be thoroughly ventilated, the upper ventilation opening (A) opens.
In addition to the steam room, ventilation is necessary in every room of the bath. In order not to waste precious heat, you can make it so that it is possible to close the ventilation openings during those hours when there is no need for ventilation.
Furniture
The canopy and all the furniture for a summer cottage can be made independently. If there is no desire to tinker with something else, then there are many offers on the network for the sale of everything you need for a summer residence.
If you want to save money on furniture, you can revise old stocks. Maybe there is something that needs to be repaired, but hands do not reach it? After a small restoration, such furniture can last a long time. The main requirement is not to use chipboard furniture, as this material will deteriorate very quickly from high humidity.
Schemes


Photo: original baths


After building a house on their site, most land owners think about building a good steam room there. In this case, the work is supposed to be done by hand, and the bath should be built quickly, cheaply and very simply. Satisfying these criteria is not easy, but it can be done.
It is hardly worth relying on other people's projects or ordering overly expensive individual building plans. In most cases, a small building is required to meet the needs of a family of 2-3 people.
The foundation is the basis of everything
For most self-contained buildings with little physical activity, the following types of foundations are used:
- pouring concrete;
- support-columnar;
- on pile-screw supports;
- tape-block.
The simplest is the columnar base. It is used both for frame structures and for timber structures. A cheap frame bath, built with your own hands, begins with it.

For support, cement blocks (cinder block) with dimensions of 200x200x400 mm are used. They are mounted according to a prepared template at the corners of a conventional grid of 2x2 m. Accordingly, in order to build a 12 m 2 bathhouse with your own hands cheaply and in stages, as shown by us, you will need about 9 such supports. Each of them contains 4 blocks.
Before installation, it is necessary to level the site, and the installation should be carried out along the construction hydraulic level. First, you need to fill a layer of sand under the base and tamp it. From this stage, it is possible to provide for the installation of the weir.
When using screw piles, it is unlikely that it will be possible to reduce the total cost less than the price of a strip foundation. However, for wetlands or soils with high groundwater levels, this solution would be appropriate. In such a situation, you can save money on your own installation without the involvement of third-party specialists or technology.

It will be possible to build a bathhouse with your own hands cheaply on a strip foundation of blocks. For a structure of 12 m 2, an amount of 6,000 rubles will be required, taking into account that the installation is carried out independently, as well as the preparation of the solution. This will reduce the expenditure side.
For most types of foundations, care must be taken to have a sand cushion.
Actual building materials
When erecting walls for a cheap bath with your own hands (the video is on the site), you can use a large number of modern materials. They have a lot of positive qualities, but the most accessible of them, and at the same time effective, are the following:
- wooden beam;
- arbolite;
- the use of an insulated frame.
In our country, it is enough to use a 100 mm thick bar for the outer walls of the bath, which will be operated from late spring to late autumn. During the installation of the timber, it is necessary to install the dowel at least every 0.9-1.0 m. For the classic size of 12 m 2, it will be enough to stock up on 62 bars. Such a do-it-yourself bathhouse will certainly come out cheaper than its larger counterparts.

In the process, a mezhventsovy insulation is used. The total amount of these materials will be about 25 ... 30 thousand rubles. If you take all this from a wholesale warehouse or directly from the manufacturer, you can save money.
When building the cheapest wood concrete bath with your own hands, you need to stock up on so much material:
- about 20 bags of cement;
- a quarter or a third of a cube of sawdust;
- sand 2.5-3.0 t;
- about 1 m 3 of sawn timber;
- enough water.
When pouring a bath from sawdust material, every time 2-3 days are expected for the layer to harden, and only after that the formwork is rearranged. It should be noted that with this method, the maximum cost of building walls is unlikely to exceed 12,000-15,000 rubles.
When erecting walls from this material, you will need to devote a lot of time to protecting them from moisture in the steam room. Increased waterproofing will protect the material from destruction by water.

Arbolite construction
In addition to a cheap bath from a bar or arbolite, you can build a frame structure with your own hands. Moreover, it will need to be reliably insulated. For an estimated building of 12 m 2 of area, you need to stock up on 3 m 3 of beams. Also, the estimate will need to include insulation. In a lightweight version, 10 cm of thickness is enough. If basalt wool is used during the construction, then the total cost of the walls will not exceed 25,000 rubles. At the same time, the advantage of this type of mineral wool is its maximum fire safety.
Floor arrangement
Any bathhouse built with your own hands cheaply and quickly will not do without a reliable floor. For its installation, various paired schemes tested by many owners are used. In most cases, you have to use the double base option.
.jpg)
- A sand cushion of 150 mm is pre-arranged, which can be poured and tamped for better styling.
- The base surface is then a concrete casting of 70-80 mm.
- The top layer is a mesh rail, knocked into a rigid frame. This flooring can be moved and laid as you like.
After each visit, it is advisable to dry and ventilate wooden frames from the floor outside the walls of the steam room.
The total cost, which includes sand, cement and slats, will be approximately 3000-4000 rubles.
Even before laying and installing the floor surface in the bath, you need to drain and drain it into a drainage pit outside. For the absence of odor, it is necessary to use ready-made gutters with water locks.
Working with the ceiling
When working with the ceiling, it is necessary to adhere to certain tricks, only then it will be possible to build a bathhouse with your own hands cheaply, as in the video. It is impossible to use an overly thin lining to cover the ceiling, this applies to a thickness of about 15 mm, as it quickly absorbs moisture and damp. It is necessary to take boards about 30 mm thick, which will save on insulation.

Quality ceiling scheme
In the old days, a composition of earth or clay mixed with dry leaves was used to insulate ceilings. This natural option remains in demand today, when you need to build a bathhouse yourself cheaply, as in the photo. Instead of leaves, sawdust is suitable.
For a project of 12 m2, it is enough to have 17 prepared boards with tongue and groove to cover the entire ceiling. Before filling the insulation from the outside, a layer of glassine must be laid.
A pitched roof will take about 0.7 m 3 of wooden beams. They are covered with two layers of roofing material, and the seams are glued with bitumen. Such a roof can last up to five years without leakage.
VIDEO: Bath for a summer residence - very fast and very cheap
And you want to build a bathhouse and finances do not allow - a familiar situation? Patience is worse than bondage. The Russian person is keen on inventions, so everyone who has planned to put a bathhouse on the site tries to save money in all possible ways. What comes out of this and how can you really cut your budget?
Mobile constructions
First, let us highlight the desire of all manufacturers to introduce a variety of cheaper options for baths. Keeping their finger on the pulse of the problem, the consumer is offered to purchase mobile designs. The set of such a bath consists of a tent, stove and bag. There are lightweight options. They do not have ovens, and the temperature is pumped by a portable steam generator.
You can install such a structure on any site, and it can be done by two adults. Depending on the type of mobile bath, from 3 to 7 people can take a steam bath. Again, everything depends on the possibilities of your budget. The temperature created inside is acceptable for procedures - 90 ° C. When folded, it does not take up much space; it can be transported from one site to another, in a small car trailer. After the procedures, the structure must be washed and dried.
Bath-dugout
Departing from the purchased option, you can recommend the best price-quality ratio in the form of a dugout bath. Such structures are being built, or more precisely, they are swarming on their own. Hence the first point of savings. The work of hired craftsmen is not assessed in favor of the owner of the bath.
 The second point of savings can be considered an independent basis. That is, the foundation for the dugout bath is not needed. The third point will be to reduce the cost of wall materials. The disadvantage is the complexity of preparing the pit.
Even one person can build such a bath, but in this case, the work will drag on for months. The attraction of technology will speed up the process, but will affect the pricing policy. If the time frame does not bother you, then this option is the most profitable. Unlike a mobile structure, a dug-out bath will have a permanent registration, therefore, it is necessary to determine its location in advance.
What is cheaper to build from?
There are many options for building and purchasing, inexpensive baths. But still, without departing from tradition, more specifically, you need to talk about options for reducing the cost of erecting capital structures. Everyone wants to have a full-fledged bathhouse on their site, in which it is not a shame to invite friends on a weekend.
There is only one way out of this situation - to build a bathhouse that meets all modern requirements and implement all kinds of economic solutions, which are abundant in the construction market today.
We save on wall materials
The most inexpensive is a timber bath. The choice of this material for laying a log house allows not only to independently carry out all the processes, but also to vary the price. For example, if you use the sauna only in the summer months, the savings will increase by reducing the cost of purchasing a bar. A log house made of logs with a section of 100 mm will be enough.
 For a budget-sized bathhouse of 12 m2, you will need about 65–70 bars. Plus - an inexpensive insulation in the form of tow. You can even refuse finishing by first cleaning the wood surface. The most economical option for building a bath.
Arbolit
Home craftsmen suggest using this material to save money. To work on the construction of a small bath, you will need the following:
- 20 bags of cement;
- sawdust;
- sand about 3 tons;
- lumber.
In addition, you will need a lot of water. A bath is being built using a monolithic technology, or blocks of various sizes are pre-made. In the first version, the formwork is assembled, all the ingredients are mixed and poured into it. In the second, masonry is made according to the technology of assembling the walls of the bath from foam blocks or bricks.
In the language of builders, this is a sawdust concrete bath. This is how arbolite is called in the construction environment. It is a reliable material with a high degree of thermal stability.
 Some inconvenience is caused by the construction process itself. Filling the walls by collecting the formwork, you have to wait 3-4 days. Time intervals are required for the layer to freeze. Reduces costs, low material cost.
Insulated frame
Another budget option for building a bath. A small construction will take about 3 cubic meters. lumber, plus an insulation layer. It will not work to get off with inexpensive tow or jute, but still the costs are low.
A frame sauna for summer use is assembled with a wall thickness of only 10 cm. An insulator plays the main role in retaining heat. These are ecowool or panels on mineral fibers.
The proposed options for saving on the construction of a bathhouse were considered in the summer version. When planning a capital structure in which the procedures will be carried out all year round, you will have to spend a lot, at least for the same insulation of the walls of the bath from the inside. The costs of the base and roofing structure will increase.
Making an inexpensive floor
Savings will really show up if you follow restrictive measures at all stages, but not to the detriment of the internal microclimate. In this regard, when laying the floor, there are also certain tips and the masters suggest resorting to a double structure.
Basis - concrete fill, no more than 7 cm thick. A layer of river sand of 15–20 cm must be laid under it. After the concrete has hardened, a removable panel is constructed from boards. In everyday life, craftsmen call this option a leaking floor. The panels can always be removed and taken out into the street for ventilation.
We save on ceiling construction
Remembering the law of physics from the school curriculum that hot air rises up - you should not save on the ceiling. Up to 70% of the steam goes through it, but still, there are some tricks.
The craftsmen suggest saving by using natural materials for insulation. At the beginning of the first century, dry leaves mixed with earth were the only way out of this situation. Time and experience that comes over the years has made it possible to move away from such compositions and today, other mixtures can be used to insulate the ceiling in the bath.

Sawdust or expanded clay is a great option. Using them, you can make an inexpensive, but high-quality backfill. In this case, you cannot save on vapor barrier and it is better to lay it in 2-3 layers. Especially the recommendation must be observed when choosing a sawdust backfill. Expanded clay is more resistant to moisture, but still, you should not bring it to circulate through the ceiling.
Windows and doors - do it yourself
In a small bath, windows can be omitted at all. For ventilation, ventilation ducts will be enough. But you will need at least two doors: the entrance and the one that separates the dressing room with the steam room.
You can make the door yourself. Given the small size, one canvas will need 5 grooved boards and two bars. It is not necessary to insulate the door to the steam room; this must be done with the entrance structure.
Inexpensive roofing system
The most inexpensive in this regard will be a shed construction. For assembly, you need a minimum of lumber and the same amount of insulation and a roofing sheet. Regardless of which roof design is chosen for the bath, it is better to cover it with roofing material or other materials derived from it in order to save it. Slate is not very expensive today.
Layout of premises
This point makes a great contribution to reducing the cost of building a bath. Reducing costs will allow the refusal to plan multiple rooms. The classic version, where a steam room is combined with a washing compartment, is the most effective way to build a budget bath.

All unnecessary partitions only affect the price increase. It is necessary to purchase additional material, plan their location, and in some cases lay a base specifically for them.
In the fight against cost reduction, any weapon is acceptable, the main thing is to use it correctly. All options for building a budget bath must be carried out carefully, after analyzing the materials used and methods of saving. Cost reduction actions should not compromise comfort.
Rest without a bath is not a rest. Neither summer shower nor bathing in the bath can replace the bathhouse in a suburban area. Of course, if the budget is very limited, you shouldn't try to build a two-story bath complex with a swimming pool. But it is possible to build a small cozy bathhouse on a suburban area with minimal investment.
In this article we will look at how a budget bath is built with our own hands, we will reveal the secrets of choosing and saving building materials, we will tell you how to prevent oversight and mistakes for novice craftsmen.
The most popular materials for building saunas are wood, bricks and blocks. A wooden bathhouse can be in the form of a log house or frame.
Wood

Wood is a classic material for building baths. Wood is prized for its environmental friendliness and ease of processing. Wooden baths warm up quickly, and the essential resins released into the air have a beneficial effect on the well-being of visitors.
However, wood is far from ideal for construction. In order for the walls of the bath to be even, you need to choose a high-quality timber or log. Do not forget about shrinkage. The better the wood is dried, the lower the percentage of shrinkage and the risk that the frame will "lead".

It is important to be able to work with an ax and a saw, to have sufficient physical strength and endurance to cut down locks for connecting corners, external and internal walls, floors. Of course, you can buy a ready-made log house with delivery to the site, but this is associated with additional costs and is not relevant for the construction of a budget bath. It is best to do the construction at least together, because it is extremely difficult to lay the crowns alone, especially the upper ones.

Hardwoods such as linden are best suited for building a bath. This material is considered relatively light, therefore, if the geological conditions of the area permit, you can save on the foundation and limit yourself to a lightweight tape option (monolithic or prefabricated).
What else can you save on? For example, for insulation and decoration. If the bath will be used for its intended purpose only in the warm season, there is no need to purchase insulation, battens for lathing, steam and wind insulation, decorative finishing material for the bath's facade. Wood, if it is properly sanded and coated with protective impregnation, varnish, is quite aesthetically pleasing and fits perfectly into the landscape design of private land plots.

In a budget bath, you can save on the organization of a full-fledged sewerage and water supply system. Since ancient times, in Russian baths, the floors were made pouring, and water was carried in buckets in advance. Yes, this causes some inconvenience, but it will not spoil the overall pleasant experience of bathing procedures.
What can you not save on? Wood is a highly flammable material. It is worth a little oversight, not closing the blower door, as a falling-out hot coal will lead to a fire and damage to property. A similar situation is possible in case of neglect of fire safety rules when installing the furnace and therefore, in no case should you save on:
- fire-retardant impregnation;
- fire-fighting cutting;
- materials for insulating the floor in front of the firebox and
We strongly do not recommend saving on fasteners. Firstly, the difference will be insignificant, and secondly, low-quality metal hardware will quickly begin to rust, and ugly black smudges will appear on the walls. The worst thing that rusted fasteners will lead to is the collapse of building elements due to the loss of nodes of their strength.
It is very important to properly organize ventilation in wooden baths. Even if the bath is only 4-6 square meters. Visitors are unlikely to enjoy the musty and mildew scent, and the owner will not be pleased with rotting floors and walls.

Now more specifically about the prices of wood, to roughly calculate the cost of construction.
| Lumber | Breed | Section or diameter, cm | Price in rubles per cubic meter |
|---|---|---|---|
| Profiled timber | Pine, spruce | 140x140 | From 11.5 to 14.5 thousand rubles. |
| Profiled timber | Larch | 140x140 | From 16.5 to 18.5 thousand rubles. |
| Round timber | Larch | 180 to 460 | From 8.5 to 10 thousand rubles. |
| Carriage | Larch | 150x250 | From 15 thousand rubles. |
* The average cost of building materials is relevant for 2017.
Based on the cost of new sawn timber, a budget bath will definitely not work. A way out of the situation is to buy a used timber at a price of 1000 rubles per cubic meter or from 80 rubles per 1 piece. Used pallets can also come in handy if used correctly.
Bricks and Blocks
A block or brick bath will undoubtedly be more durable than a wooden one. And the suddenly flared fire is not terrible for the stone walls. You can build a bathhouse of any size and shape to your taste and discretion, as long as funds and personal time allow.

Brick manufacturers always have a large assortment of products of various shapes, shades, textures. For example, by combining bricks of two different shades in the construction of walls, you can build a bathhouse that looks very neat and aesthetic.
On a note! In a brick bath, the window can be replaced with glass blocks. They have sufficient light transmittance. But in this case, it is important to take care of the arrangement of effective ventilation.

A brick bath warms up longer than a wooden one, and cools down much faster. Brick walls are in need of finishing, and this adds cost items to the overall estimate. For laying bricks, a cement-sand mortar is used, which can be bought ready-made and simply diluted with water in the required proportions, or prepare the mixture yourself and spend less money.
How much will it cost to build a bathhouse from a private M100 brick?
| Building material | Description | Price |
|---|---|---|
| Width 120 mm, height 65 mm, length 250 mm. | From 6.20 rub. for 1 piece. | |
| Has the same dimensions as a private. Used for laying those walls that are directly heated. For example, fireclay bricks are used to lay out a base for a furnace and a protective screen. | From 41 rub. for 1 piece. | |
| River sand for the preparation of masonry mixture or concrete mortar for pouring the foundation | From 68 rubles for 30 kg | |
| The purpose is the same as that of the sand. Crushed stone fraction 5-20 mm. | From 86 rub. over 30 kg | |
| M400 | From 195 rub. over 50 kg |
For an example of calculating the cost of masonry, take a single brick and laying in one brick (the wall thickness will be 25 cm). Using the data in the table, we get:
- taking into account mortar joints per 1 sq. m of masonry requires 102 bricks;
- 102 bricks x 6.20 rubles. \u003d 632.4 rubles.
Brick prices
Usually, a brick is purchased with a margin of up to 15%, taking into account possible marriage. And to the cost of masonry 1 square meter of the wall, you need to add the cost of the mortar. Do not forget that you may need a concrete mixer, jointing for joints, a set of mason's tools, etc.

Foam blocks and gas blocks are materials that are increasingly used for the construction of baths. Their main advantage is their high construction speed. The disadvantages are similar to those of bricks.
Blocks are laid with reinforcement of rows, fixation is carried out with special glue or cement-sand mortar.
For the construction of a bath, blocks with dimensions of 200 x 300 x 600 mm are often used. One such block costs from 93 rubles. For internal partitions, blocks of smaller thickness are suitable - 100 or 120 mm and cost from 50 rubles per 1 piece.

The number of blocks in 1 sq. m the following:
- with a wall thickness of 20 cm, there will be 5.5 blocks in one square meter of the wall (5.5 x 93 \u003d 511 rubles);
- with a wall thickness of 30 cm, there will be 8.33 blocks in one square meter of the wall (8.33 x 93 \u003d 774.69 rubles).
We conclude: for the construction of a budget bath, it is preferable to use not bricks, but blocks of 200 x 300 x 600 mm, construction should be carried out with a wall thickness of 20 cm.It is necessary to take into account the cost of glue for blocks (from 155 rubles per 30 kg, consumption is about 1.2- 1.4 kg per 1 sq. M of masonry) and do not forget that the blocks are purchased with a margin.

Important! In an effort to save money, you should not sacrifice the reliability and durability of the bath. You can always buy, for example, a used brick for a penny, but there is no guarantee that in the next decade such a brick, and with it the walls of the bathhouse, will not begin to collapse.
A big plus of the construction of a bath from blocks is the high strength of the walls, which is achieved by reinforcing the rows. Provided that the reinforcement is done correctly, the walls will not crack. Even when building a budget bath, you should not neglect the safety margin of the walls, so as not to start overhauling the bath in the next few years.
Prices for foam blocks
foam block
Construction of aerated concrete bath with a brick base
We will consider the process of building a bath with dimensions of 6x5 m. This area is enough for arranging three main premises: a rest room or dressing room, a shower room, a steam room. If the free area on the site does not allow the construction of a 6x5 m sauna, the dimensions can be reduced to 4x4 m, and the internal space can be divided into a dressing room and a steam room, without a shower and other amenities.

So, let's begin. Inspect your land, prepare a place for construction. It is necessary to remove debris, uproot stumps, remove the top layer of soil with grass growing on it, level and tamp the area.
In advance, you need to prepare a bath project with a masonry order. According to the drawings, it is easier to calculate the amount of building materials and conduct construction.
Make markings on the ground, dig trenches, fill in the shallow strip foundation. Don't forget about the air. You can read more about the filling technology.
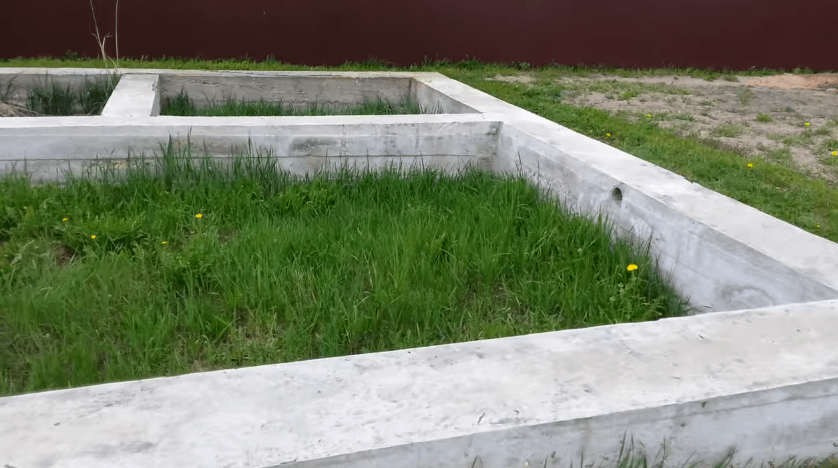
It is important already during the pouring process to carefully level the upper surface of the foundation. If, nevertheless, the base has deviations horizontally, it is necessary to level everything with a cement-sand mortar.
Step 1. We put a waterproofing material on the foundation strip, for example, strips of roofing material.


Roofing material prices
roofing felt
Step 2. We mix the cement-sand mortar for brickwork. To prepare the solution, we use the proportions:
- cement M400 - 1 bucket;
- sifted river sand - 2 buckets;
- dishwashing detergent or any similar - from 50 to 100 ml.
Important! We recommend first adding water and detergent to the concrete mixer or mortar container, then add cement and sand, with constant stirring. The consistency of the finished solution will resemble thick sour cream, and if you run your finger over the mixture, a clear, non-spreading mark will remain. Mixing should be carried out for 3 to 5 minutes.

We transfer the finished solution to buckets and transport it to the construction site.
Step 3. We start laying a brick base. We will work from the corners of the bath.
Apply the mortar with a trowel to the brick. We lay the brick at the corner of the foundation (along the outer edge). Place the bubble level on the brick and, if necessary, tap the brick with the handle of the trowel. We repeat the procedure on the next corner of the bath foundation.

It is important that the bricks laid at the corners are at the same level. To check, we pull the mooring thread, additionally check the position of the bricks with a water level. We put the second brick at each corner perpendicular to the first one.

We carry out the laying of the basement "in one and a half bricks". With standard brick sizes, the total width of the basement will be 38 cm. This width is the sum of one brick length (25 cm) and one brick width (12 cm), 1 cm is a connecting mortar joint.

Spoon out the first outer row. We lay the bricks on the mortar previously applied with a trowel, pressing into the mortar and slightly moving back and forth. We leave a gap between the adjacent bricks, into which we add the mortar with a trowel. Remove excess mortar immediately with a trowel. We knock out the bricks so that they are all in the same plane (the reference point is a stretched thread-mooring). As a result, if you look at the base from the side of the "street", you will see a row laid "in half a brick".
We lay the inner row with a jab towards the future premises of the bath. Further, the laying is carried out according to the ordering scheme, observing the dressing of the seams.
We lay out 2 rows of bricks and proceed to the arrangement of the floor overlap.

Step 4... To equip the floor overlap, you need to prepare the beams.

The beams must be fixed in the “sockets” of the base to a depth of 10 cm. We measure the width of the interior, add 20 cm, we get the length of the beams. The section of the beams can be selected using the table.
* The section is indicated in millimeters. The beams are laid on the edge. Maximum floor load 400 kg / m 3.
We cut the roofing material into rectangular pieces 15 cm wide. We wrap the ends of the beams with roofing material, fix it with a construction stapler.
We lay the beams on the ends, observing an equal distance between them.
We continue to build the brickwork.


We spread two more rows, observing the dressing. We also lay the brick between the beams, sawing it with a grinder if necessary.

The height of a single ordinary brick is 65 mm. Accordingly, two rows of bricks plus two mortar joints in height will be 150 mm, the upper surface of the beams will be flush with the surface of the brickwork.

Fourth row masonry
Recommendation! If the brick is pre-moistened with water (without soaking it), it will not absorb moisture from the solution. The masonry will turn out to be very strong. The recommendation is relevant for work in hot weather.
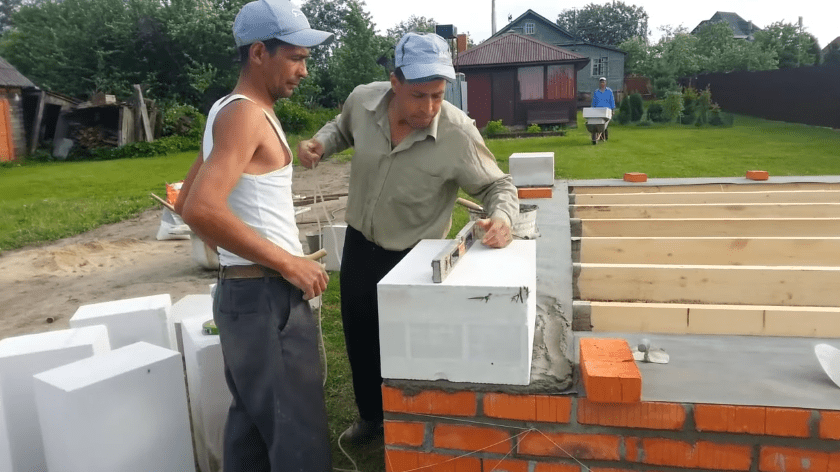
Step 5. The basement has been built, we proceed to laying the walls from aerated concrete blocks.
We lay a layer of roofing material on the brick over the entire surface of the external and internal walls of the bath.

We start work again from the corners of the bath. Knead the solution, spread the layer over the roofing material.
Smooth the solution with a notched trowel. We install the first block.

Similarly, we install the second block on the adjacent corner of the base. The hardest part is to bring both blocks to zero. We carry out the check with a hydro level, a bubble level, if there is a laser level, it is better to use it.

Haste is inappropriate here. If necessary, you can remove the block, remove excess solution, or add more solution. The horizontal deviation should not be more than two millimeters.

We spread the first row of blocks on the solution. If the distance between adjacent blocks does not allow installing the whole block, it is necessary to cut with a hacksaw with fine teeth. After cutting from the block, we sweep the dust with a brush.

Laying out the blocks, do not forget about the doorway.

Step 6. We pass to the reinforcement of the first row of blocks.
Prepare a set of tools for work in advance.
| Tool | Approximate minimum cost, rub. |
|---|---|
| 450 |
| 490 |
| 500 |
| 600 |
| 365 |


* Used tools will cost less.
For reinforcement, we use corrugated rods of class A3. The diameter of the bars is 8 mm. Reinforcement of greater thickness is not advisable to take.
Using a manual wall chaser, we cut two grooves for the reinforcement. For convenience, you can draw two parallel straight lines along a ruler on the surface of the blocks in advance with a pencil. At the corners of the bath and at the junction of the internal partitions with the external walls, the grooves are rounded, parallel.

We clean the surface of the strobe from dust using a damp brush.

We take the reinforcement and put it in the grooves. We bend the reinforcement at the corners. Pay attention that the reinforcement bars are not connected at the corners. The connection of rods is possible at a distance of more than 30 cm from the corners.

We take out the reinforcement from the gates, put it on the surface of the blocks.
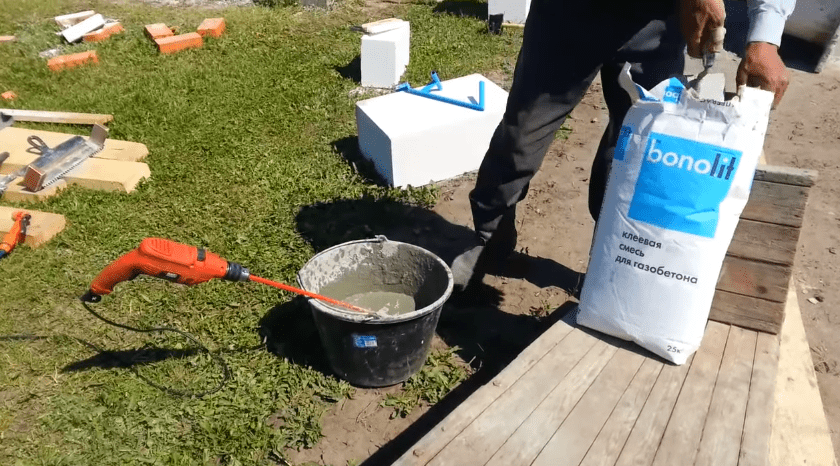
We mix glue for aerated concrete (approximate cost for 25 kg - 220 rubles).

Pour water into the bucket, then pour the dry mixture from the bag. We mix the glue with a drill with a mixer nozzle at low speed (up to 800 rpm). The consistency of the glue should be similar to thick sour cream. The glue should not run.
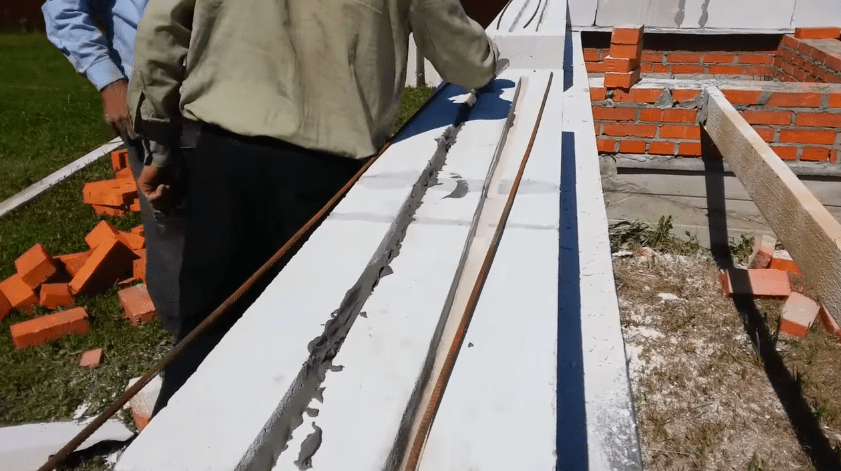
We fill the grooves with glue. We spread the glue with a spatula. We embed the reinforcement in the glue. If necessary, add more glue on top of the laid reinforcement, so that the surface of the gas blocks is flat, without grooves or bumps.

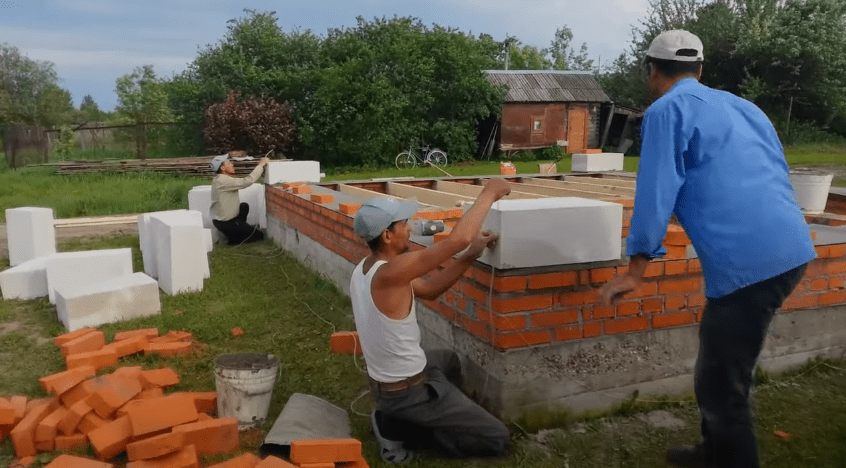
Step 7. We proceed to laying the second row of gas blocks. We start traditionally from the corner. We proceed to applying glue under the block.
Important! Do not forget about the need to lay blocks with a bandage similar to that of half-brick brickwork. The offset of the top block relative to the bottom should be between 15 cm and ½ the block length.
It is most convenient to apply the glue with a bucket (trowel). The working width of the trowel must match the width of the block. This will allow the adhesive to be applied quickly and accurately. But sometimes builders use homemade tools, for example, as in the photo. The main thing is to evenly apply a thin layer of glue over the entire surface of the blocks.
On a note! The applied layer of glue can be continuous, but it is the use of notched trowels or special buckets that reduces the consumption of glue.

We continue laying blocks of the second row. We check the correctness of the installation of the blocks in two planes - in the vertical and horizontal. If necessary, we grind the block surfaces.


For the convenience of bandaging the blocks, you can start laying from half of the block. We cut the gas block with a hacksaw. We sweep away the dust with a brush. Apply a thick layer of glue (2-3 mm) to the ends of the block. Install the block.
We continue laying blocks of the second row. We check the correctness of the installation of the blocks in two planes - in the vertical and horizontal.

Important! If the bath is more than 6 meters high, it is recommended to reinforce every fourth row of masonry.
Prices for cement M600
cement М600
Step 8. We pass to the laying of the lintels, their reinforcement.
There must be reinforced lintels above the window and doorway. The easiest way is to use U-boxes, but this comes with additional costs.
To save money, you can manually make recesses in conventional gas blocks. To do this, make two cuts with a hacksaw across the width of the groove on the block, then remove the excess material using a chisel and hammer.
For stacking blocks, we make formwork from boards. Blocks will rest on the top of the formwork. We fix the horizontal board with props, fix the elements with ordinary screws.
The armopoyas should protrude at least 15 cm beyond the window and door opening. We install the blocks on the formwork. We fasten the ends of the blocks with glue.
Inside the blocks, closer to the outer edge, we lay pieces of EPS (Penoplex) 50 mm thick.
We start knitting an armored belt. For the bundle we use plastic clamps (ties). Armopoyas consists of four long parallel rods, and every 0.5 m - vertical sections of reinforcement. In section, the armopoyas should form a square.
Important! You cannot lay the armopoyas directly on aerated concrete. Plastic retainers must be used. Without clamps, the reinforcement cage will not take the correct position and will not be filled with concrete mixture on all sides.
We install the frame with clamps and fill it with concrete flush with the edges of the gas blocks. We compact the concrete mixture by piercing it with a rod or wooden lath. We level the surface as carefully as possible.
Now you need to make a technical pause and wait for the solution to set. This will take from 10 days to two weeks.

Step 9. So, the concrete in the lintels has frozen, we continue construction. If the height of the walls is not enough, lay out another row of blocks. In our case, this row will be the final one on the ground floor and at the same time perform the function of an armored belt.
We manufacture the armopoyas on the floor using the same technology as the lintels, but with one difference. Now the armopoyas will be poured along the entire perimeter of the external and internal walls. For the sake of economy, we do not use U-blocks, but we cut and hollow out solid wall blocks.
- We put the whole row of prepared blocks on the glue.


- We install expanded polystyrene plates. We cut them carefully, along a ruler so that the edges are even.
- We knit a reinforcing frame.


- We put the clamps, put the frame inside the blocks.

We pour concrete.
- Align the surface.
- We are waiting for the concrete to harden.

Step 10.The first floor cannot immediately end with a roof, of course. We turn to the arrangement of the interfloor overlap. It will be wooden. We put antiseptic beams with waterproofed ends on an armored belt. A similar technology was discussed above when the basement was being built.


But since now we are putting not a brick, but a gas block, we make cuts in each block under the ends of the beams.


It is important to accurately measure the distances between the beams and carefully select smooth rectangular niches in the blocks with a chisel and hammer. We lay the blocks in the standard way, observing the dressing, applying glue to the previous row and the ends of the blocks.


Important! In our example of construction, the bath will have a small balcony. Therefore, several beams are carried out beyond the walls of the bath.

Step 11. We lay the rough floor. We lay the edged board over the beams. We fix the boards to the beams with self-tapping screws through the board. If the board is 50 mm thick, we take the hardware with a length of 8 cm.
We leave a rectangular opening in the floor for access to the attic.

In the future, when the floors are ready, windows and doors are inserted, decorative finishing will be made, foil vapor barrier will be stretched in the steam room, lining or a simple hardwood board will be nailed.
Step 12. Usually a one-story bath is enough for the owners for a comfortable pastime. The space under the roof is often used to store fragrant bath brooms.
Sometimes in the bathhouse on the second floor they put a small sofa, a table, equipping the rest room. Our project provides just such a room on the second floor. After the bath procedures, it will be pleasant to relax, cool down, going out onto the small balcony. A window on the second floor will increase the ventilation efficiency and reduce the cost of building materials.
The roof has a complex configuration. On both sides there are two trapezoidal pediments, tightly laid with a gas block. And if you look from the side of one of these gables, the perpendicular slopes of the roof are clearly visible on both sides.

Advice! If you are not confident in your abilities, limit yourself to the construction of a simple pitched or gable roof.
The main stages of work during the construction of the second floor and roof:
- installation of vertical racks from a bar;
- installation of horizontal piping;

- flooring of floor beams on top of the strapping;


- installation of extreme trusses along the gables;

Floor beams and rafters


- installation of intermediate trusses;

- masonry of gables from blocks;


- installation of vapor barrier from the side of the room;

- filing the ceiling, slopes from the inside with a board;

- laying mineral wool in two layers;

- installation of a windscreen over the insulation;

- installation of a counter lattice for metal tiles;


- assembly of a gable canopy over the balcony, installation of a windproof membrane and counter battens on the canopy slopes;

- installation of metal tiles and additional elements.


You can watch the video about how a roof of a complex configuration is being erected.
Gas block prices
gas blocks
Video - Roof construction
Video - Construction of gables
Video - Rafters, armopoyas
Video - Completing the installation of rafters, laying aerated concrete walls of the second floor
Video - Overlapping, vapor barrier
Video - Roof insulation
Video - Counter lattice for metal tiles
Video - I washed down the ends of the counter-lattice, filing the ceiling of the ceiling
Video - Laying metal tiles
Shed roof for a budget bath
Step 1... We fasten the Mauerlat on top of the armopoyas. It is a board fixed with dowels (wood grouses).
We drill holes in the boards and then in the blocks. We hammer in the dowels. We lay a layer of roofing material as waterproofing. We put the Mauerlat board, screw in the screws (capercaillie).


Step 2... We install vertical posts and a horizontal strapping bar. The height of the front part is 130 cm, from the rear of the bathhouse - 30 cm. The roof slope will be 18 degrees.
We fix the beams with metal perforated corners and wood screws.
On a note! To prevent the racks from loosening from gusts of wind, we temporarily fasten the boards connecting the front and rear frames with self-tapping screws.


Step 3. We lay the rafters (we put straight boards on the edge and fasten with perforated corners to the horizontal bars of the front and rear frames).

Step 4. We mount counter-lattice boards perpendicular to the rafters.

Step 5. We fix sheets of corrugated board. We cut off the counter-lattices sticking out at the edges of the board.


Step 6. We strengthen the frame with jibs. On the sides we install posts from a bar and one additional jib in order to further attach the sheathing.


Step 7. We sew the rough ceiling.


Step 8. We sheathe the frame with plywood. We treat plywood sheets with protective impregnation.


Step 9. Foam the gaps between the blocks and the plywood.

Step 10. If the decorative finishing of the facade is not planned yet, we attach the protective canopies made of tin.

You can use plaster as a decorative finish on the facade of the bath. It is necessary to choose a mixture for aerated concrete. Conventional cement-sand mixtures are not suitable for this purpose. Aerated concrete quickly absorbs all moisture from the plaster, the decorative coating cracks and falls off.
To plaster the facade, you need to clean it from the remnants of glue with a float, grind off irregularities, if any. After sanding, the walls must be primed with Aerated Concrete-Contact. The plaster mortar is applied with a wide trowel over the fiberglass mesh fixed with self-tapping screws. After the plaster has dried, you can paint the facade or simply apply a water repellent.


