DIY material for roller blinds. Roller blinds: how easy it is to make them yourself. Cutting and sewing canvases
Russia, Moscow region, Moscow +79041000555
DIY roller blinds: step by step instructions + video
It takes ~ 5 minutes to read

Save
Every hostess dreams of changing the interior of her house from time to time. There are many ways to do this. The easiest and cheapest is to change the curtains. They can be purchased at any market or store. It will be easy to do this, since the choice of curtains is huge. But the best solution would be to sew the curtains yourself. Even those who have never sewed such products can easily cope with this task. You will learn how to make roller blinds with your own hands by reading the step-by-step instructions of the article to the end.

Save
Disadvantages and advantages of such curtains
Advantages:
- Light does not leak through them, nothing can be seen through them, that is, no one can look into your window.
- They can be hung anywhere.
- They take up little space.
- Fresh air passes through the blinds easily and freely.
- These curtains are suitable for any room.
- Blinds can be hung either independently or in addition to others.
- Their choice is huge.
Disadvantages:
- Blinds absorb unpleasant odors.
- They need to be constantly looked after.
- After a while, they may skew.
- The mechanism that lifts the roller blind quickly fails.

Save
How to sew roller blinds on plastic windows with your own hands
To sew a roll of curtains with your own hands, you need to choose the right fabric. When choosing a fabric, it must be taken into account that it is:
- Natural;
- Moisture repellent;
- Reflected the light.
For the manufacture of roller blinds, you can use fabric of the same color or multi-colored and patterned. It will only depend on you and your choice.
DIY making: step-by-step instructions (photo and video)

Save
To make a roller blind with your own hands you will need:
- The cloth.
- Cord.
- Rope.
- Tape.
- Weighting agent (metal or wood).
- Rod shaft (wooden block or metal tube).
- Screwdriver.
- Self-tapping screws.
- Drill.
- Iron.
- Sewing machine.
- Fasteners.

Save
Save
Master Class
- Determine the width of the roller blind. Measure the length of the roller and subtract one centimeter from the resulting length.
- Now let's determine the length of the curtain. To do this, measure the distance from the roller to the window sill. Add twenty centimeters to the result.
- Now make a curtain pattern. Measure on the fabric the width and length you received when measuring. Cut out the resulting rectangle. There should be two such rectangular segments.
- Fold the pieces right side in and sew on three sides. You should get a bag.
- Turn the resulting bag inside out and iron it with an iron.
- Let's move on to securing the weighting agent. Its length should match the width of the curtain. This is necessary so that the roller blinds do not hang on the plastic window. Attach the weight, tuck the fabric and sew five millimeters away from it.
- Now you need to prepare the ribbons. With their help, the curtain will hang in a folded state. From the fabric, cut a tape eight centimeters wide. And the length of the ribbon depends on the height of the window and is calculated using the following formula: 2 * height of the window opening + 30.
- Fold the resulting ribbon lengthwise, right side inward and sew. Then the tape must be turned out, ironed and sewn on the open side. Do-it-yourself blinds are ready.

Save
DIY roller blinds mechanism
First option.
To make the mechanism you will need:
- Staples;
- Roller;
- Duct tape;
- Screwdriver.
Manufacturing steps:
- Let's start with the staples. If the curtain is inside the frame, then the staples are placed three centimeters below the top of the curtain. If the curtain is outside, then the brackets must be fixed five centimeters above the window opening. The round hole bracket fits on the right side and the square hole bracket on the left side.
- The distance between the clips should be the same as the length of the roller. If so, secure the roller.
- Now we fix the curtain on the roller. Place it face up and place the roller at the top of the curtain. Roll the edge of the fabric onto a roller and secure it with adhesive tape.
- Throw the ribbons over the roller, and fix them in the center with a stapler.
- Insert the roller with the curtain into the staples. The roller blind for a plastic window is ready.

Save
Second option.
For him you will need:
- Bar.
- Sticky double-sided tape.
- Glue gun.
- Special mounts.
- Cord and hooks.
- Wooden slats.
- Weighting agent.
Manufacturing instruction:
- First you need to saw off the wooden strip. Its length should be less than one centimeter of the curtain's width.
- Cover it with the same fabric from which the roller blind was sewn.
- Glue double-sided sticky tape to the bottom of the block.
- On the back of the block, special fasteners must be attached.
- Insert the weighting into the sewn roller blind.
- Attach the blinds to the prepared cornice.
- Take the cords, tie them and lead them through the special holes. Then line them up and tie a knot.
A video on the manufacture of curtains and a mechanism will help to cope with this task.
How to make with a garter tape
To make such a roller blind you will need:
- the cloth;
- sewing machine;
- iron;
- weighting agent;
- bar and rail.

Save
Manufacturing steps:
- First you need to make a fabric pattern. Measure the desired width and length of the future curtain. Cut out the resulting rectangle and sew on three sides. Turn the fabric inside out and iron it.
- Insert the batten on the unstitched side, then sew it on. This will be the bottom.
- Attach the top of the blinds to the block.
- Now prepare the ribbons. They should be twice as long as the blinds itself. There should be two such tapes.
- Attach the ribbon to the block.
- The roller blind is ready.
Roller blinds on their own
To make roller blinds you will need:
- fabric for sewing;
- paper template;
- simple pencil;
- a bar of soap or chalk;
- ruler;
- glue pad;
- fringe;
- special fabric adhesive.

Save
Master class on their manufacture:
- First you need to make a pattern. It is done in the same way as for conventional roller blinds. But there is also a difference - you need to leave an allowance of 25 centimeters. This is necessary for finishing the edge.
- Now make a template. It is made from plain paper. Its width is equal to the height of the carved edge, and its length corresponds to the length of the roller minus one centimeter. On the resulting rectangle, make the pattern you like.
- The rectangle must be folded like an accordion. On the first strip, draw the desired pattern. Cut the rest of the stripes along this pattern. So, the pattern will be the same across the entire width.
- Make a drawstring. Insert the tube into it, and sew the edges.
- Place the paper template under the drawstring and secure with pins. Circle the pattern with a piece of chalk.
- Glue the fringe along the bottom edge.
- Fix the resulting roller blinds on the roller.
Now you know how to make roller blinds with your own hands, as well as how to make roller blinds yourself without the help of a master. Good luck!
First of all, let's figure out what it is - roller blinds. What are their advantages and disadvantages. Blinds are of various types to restrict the penetrating light. They can consist of a different number of elements and materials. Must have a lifting and lowering mechanism. Installation and operation of roller blinds is very simple.
Designers often include them in their projects due to the high variety of colors and textures. Also, blinds are ideal for plastic windows, which gives them an advantage in modern urban interiors.

Pros and cons of operation
The advantages of a roller blind are: a large selection of materials and textures that can be found suitable for any style and room, including rooms with high humidity. They are easy in daily use due to the mechanical component.

In addition, this approach saves space - the window sill remains free. Also, a special approach to insolation of the room helps to save on expensive curtain fabrics.

The mechanism is ideal when installing the “Smart Home” system - the roller blinds can be installed electrically. A big plus is easy self-installation. To preserve health and order, there are special solutions and impregnations of materials.


Also, the pluses include a huge variety of manufacturers of this product. In our time, the competition is very strong: in addition to going to the store, you can put your hands on the creation of a roller blind or order in the online store according to the sizes and accessories you need.

In addition, the maximum size of the canvas up to 3 meters is already a minus, since the height of the window also matters, the more material is used, the more difficult the operation of the mechanism itself. If the width of the window does not allow it to be closed with one canvas, gaps are inevitable. Low-wear, cheap materials quickly fail from constant friction.

Step-by-step instructions for creating a fabric roller blind
An excellent option for window decoration is handmade roller blinds. An easy replacement of the fabric base is conducive to numerous variations in the transformation of the interior. What's even more interesting is that you rely solely on your imagination.

We propose to consider three options for creating a curtain on your own: with a bar - a shaft made of wood, with a roller located on the lower edge of the curtains and making blinds from ready-made industrial parts.

Before starting work, it is better to wet and dry the fabric, decorate and stitch it so that it does not deform during work. The width of the fabric is matched to the width of the opening plus or minus allowances.

It is enough just to take the required footage of fabric for alteration: its length will be equal to the height of the window opening with the addition of 30 cm to hide the fastening, the width is selected according to the width of the window. Fabrics can take twice as much, in the case of a one-sided print - two window widths plus a few centimeters for allowances.


The first option - with a bar shaft from a bar
A very easy-to-manufacture method, we need: fabric, a pair of bars (shaft and weighting agent), garters, tape measure screws (hooks and rings), cutting tools. And detailed photos of roller blinds for example can be found on the Internet.

The sequence of actions is as follows. It is better to wash and iron the fabric pre-purchased according to calculations and accurate measurements before starting work. We sew from the seamy side along the width and on both sides of the length of the curtain, this is how we get a bag, which we then turn out.

Gently stitch the raw edge, iron it. We sew pockets by folding three centimeters at the edge at the top, one and a half at the bottom. Planks will then go there.

Kitchen Roller Blinds: Types, Sizes, Prices, Installation (Photo) regarding DIY Roller Blinds - Goosengz
We screw in two rings on the screws from the inside of the curtain. We retreat 6 cm on the front of the product and screw in another screw with a ring mount. We take the prepared garters, one of the elements is equal to the length of the curtain multiplied by three, the second is equal to three and a half lengths.

We tie the fasteners with rings, fasten the long garter to the fastener that was screwed in at the extreme. We carry them along the inside out and pass them through the screw rings again. We withdraw through the side loop, tie. Our blinds are ready!

To hang it, we screw the hooks of the screws into the window frame opposite the hooks already on the curtain. Now the curtain can be hung! And for winding the cord, we use another hook. All the work takes a couple of hours!


The second option is the roller at the bottom of the roller blind
We process the fabric on both sides. We form a pocket for the weighting agent at the bottom of the canvas. If the fabric is not double-sided, then we sew a bag and iron it according to the previous pattern. The weight will serve as the shaft mechanism.

If the fabric is printed on one side, then we sew a bag, turn it inside out and iron it. We hide the bar in the lower edge of the curtain. We spend a couple of millimeters on the upper edge with a hem on the wrong side. Next we work with Velcro / duct tape.

We sew one part of the fastening element to the curtain, the second to the bar near the stream we fasten with a stapler. We wrap the bar with a cloth, attaching a canvas to it. We make strings 25 cm plus a length equal to the height of the window multiplied by two.

We fasten the ties at the upper bar with the same tool, symmetrically relative to the center of the product and in half relative to the total length. Secure the top bar with a screwdriver and self-tapping screws.

The third option is creation with a base in the form of a finished structure
It happens that there is no way to choose curtains according to your desire or the materials you need are not available. Then your imagination comes into play, you can easily change an already finished product to choose the desired pattern or ornament.


For alteration, natural fabrics are often chosen: cotton, rattan, possibly canvas. You need to be careful when attaching the canvas, much depends on how the winding will take place.

Then we take out the weighting agent from the cylinder, remove the original canvas. We add 2-3 cm to the length of the roll and get the value A. To get the value B, we take a value equal to the distance from the fastening to the window sill plus 2-3 cm.Next, we cut out a cut of width A and length B on the canvas. We process the edges on the side - bend one and a half cm with an iron, we spend.

We make a pocket along the lower edge of the curtain, the weight will be hidden there. We also bend one and a half cm, then five cm. We attach the curtain to the mechanism on a layer of glue, you can use double-sided tape.

With an even fixation, the curtain unwinds and unwinds without problems. We place the curtain in the finished mechanism, insert the weighting agent, the curtain is ready!


Perhaps it is really not easy to make only a kind of day-night blinds, since in their functionality two canvases are displaced relative to each other when twisted. The idea of \u200b\u200bsuch curtains makes it possible to carry out insolation through strips of translucent fabric, but from the technical point of view, it is quite difficult to carry out when reworking.

Roller blinds maintenance
Making or choosing roller blinds is just the beginning of their service. Fortunately, there are a lot of examples and photos of roller shutters on the Internet. It is also important to handle and care for them competently. However, it is very easy!


If cleaning is necessary, the installation mechanism is removed, in almost any model. Thus, the structure is disassembled and perfectly cleaned.

If necessary, the fabric can be steamed on the weighting agent to make it easier to remove. Then, according to the recommendations for a certain type of canvas, the fabric is cleaned, washed, ironed and placed back on the window frame. Roller blinds are unpretentious and always pleasing to the eye.

Photo roller blind do it yourself


Thanks to the convenience, style and originality, roller blinds - they are also roller shutters and roller blinds - are gaining popularity every year. Their production today is quite profitable, and the modern market does not lack them, however, you can create a unique interior only by making unique curtains with your own hands.
Types of mechanisms and options for mounts for roller blinds
The main element of any roller shutters is a round bar that collects the curtain into a roll, as well as a decorative chain or cord, the tension of which sets the roller in motion.
This mount is a bit like a blind control system and has worked well.
To keep the fabric in a straightened state, a weighting agent is used, and to maintain a folded position, garters and other decorative elements are used.
Depending on the type of construction, the bar can perform the function of both a roller and a load, if it is placed at the bottom or attached to a frame or cornice.
Despite the same principle of operation of all roller shutters, their designs can be equipped with various elements designed to improve the appearance of the product and ensure more comfortable operation:
- magnetic or guide tapes are a practical addition that excludes the occurrence of distortions and cracks during the operation of curtains;
- a closed box that hides the roller - in addition to the aesthetic function, it also performs a protective one, protecting textiles from dust accumulation and various kinds of damage.
Blinds with a closed box are called cassette
Table: features of lifting mechanisms for roller blinds
| Mechanism type | Roller shutter adjustment principle | pros | Minuses |
| Chain | By pulling a cord, rope or chain thrown over the drum and attached to the bottom of the web. When the chain is pulled, the roller starts to move, straightening or winding the curtain. To hold the canvas in a fixed position, special holders are used - garters, clips, etc. | Despite the simplicity of the mechanism, such a system is considered the most reliable and durable | — |
| Spring | The system is installed at the bottom or top of the web and closes quickly when the spring is extended. Fixation of the material is carried out automatically and does not require additional manipulations with the holders. | Rapid wear of springs and the need for frequent replacement | Can be installed both at the top and at the bottom of the window opening. |
| Electric drive | The canvas is folded due to the operation of an electric motor, which can be started both with the help of a switch button, and remotely. This system is especially relevant for high and large openings, as well as skylights and skylights. | The easiest system to use | The most difficult and costly to work with. |
Situations are not uncommon when roller blinds are understood to be Roman. In the closed state, such curtains are really similar, however, when lifted in roller shutters, the fabric is wound on the shaft, and in Roman curtains it is gathered into horizontal folds.
The simplest mechanism for roller blinds can be made independently, using a round block of wood or a metal bar to create a roller, and supplementing it with a cord and mounting hardware. However, if you want to get a more functional product, it is recommended to purchase a ready-made system and attach the canvas you like to it.
See also master classes on making Roman blinds:.
Suitable materials for the production of roller blinds
The most demanded material in the manufacture of roller blinds are fabrics: linen, polyester, nylon and cotton. No less popular are combined canvases - polyester with the addition of viscose, cotton or satin, fiberglass and polyvinyl chloride with fiberglass.
All of the fabrics listed above are distinguished by a high degree of practicality, ease of maintenance and durability. A large selection of colors and ornaments allows you to choose a canvas that suits any interior. Particular attention, however, should be paid to the degree of transparency - while thin fabrics are preferable for the kitchen, living room and study, thick curtains are more suitable for bedrooms.
It is important to consider that when the canvas is unfolded, its wrong side is visible from the street side. That is why, when choosing a material, it is recommended to give preference to double-sided fabric or to sew two canvases into one.
According to the degree of shading, fabric roller shutters can be divided into several groups:
- translucent and transparent - satin, silk, cotton, which perfectly diffuse the sun's rays, but poorly darken the space - are good for protection from prying eyes on a sunny day;
- blackout - an opaque canvas with a complete blackout effect - ideal for bedrooms, home theaters, ceiling and dormer windows, since the material is able to provide good conditions for relaxation even in bright sunlight;
Often curtains are made from blackout for living rooms, offices, restaurants, hotels, educational institutions
- dimout - textiles with medium dimming effect - retains 70% of the light, therefore, it is a universal solution for the living room, nursery and bedroom;
Such blinds allow diffused light to pass during the day, and provide complete blackout at night.
- zebra (day / night) - a material with alternating transparent and matte stripes - allows you to control the degree of lighting in a room like a blind.
Initially, day / night blinds were developed specifically for plastic windows, but today they are also used for wooden window structures.
It is recommended to make roller blinds for the kitchen from fabric impregnated with a special composition to reduce the absorption of odors, grease and dirt. Anti-static fabrics that reflect heat and repel dust are good for living spaces. This material allows you to create an air gap near the window opening, which traps cold in winter and solar heat in summer.
You can also make roller blinds out of paper. Often, ordinary wallpaper is used, however, a significant drawback of this material is fragility - paper curtains, as a rule, do not differ in durability.
Another unusual material option for roller blinds is wooden planks or thin bamboo slats. They not only do not fade in the sun, but also reliably protect the room from bright rays and are highly durable.
However, in a draft, the moving canvas will create a rather noticeable noise, and its impressive weight requires a particularly reliable fixation of the structure. At the same time, wood cannot boast of the same variety of shades and ornaments as the same textiles.
This style of roller blinds is perfect for an apartment or a private house, decorated in a bungalow style.
How to make your own roller blinds - step by step instructions
It will not be difficult to create an elementary chain structure for roller blinds, even for a beginner, if you follow the instructions.
From fabric
Fabric is the best option for making roller shutters on your own, because no other material has so many advantages.
The main thing in this case is to choose the canvas so that it matches the type of room and the needs of its inhabitants.
The main material required for the manufacture of roller blinds is the fabric itself. In order for the shutters to tightly close the window, you should correctly measure its parameters. The rules for taking measurements are as follows:
- The first step is to determine the area that the curtain will cover - the entire opening, glass or some part of the frame.
- To calculate the length of the fabric cut, add to the desired height of the curtain an allowance of 3-4 cm for processing the cuts and 15 cm for the "pockets" for the weighting agent and the bar.
- To calculate the width of the roller shutter, an allowance of 3-4 centimeters is added to the window width for processing bends.
In addition to fabric, for the manufacture of roller blinds it is necessary to prepare:
- the future roller - an aluminum rod, a piece of cornice or a wooden block with a section of 2.5–3 cm, while the length of the roller should be 1.5–2 cm less than the width of the canvas;
- fastening - a wooden rail with two metal corners or self-tapping screws for a wooden frame or double-sided tape for a PVC window;
- a sewing machine and thread of a suitable color;
- fleece or Velcro tape along the length of the strip;
- metal / plastic rings and a decorative cloth retainer - a satin ribbon or cord 3 times the length of the curtain.
Step-by-step manufacturing workshop
The procedure should be as follows:

In order for the canvas to be assembled into a roll, the rings must be suspended at a distance of 15–20 cm from the sides and 5–7 cm from the bar. This can be done using two narrow fabric strips, sewing them to the top of the product.
You may also be interested in master classes for making lambrequins:.
Video: how to sew a roller blind easily and cheaply
How to install
The way the holder is installed on the window depends on the type of frame. If we are talking about a wooden window, then it is necessary to fasten the structure to screws or corners. For plastic windows, it is recommended to use special plastic fasteners or double-sided adhesive tape.
In order to place the product correctly, it is necessary to correctly make the markup: attach the bar to the future attachment point and check its location using the building level.
How to care
As a rule, the fabrics of fabric roller blinds are processed with a complex polymer impregnation, which allows the product not to accumulate static electricity and is easy to clean when folding. It should be remembered that special polymer preparations can be destroyed under the influence of hot water and change properties when in contact with chemical detergents, therefore it is recommended to wash such fabrics only under dry cleaning conditions. This procedure should be carried out, as a rule, twice a year.
In between washes, the curtains should be vacuum cleaned at least once every two weeks.
If no preparations were used to impregnate textiles, then you can wash the roller blind as usual. The main thing is not to forget to remove the weighting agent.
From wallpaper
As you know, the price of good roller blinds in a store starts at 2,000 rubles, but the cost of making a paper version on your own is unlikely to exceed 300 rubles.
In fairness, it should be noted that the service life of paper roller shutters will be lower, but even their annual replacement will not cause serious financial damage.
Made from wallpaper with interesting texture and soft colors, these curtains look stylish
Required materials and tools
Before you start making paper curtains, you need to prepare:
- wallpaper - new or remnants of existing ones;
- meter ruler and pencil for measuring;
- round wooden beam, cornice or aluminum rod;
- roller shutter mechanism;
- metal plumb line or rail for weighting;
- stationery knife or scissors;
- double sided tape.
To correctly determine the required amount of wallpaper, you need to correctly measure the window: the width of the future curtain will be the same as the width of the window itself, and the length requires taking into account additional centimeters to fix it on the roller.
Step by step master class
The procedure for making a roller blind from wallpaper is extremely simple and looks like this:
- Take measurements of the window;
- Attach the control mechanism to the future roller;
- Using double-sided tape, fix the upper part of the paper web on the roller;
- Insert the lower part of the future curtain into the groove of the metal plumb line - or fix the rail, creating a kind of "pocket" from the lower edge of the wallpaper.
Video: we make roller blinds with our own hands from the remnants of wallpaper
Video: DIY paper roller shutters
Installation and maintenance
Installation of the structure on a wooden frame is carried out using corners or self-tapping screws. For PFH windows, use special plastic brackets that come with the roller blind mechanism.
Of course, paper curtains cannot be washed, so the only available way to care for them is to remove dust with a dry cloth, soft brush or vacuum cleaner.
In case of slight damage to the product, you can try to repair the area with glue, but in most cases, the occurrence of such problems requires a complete replacement of the blade.
Having considered several striking examples of roller blinds, you can find the option you like and use when creating your own masterpiece.
See also the material with step-by-step instructions for making curtain hooks:.
Photo Gallery: Ideas for Inspiration
The pattern of such roller shutters adorns the plain interior of the room Bright sunny colors of such a fabric roller blind enliven the kitchen interior and go well with the countertop Multi-colored roller blinds of the same texture, repeating the colors of the cushions, look bright and fun Paper roller blinds "under cardboard" go well with white curtains and a sofa , creating a feeling of discreet coziness The light green interior of the room is well complemented by beige day / night roller blinds Roller blinds made of blackout fabric are very good for people who like to sleep during the day, especially sunny  A fabric roller blind in spring green color adds positive to the nursery Graceful drawing on a translucent roller shutter creates a beautiful play of light and shadow in the room Partially unfolding the curtain made of dimout fabric is convenient to adjust the lighting in the kitchen for convenience of work The color and pattern of the roller shutter should go well with the interior items of the room
So, roller blinds are a great way not only to darken, but also to decorate the room. And creating a product with your own hands allows you to make a completely unique design without incurring serious financial costs.
Pursuing the goal of freshening up the interior, sewing new curtains will simultaneously demonstrate the hostess's creativity. Replacing classic curtains with an up-to-date roll-up model will be a successful experiment. You should not be afraid of a complex lifting mechanism.
The proposed master class will help you create original roller blinds with your own hands. There are options for attaching textiles to the window without drilling. Further information will reveal the secrets of the craft.
Feature of roller blinds
Laconism and practicality are the hallmarks of roller blinds. This model is especially appreciated in the interior of the kitchen. Roll-type curtains in small rooms are designed to save space and not visually clutter up the space. When assembled, finished products are wound on a shaft. There are three options for the location of the structure:

The advantages of interior decoration with roller blinds are as follows:

The cost of finished models, especially with a cassette design, is quite high. It is much cheaper to arrange your own roller blinds. The principle of their work is as follows:
- The role of the cornice is played by the shaft, which is fixed above the window opening or directly on the frame. There is a canvas on it.
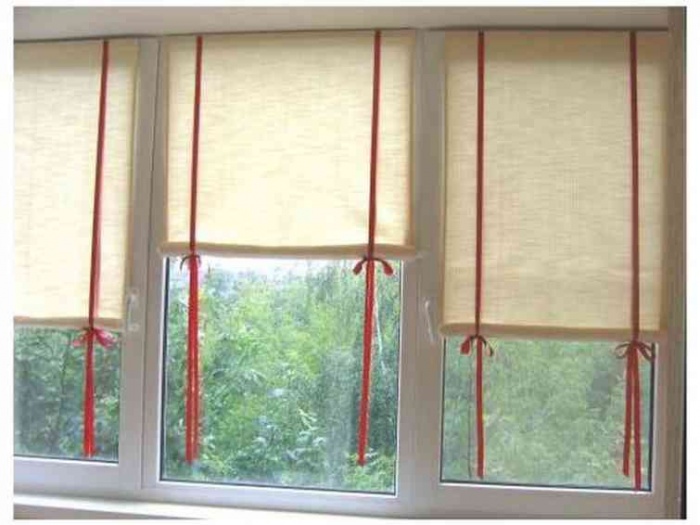
- The fabric itself is held by ribbons or cords that are located at the top of the curtains. They allow you to adjust the degree of opening or closing of the roller blind.
- There are sewing options when several transverse "rods" limit the height of the product opening.

The mechanism when the curtain is installed without drilling is presented in the following video:
Preparatory stage: measurements, choice of fabric, related materials
Before proceeding with measurements, you should decide on the place of fixation of the curtains and the model itself, whether it will cover the entire window opening or only glass. The procedure consists of simple steps:
- All window sizes are recorded first.
- The length of the product is determined by the height of the window with the addition of 15 cm for the pockets and 2 cm for sewing.
- The width is equal to the dimensions of the window, which are increased by 2 cm.
An approximate measurement scheme is shown in the photo below:

The choice of fabric is based on the desired degree of shading in the room.

Important! When installed on window sashes, roller blinds are clearly visible from the street. Therefore, the material is chosen with a double-sided pattern, or a cut is purchased, the length of which is twice the required size.
If your roller blinds are intended for the kitchen, it is a good idea to find an anti-static fabric that can repel dust. It is less prone to dirt, making it easier to care for textiles.

In addition to fabric, for original curtains you will need:
- Two slats, the length of which corresponds to the size of the window.
- Furniture stapler.
- Hook screws - 3 pieces.
- Ring screws - 5 pieces.
- Strong tape or cord.

Self-production
There are several options for self-manufacturing curtains, we will consider the most popular ones.
Method 1
To create roller blinds on hooks, you need:

To place the finished curtain on the plastic window without drilling, screws-hooks are screwed into the frame, which are placed in accordance with the place of the upper rings on the strip of the roller curtain. You will need to fix another hook on the frame, which will serve for winding the rope when the roller blind is in a folded state.
To create comfortable conditions for the room and to prevent the ingress of sunlight inside, it is recommended to do roller blinds with your own hands. Step-by-step instructions will help you choose the right material and components for this mechanism, as well as carry out the necessary calculations. This option is much more profitable and more economical than purchasing products in stores. In addition, creating an original and unique design with your own hands is always a pleasure.
It is quite possible to make such curtains yourself.
Importance of soaking
The material is impregnated with special antibacterial agents. The degree of transparency is different: transparent, translucent, darkening. The choice of colors and patterns is as diverse as possible.
Attention! Pre-processed polyester is often used.
Impregnations:
- Antistatic impregnation prevents dust from sticking to the web.
- Spraying of various shades adds modernity to the look - metallic color, mother-of-pearl pigments add a soft shine.
- With the help of a Teflon coating, the canvas has special water and dirt repellent properties. Suitable for kitchens and balconies.
- Fire protection is suitable for any building.
Forming a protective layer of the canvas, impregnations are considered absolutely safe and harmless.
Calculations
Before you start sewing a product, you should calculate the amount of material. When installing fasteners in a window opening, measure it directly. If in a wooden frame, measure the parameters of the glass.

Marking the location of future curtains
Dimensions of prepared sewing cuts:
- web width - glass width (poem), for allowances + 20-40 mm;
- length - opening height + 50-150 mm.
Cloths with such parameters are needed in two copies - for the front side and the wrong side. Their drawing may differ. Or it can be done in the same way. You need ribbons and decorative cords to create garters. The length of the strips of fabric is equal to 2 lengths of the fabric +250 mm additionally.
Preparation of materials
For sewing and fastening are used:
- timber for fastening, its parameters are 30x40 mm, can be replaced with a metal tube; fastening parameters correspond to the width of the curtains;
- it is allowed to use a ready-made purchased cassette system as a fastener element;
- a metal rod or a wooden bar is used as weighting agents;
- paper clips and a stapler for furniture;
- screwdriver with screws for mounting installation work;
- sewing items.
The fabric must be carefully selected. Due to the use of impregnations, the fabric becomes elastic and easy to clean.

Fastening the canvas
Light-transmitting material:
- light scattering - partially passes the sun's rays into the room;
- light reflection - impervious to rays, due to which the room is kept cool.
Whether it is plain material, or with photo prints, or with expressive ornaments, you should adhere to the basic rules when choosing:
- harmony of colors of textiles with pieces of furniture;
- in dining rooms and kitchens, it is not recommended to use dark monochromatic solutions, floral patterns and abstractions are suitable;
- the image of the canvas should not be executed exactly as on the wallpaper;
Note!It is advised to use such color combinations: chocolate shade with gold, beige and cream, blue with silver, yellow and white, red - gold and beige.
- the translucency of the fabric visually expands the room;
- the transverse stripes of the wall are made wider;
- vertical arrangement of the picture increases the height of the ceilings;
- the exit of windows to the south side is made cooler, for this they use blue, green and purple cold colors, northern rooms will be warmer due to orange, red and yellow tones;
- blackout darkens the room thanks to a dense texture that does not let light through.

One way to finalize
Performance
Work is performed in the following order:
- The fabric is laid out and sewn from the wrong side. Calculations are taken into account. On both sides in length, on one side in width. The resulting pouch is turned inside out onto the face.
In this case, after sewing, a pocket is made, the canvas is ironed and a weighting agent is inserted.
- If a pocket is made as a weighting agent, it is necessary to sew up the gap. Alternatively, leave it open when inserting it into the inside of the bag.
After laying the weighting material inside the bag, a curtain is sewn over it over it. The offset is 5 mm. This will prevent it from curling up. After the gap is sutured.
- The ironed curtain is wrapped around the bar and connected together with a stapler. If a pipe is used for fastening, it is wrapped and sewn. You can also sew the fabric by hand.
- Pre-prepared dressings are thrown over the upper mount and fixed with a stapler or by tacking with thread with neat stitches.
- The timber is attached to the opening or to the window frame at the bottom. The upper part is decorated with curly elements.
Attention! To be able to change the curtain, hooks or zippers are used instead of a stapler.

Using rings in roller blinds
For plastic windows, canvases are made and attached directly to the windows themselves. In this case, adhesive tape is used. A wooden lath is used as a weighting agent.
Thanks to self-sewn curtains in several variations, you can change the design of the building, depending on the mood and the seasons.
To create your own roller blinds, step by step instructions and a video are provided.
Fixing mechanism
To fix the product, you can create a so-called remote curtain mechanism. Fabric loops or plastic rings are sewn to the upper part. Then you attach the cord to the top of the window. Better to apply decorative. The cord goes down through the bottom and passes through the rings.
The left cord is passed through the ring on the right side and vice versa. The ends that remain free are used to open and close the canvas. If necessary, fixation is carried out in the desired state.
The length of the cord used is determined when the web is fully rolled. The excess is cut off and the ends are tied together.

Such a system does not require manual intervention when folding the curtains - just use the cord
With the help of screws, the mechanism is made in a similar way. The ring is screwed into the top of the opening or hooks. In this way, the position is changed without manually winding the curtain into a roll. This happens automatically. The cord or tape is placed more than 100 mm from the outer edges of the web to prevent it from popping out.
Thus, a do-it-yourself roller blind is created. Step-by-step instructions with photos are attached to explain all the processes. The finished product is intended not only for closing window openings, but also for glass doors. Saves the room from sunlight and decorates the interior. Moreover, designers do not advise using blinds for home furnishings, which are considered an office option. Roller blinds are much more suitable for creating a cozy and homely atmosphere that is convenient to use.


