Surfaced roofs - a universal solution for many years. Surfacing roof Surfacing roof waterproofing installation technology examples
The technology for laying a built-up roof is quite simple - you can mount a reliable coating with your own hands. It is required to properly prepare the foundation, use high-quality equipment and follow the work procedure.
Roofing requirements
Roofing made using built-up roll materials allows to ensure:
- protection of building structures and premises from the effects of wind and precipitation;
- heat preservation in the cold season;
- protection of rooms from overheating on hot days.
Roofing should have qualities such as:
- tightness of the finish;
- good thermal insulation;
- strength and durability.
To create a reliable soft roof, materials are used that differ in the type of base, the binder and the type of protective coating. Choosing a built-up roofing membrane, it is recommended to give preference to a polymer-bitumen roll material on a durable basis of polymer or fiberglass. It should be borne in mind that there are no state standards for the manufacture of these products, manufacturers are guided by TU of their own design.

A membrane with a coarse-grained or fine-grained mineral protective coating is used for installation of the finish coating. Laying of a built-up roof requires the formation of a roofing carpet of rolled material with a polymer external protective film to prevent stratification of the flooring during operation.
Types of substrates for laying roof
Installation of the built-up roof is carried out on a flat surface. As the basis can serve:
- bearing reinforced concrete slabs (seams are sealed with cement-sand mortar M 150) without leveling screed;
- mineral wool heat-insulating plates without leveling screed;
- monolithic thermal insulation made of light concrete, materials based on bitumen or cement binder with a filler (vermiculite, perlite), reinforced with road mesh;
- leveling monolithic screed made using asphalt concrete, cement-sand mortar M 150;
- prefabricated dry screed of cement-bonded particle boards, flat sheets of asbestos cement, glass magnesium or other materials with a sheet thickness of 8 mm and laying in two layers.
The technology of laying of a built-up roof requires preliminary preparation of surfaces of vertical structures made of piece materials - parapets, ventilation shafts, chimneys, etc.

The walls of the parapet and the construction of brick, foam blocks and other piece materials must be plastered to a height at which the edge of the roofing will be wound - from 250 mm or more. As a plaster mixture, cement-sand mortar M 150 is used.
Base Surface Requirements
From the surface on which to install the built-up roof, you need to eliminate:
- potholes and sinks;
- influx of concrete;
- bumps with sharp edges;
- cracks;
- protruding fragments of reinforcement;
- spots of oil and cement milk;
- dust.
The sharp corners of the structures, the ends of the reinforcement, concrete flows are cut down and cleaned. Oil stains should be burned out. The film of cement milk is removed by wet or dry blast-abrasive cleaning. Dust is removed with:
- brushes;
- industrial vacuum cleaner;
- blowing by compressor;
- flushing with water.
Large potholes, cracks and sinks are repaired using cement-sand mortar M 150. Small cracks and potholes can be poured with heated bitumen mastic.
Processing of the base for laying the surfaced roof with mechanical brushes, grinding, milling cutters is unacceptable, as this leads to surface damage, the formation of furrows.
Surfacing requires a smooth and even base. Check the evenness with a two-meter rail. It is permissible to have smoothly growing irregularities with a height of not more than 5 mm along the slope and 10 mm across. The number of such irregularities should not exceed two per 4 m 2 of the total base area.
When arranging the screed under the surfaced coating, it is necessary to provide heat-shrinkable joints with a width of 5 mm, which should not be located above the seams of the bearing concrete slabs and the seams of monolithic thermal insulation.
Preparation for installation
Laying the roofing carpet is done on a dry base. For determination of humidity, a device is usually used - a surface moisture meter. If you build a built-up roof with your own hands, you can conduct a simple test: a square of a polyethylene film (1 × 1 m) is laid on the surface of the base. If condensation does not appear within 4-24 hours, you can proceed with the installation of the coating.
The following methods will help reduce the moisture content of the substrate.:
- the wet surface is wiped with a rag dipped in acetone and dried with a stream of hot air from a hair dryer;
- blowing the surface with heat guns or compressed air from the compressor;
- a heating cable is laid in the expansion joints.
In places where the base adjoins the vertical structures, it is necessary to create fillets - sides with a tilt angle of 45 ° and a height of 100 mm. For this, asphalt concrete, cement-sand mortar or a rigid mineral wool slab is used.

Immediately before laying the deposited material, the base is cleaned of all types of contaminants, since they reduce adhesion. The surface is thoroughly primed. For this, a ready-made bitumen primer is used, or a primer is made of bitumen (BN 70/30, BN 90/10, BNK 90/30) with the addition of a rapidly evaporating solvent (gasoline, nefras) in a ratio of 1: 3 or 1: 4 by weight. The primer is applied using a roller, brush or brush.
Equipment and tools
Surfacing equipment includes:
- a roofing gas burner connected to a gas cylinder through a reducer;
- putty knife;
- roofing knife;
- stock roller;
- brushes for cleaning the base, applying a primer;
- overalls (work overalls, shoes with thick soles, protective gloves).
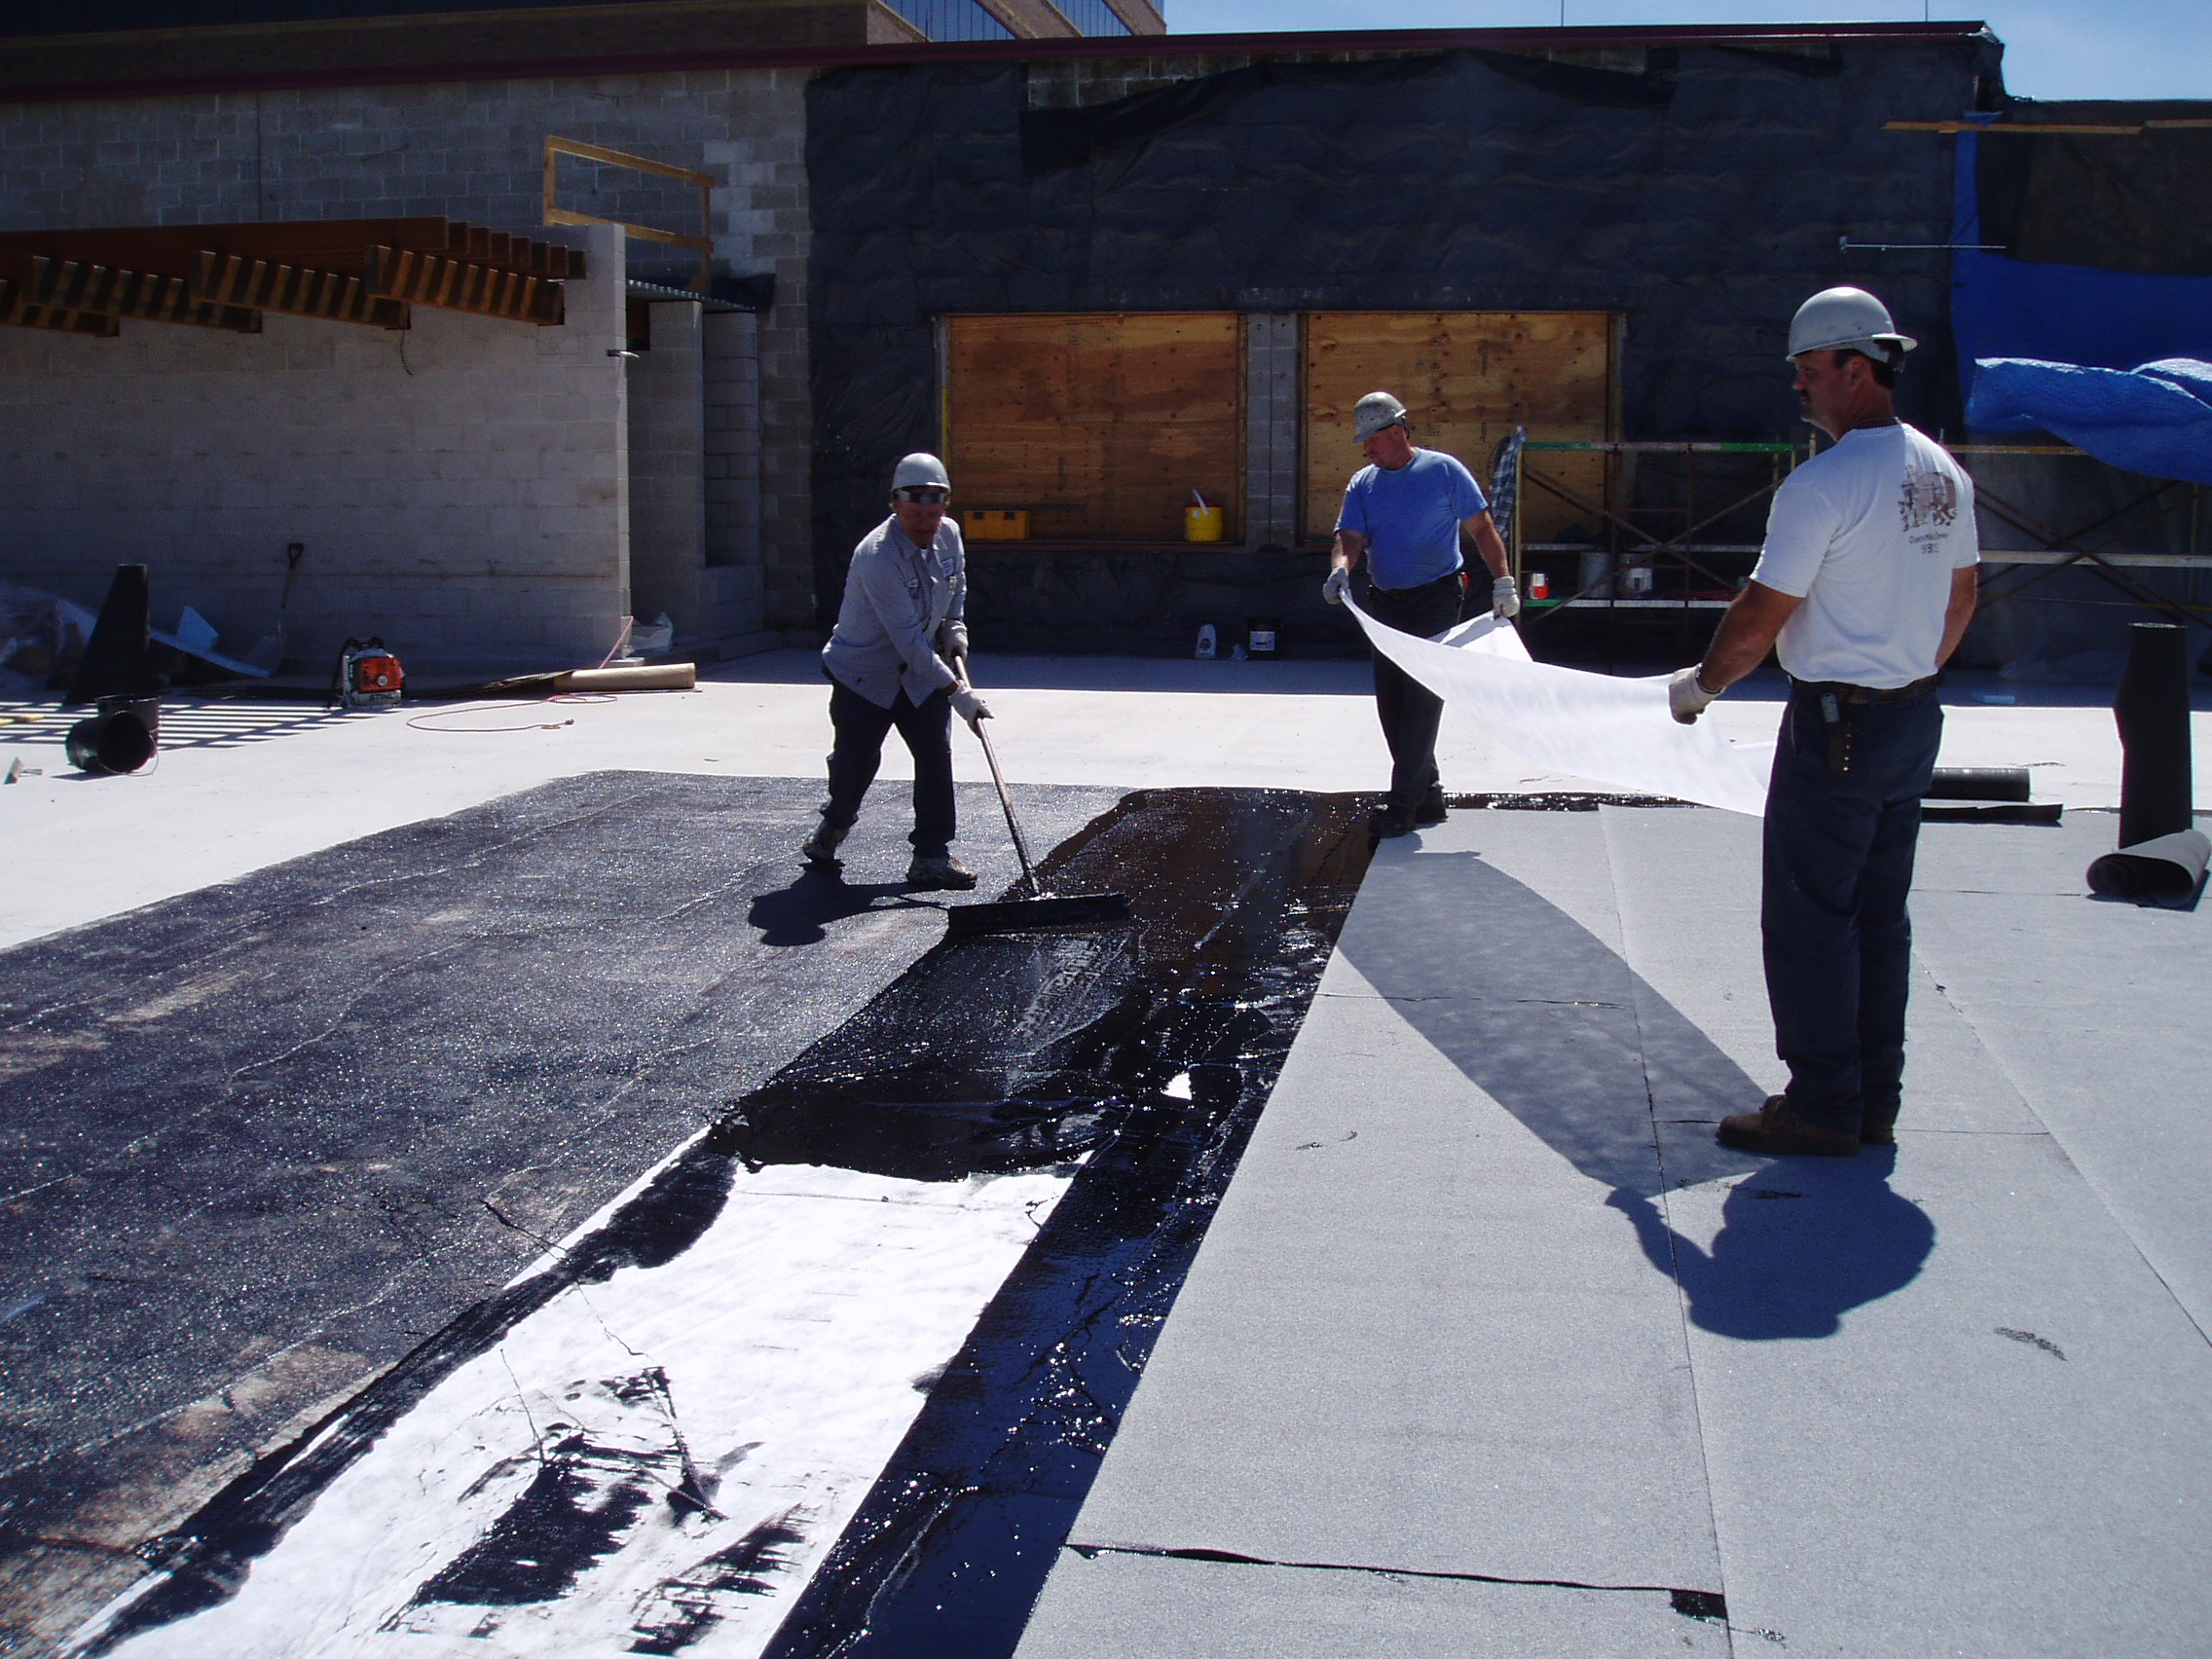
The laying of the coating can begin after the base, coated with a primer, has completely dried - the primer should not stick. Installation begins from the bottom of the roof. At the first stage, the roll must be completely rolled out to make sure that it is correctly positioned. Then, with the help of a burner, the initial edge of the roll is fixed, and the material rolls back.
The built-up roof is reliably attached to the base due to the melting of the lower bitumen layer of the rolled material and heating of the primer. The weld roof burner should be positioned so that the flame heats the bottom of the roll and the base of the roof. Such heating allows you to create a kind of influx of protruding bitumen - it contributes to the adhesion of the membrane to the base as the roll rolls.

For uniform heating of the material, the burner should move along the path in the form of the letter “G” - it is necessary to additionally warm up that part of the roll, which ensures an overlap of the coating.
After mounting the first tape, check the quality of the seam. When the material is peeled off with a spatula, the edge is raised, warmed up by the burner and rolled by a roller. It is not recommended to walk on a freshly laid topcoat so as not to leave dark marks on mineral sprinkles.
When rolling the roll, the heated part must immediately be rolled with a soft-coated roller, paying particular attention to the edges of the tape. The roller should move "herringbone" - from the axis to the edges of the tape diagonally. The tightness of the roofing carpet is ensured by high-quality overlays. Adjacent panels are laid with a lateral overlap of 8 cm, and end overlap of 15 cm. Joints are made taking into account the direction of the roof slope, so that moisture does not leak under them.

It is recommended to close the temperature-shrinkable joints of the screed with rolled material with coarse-grained sprinkling, and the tapes are laid down topping. Around the water intake funnels, it is necessary to lay an additional layer of waterproofing - squares measuring 70 × 70 cm.
To equip the junction with the parapet, the lower layer of the carpet is wound to a height of 250 mm and is fixed mechanically. Then, the finish layer of the carpet (5 cm) is started on the parapet. On top of the finished structure, using tools for a built-in roof, a tape of a coating with a protective coating is mounted, which ensures a tight seal. First of all, its upper part is glued on a vertical plane, then the lower part - on the horizontal.
If the laying of the built-up roof is performed from several layers of rolled material, the tapes are laid with an offset, while the joints should not be one above the other. Cross-laying of tapes is not allowed.
Surfaced roof can be mounted on top of an old soft roofing. Before laying, the defects of the roofing carpet should be eliminated - remove bubbles, melt irregularities, dry the surface.
The built-up roof is attached to the base by melting its lower bitumen layer using a burner or blowtorch or using a cold method using a solvent. This group of roofing materials is popular due to the speed and simple installation technology and reasonable price. How is the installation of a built-up roof?
Types of surfaced materials
The variety of surfaced roll materials is not limited to one roofing material, which is a roofing cardboard with bitumen impregnation and protective sprinkling. More modern versions of this material are impregnated with bitumen with polymer additives or polymer, and can be used as a base:
- fiberglass (example - Glassisol),
- fiberglass (example - Linocrom, Ecoflex),
- asbestos fabric,
- cardboard (Bikroelast),
- polymeric materials (example - Uniflex EPP).
Sprinkling may be coarse-grained (Uniflex TKP, EKP, KhKP, Stekloizol) and fine-grained (Uniflex EPP, KhPP, TPP) from sand, slate, asbogal (Stekloizol, Bikrost), also there can be a protective film (Ecoflex P, Stekloizol P) or foil coating (Uniflex K).

Foundation preparation
Before starting work on laying the roofing material, it is necessary to prepare the base. It should be smooth and even, it should not be:
- cracks
- potholes
- sharp edges
- influx of concrete,
- protruding reinforcement,
- dust
- spots of oil, cement milk.
Large cracks and potholes are sealed with cement mortar, small ones are filled with bitumen mastic. Oil stains are burned out by a burner. Sticking fragments of reinforcement are cut down and cleaned. Dust is removed using brushes, an industrial vacuum cleaner, a compressor or washed off with water.
The evenness of the base is checked with a 2 m long rail. Small (up to 5-10 mm) smooth irregularities are allowed, which for every 4 square meters should not be more than two.
Before installation, check the humidity of the roof. To do this, use a surface moisture meter or a simple plastic film, which is placed on the roof and check whether condensation has formed under it. If condensation does not appear in 4-24 hours, you can proceed with installation. If the roof is too wet, it is dried with heat guns, you can also treat the surface with acetone and dry it with a building hair dryer, put a heating cable in the expansion joints.

Adjacencies to vertical surfaces are prepared by making boards at an angle of 45 degrees and a height of 10 cm. Asphalt concrete, cement mortar, and hard mineral wool slabs are used for the sides.
Before laying roofing materials, the surface is cleaned of dirt and dust, and then primed with a bitumen primer.

Flat roof mounting
According to SNiPs, deposited materials are laid in several layers. Subject to technology, this allows you to create a reliable roof with excellent waterproofing properties. For the first layer, roofing material, Stekloizol K, Uniflex EPV are used.
They begin to lay the roofing material when the primer hardens. At the same time, installation starts from the bottom of the roof. First, the roll is completely rolled out to make sure that it is positioned correctly, then the edge is fixed with a burner and rolled up the roll.
When laying the roof, the burner is positioned so that it heats the roll and the primer coated base. Also in the fusion process, that part of the roll that creates an overlap on the previous row is also heated.
After laying the first row, check the quality of gluing. If the material lags behind, it is lifted with a spatula, heated with a burner and glued again, rolling with a roller. Roller roll the entire tape during installation, while you need to move the "herringbone" from the middle to the edges.

The overlap of one row on the other along the longitudinal side is made equal to 8 cm, at the ends of the roll - 15 cm. It is overlaps that are responsible for the tightness of the roofing.
If the deposited material is laid in several layers, the seams should not match. Layers are laid in parallel. Over the heat-shrink seams, the screeds are laid with sprinkled material, placing it down to the top. If there are water intake funnels on the roof, an additional layer in the form of 0.7 * 0.7 m squares is laid around them.
Particular attention is paid to the device of adjacencies to vertical structures, for example, parapets. To do this, the bottom layer of the roofing carpet (from a horizontal surface) is first placed on the parapet at 25 cm and attached mechanically (not by fusion). After that, a 5 cm finish layer is placed on the parapet. Next, a tape of material with a protective coating is deposited on the parapet itself and on a horizontal surface next to it.
Cold way
With this method, instead of a burner, a solvent is used to melt the lower bitumen layer of the material. Apply it using a spray, after which it is necessary to wait 10-15 minutes. Then the rolled material is rolled in a roller, gluing to the base.
It is necessary to roll each row at least three times in a row, then there will be no bubbles and irregularities. With this method, difficult places are also protected with an additional layer of roofing material.
Pitched Roof Mounting
Surfaced roofs can be made on pitched roofs with an inclination angle of not more than 50 degrees. First, make the base of waterproof plywood or OSB boards that are coated with a primer. Then roll material is deposited onto the base, and it is better to place the strips vertically. When installing a pitched roof, it is allowed to lay the layers perpendicular to each other.
Surfacing roof repair
Repair of a roof made of surfaced materials can be cosmetic or overhaul.
Cosmetic repairs are carried out if the damage occupies no more than 40% of the roof area. In such cases, the coating is cleaned of impurities and a patch of the same material is deposited on top of the required size.
Major repairs are carried out when the damage occupies more than half of the roof area. Depending on the nature of the damage, repairs may include:
- removal of roofing material partially or completely,
- repeated primer application
- foundation repair, creation of a new concrete screed,
- laying steam and heat insulation,
- installation of one layer of rolled material over the entire roof area and two layers - near the parapets,
- fire retardant coating.

Estimation for the surfacing roof device
The estimate for the installation or repair of the built-up roof includes the cost of all materials, the cost of preparing the foundation, etc., if necessary, and dismantling the old roof, installing a new roof, connecting devices, vapor barrier, waterproofing, and insulation. The more detailed the estimate, the better. An example of an estimate is given below.
Surfaced materials allow you to quickly create a roofing carpet, the installation of such materials is not particularly difficult and can be done with your own hands.
It is important to observe the technology and safety precautions when working with the burner.
- Foundation preparation
- Primer application (primer):
The surface is cleaned of dirt, dust, cement milk and other particles that impede adhesion of the deposited material to the base, all sharp and protruding elements are removed - sharp corners and edges.
- increases adhesion of the surfaced waterproofing with the base;
- binds dust, small particles, fills pores and small cracks,
making the base more durable; - moisturizes the surface, which increases the speed of waterproofing.
The drying time of the primer is from several minutes to 24 hours, depending on the type of primer, temperature and humidity of the surrounding air.
A primed surface is considered dried if it is not sticky.
The gluing of the roll material is carried out in the process of melting the bottom surface of the rolled roll with a gas burner flame while heating the surface of the base, gradually rolling the roll and pressing it to the base.
Waterproofing bases
The basis for the roof can be smooth surfaces:
- reinforced concrete bearing plates, the seams between which are sealed with a cement-sand mortar of a grade of at least 150;
- mineral wool heat-insulating boards with a compressive strength at 10% deformation of at least 0.06 MPa;
- monolithic thermal insulation with a compressive strength of at least 0.15 MPa from lightweight concrete, as well as materials based on cement or bitumen binder with an effective filler - perlite, vermiculite, etc .;
- leveling monolithic screeds from cement-sand mortar and asphalt concrete with a compressive strength of at least 15 (M150) and 0.8 MPa, respectively, as well as prefabricated dry screeds from flat asbestos-cement sheets, cement-bonded particleboards, glass-magnesium sheets and others with a thickness of at least 8 mm laid in two layers.
Screeds made of sand asphalt are used in the autumn-winter period for monolithic and slab insulation. It is not allowed to use screeds made of asphalt concrete on compressible (mineral wool, etc.) and filling (expanded clay gravel, perlite sand, etc.) insulation materials, as well as when sticking roll materials on cold roofing mastics.
The installation of cement-sand mortar screeds in roofing structures with a supporting base of profiled sheet is not allowed.
For filling insulation (expanded clay gravel, perlite sand, etc.), cement-sand screeds with a thickness of 50 mm are arranged with mandatory reinforcement with a road mesh.
When forming a prefabricated screed, the sheets must be laid with the seams apart so that the sheets of the upper layer overlap the seams of the lower layer by at least 500 mm. The sheets are fastened to each other by riveting around the perimeter and in the center of the sheet. The number of fasteners is selected based on at least 14 pcs. on a sheet measuring 3000 x 1500 mm. Self-tapping is allowed. In this case, it is necessary to ensure that the self-tapping screw does not destroy the prefabricated screed sheet. To do this, pre-drill a hole for a self-tapping screw. The connection of sheets of prefabricated screed is necessary to create a "monolithic" base. For roof slopes of more than 10%, it is necessary to mechanically fix the assembly screed to the supporting base. With smaller deviations, the need for fixation to the base is verified by calculation of the wind load.
The vertical surfaces of structures protruding above the roof and made of piece materials (brick, foam concrete blocks, etc.) must be plastered with cement-sand mortar M150 to the height of the edge of the roof carpet, but not less than 350 mm. Similarly, parapet walls made of piece materials should be plastered.
The basis for waterproofing can serve:
- flat surface of the concrete base;
- leveling layer made on a concrete base with insufficient evenness.
Slope-forming layer
To ensure maximum durability of the roofing under the base of the waterproofing, it is recommended to provide a slope.
As a slope-forming layer, fill insulators (expanded clay gravel, perlite and others), lightweight concrete mixes (foam concrete, expanded polystyrene concrete, expanded clay concrete, perlite concrete), cement-sand compositions or wedge-shaped insulation boards can be used. If necessary, it is possible to use sand filling in cases where the fraction of the slope-forming layer exceeds the required minimum thickness and the formation of a “step” is possible.
It is forbidden to use bulk materials, as well as concrete and cement-sand compositions as slope-forming layers on bearing bases of profiled steel flooring.
Foundation preparation
- The surface of the base must not have protruding reinforcement, sinks and potholes, concrete flows, cracks, rough edges, oil stains and dust.
- The base under the surfaced waterproofing must be even and smooth
- In newly arranged screeds, heat-shrink seams with a width of about
5 mm, separating a cement-sand mortar screed into sections of not more than 6x6 m, asphalt concrete screed into 4x4 m cards. - The waterproofing surface must be dry.
- In places adjacent to vertical roof structures (walls, parapets, ventilation shafts, etc.), it is necessary to make inclined sides (fillets) at an angle of 45 ° and a height of 100 mm from cement-sand mortar, asphalt concrete or hard mineral wool slabs. For the bases of prefabricated screeds or hard mineral wool slabs, the sides must be made of hard mineral wool insulation or use ready-made stone wool elements.
- Before the direct installation of the surfaced waterproofing, all contaminants and materials that prevent adhesion (dirt, dust, a film of cement milk, etc.) are removed.
- The prepared surface must be primed.
The influx of concrete, the ends of the reinforcement, sharp corners and chamfers cut and clean; oil stains burn out.
Shells, cracks, irregularities are covered with cement-sand mortar M150.
Small potholes and cracks can be fused with hot bituminous mastic.
The evenness of the base is checked with a 2-meter rail. It is allowed that, on the basis for laying the deposited material, smoothly growing irregularities of not more than 10 mm across the slope and not more than 5 mm along the slope. In this case, the number of irregularities should be no more than two per 4 m2 of the base area. For bases made of piece materials, irregularities across and along the slope should not exceed 10 mm.
Shrink joints must coincide with the end joints of the bearing plates and be located above the joints in monolithic thermal insulation.
The permissible moisture content of concrete or cement-sand screed (including depth humidity) should not exceed 4% by weight, and screed made of asphalt concrete - 2.5%.
The determination of the moisture content of the base is most often carried out using instruments - surface moisture meters.
The simplest moisture test involves laying a plastic film of 1x1 m in size on a prepared concrete surface. If condensate does not appear under it in 4-24 hours, laying of deposited materials is possible.
To reduce the moisture of the waterproofing surface, various methods are used: 1) wipe the wet surface with a rag soaked in acetone, and then dry it with hot air from an industrial hair dryer; 2) arrange greenhouses and install heat guns in them; 3) blow off the surface with compressed air from a compressor with an oil trap; 4) in the expansion joints, heating electric cords are installed.
It is recommended to remove the film of cement milk with dry or wet blast-abrasive cleaning. Dust removal, depending on the situation, is carried out dry or wet. To do this, use sweeping with brushes, blowing air from the compressor, industrial vacuum cleaners, flushing with water. Surface treatment with cutters forming grooves in concrete, as well as mechanical brushes and grinding is not allowed.
For surfaces made of concrete slabs, cement-sand screeds, a primer is used (ready-made bitumen primer). The primer can also be prepared from bitumen (grades BN 70/30, BN 90/10, BNK 90/30) and rapidly evaporating
solvent (gasoline, nefras), diluted in a ratio of 1: 3-1: 4, by weight or bituminous mastics with heat resistance above 80 ° C, diluted to the desired consistency.
The bitumen primer is applied with brushes, brushes or rollers.
If the material is deposited on the base of mineral wool heat-insulating plates, the surface of the upper layer of insulation must be primed with hot bitumen mastic with heat resistance not lower than 85 ° C or bitumen BN 70/30, BN 90/10, BNK 90/30 with a flow rate of 1.5- 2.0 kg / m 2.
Surfacing device
- Robots for the device of the built-up roof are performed in a certain technological sequence:
- Pasting funnels of internal drains
- Pasting valleys and cornice areas
- Laying the roof carpet of the main plane of the roof
- Arrangement of junctions.
- The stick-up of the deposited roll material should be made in the following sequence:
- Roll the material onto a prepared base
- Set the necessary direction and provide overlap between adjacent panels
- Roll a roll to the middle (from two end sides)
- In the process of heating the bottom surface of the roll with simultaneous heating of the adjacent zone of the base, sequential re-rolling of the sheet is carried out, and its gluing to the underlying layer.
- The rolling and sticker of the panels of the deposited roll material must be done after reaching the required parameters of the melting of the coating layer from the polymer low-melting film, namely: in the process of melting, rolling and pressing, it is necessary to ensure the required heating of the coating layer and heating of the base over the entire width of the gluing and synchronous movement rolling material with a melting device; the melting temperature of the coating layer should be between 140 - 160 ° C. A sign of this heating is the transition of the coating layer to a plastic, but not liquid state and the absence of blackening and bubbles on the outer surface of the guided web.
- The polyethylene film on the lower surface of the material should be completely melted together with the bitumen mass.
- One of the signs of proper heating of the material is the outflow of bitumen mass from under the side edge of the material with a solid roller, about 5-10 mm, which also guarantees a tight joint.
- Surfaced rolls should not have wrinkles, wrinkles and waves. To prevent these defects, if necessary, the panels are rolled with soft brushes or rollers, the movements of which should be from the axis of the roll diagonally to its edges while the substrate is softened.
- Rolls are rolled on the roof slope along or perpendicular to the slope (with slopes of more than 15% - only along the slope).
- Cross sticker of rolls of rolls of the first and second layers of the roof is not allowed.
- Laying of rolled material must begin with lower sections of the roof (adjoining drainage funnels along the valley), across the slopes.
- Shrink joints in screeds must be covered with strips of web material 100-150 mm wide. When this is used, the material is sprinkled, laid down topping.
- Sticking of the deposited roll material should be done with an overlap between adjacent panels with a width of 80 -100 mm (lateral overlap), with a lap across the canvas with a width of 150 mm (end overlap) with preliminary cleaning of sprinkling the strip of overlap of the panel with a metal brush or a heated spatula.
- The distance between the side joints of roofing panels in adjacent layers should be at least 300 mm. The end overlaps of adjacent panels of roofing material should be offset relative to each other by 500 mm.
Rolling the roll must be done in the direction of "yourself", additionally rolling with a roller. Overlapping places are rolled with special care.


Adjacency device
The main roofing carpet at the places adjoining vertical surfaces should start up on the vertical part above the transition side. In places adjoining vertical surfaces, two additional layers of roofing carpet are glued with the base of fiberglass or polyester with an institution up to the design mark on the vertical surface.
The first additional layer of the roofing carpet should extend at least 250 mm onto the vertical surface. The second layer of sprinkled material should overlap the first minimum of 50 mm on a vertical surface.
On vertical surfaces, additional layers are mechanically fixed to the base using edge rails or washers with a diameter of 50 mm. Fastening is carried out using dowels or self-tapping screws on concrete with a pitch of 200 mm.

If the rolls of roofing material of the main layers of the roofing carpet are laid parallel to the parapet wall, then the arrangement of the layers changes.
The main layers of the roofing material are laid close to the transition side. In addition, a reinforcing layer of roofing material extending to a horizontal surface of 100 mm is laid on the transition side.

When the height of the parapet wall is less than 500 mm, additional layers of the roofing carpet are placed on the parapet wall. The upper additional layer should go to the front of the building at 50-100 mm.

When attaching the parapet apron, the distance between the attachment points is determined by the stiffness of the profile, but should not exceed 600 mm.
Joints of parapet slabs must be sealed with thiokol (polysulfide) or polyurethane sealant.

It is possible to wind up material on parapet walls up to 1 m high by additionally fixing panels of roofing material to the parapet wall after 500 mm. The parapet wall should also be covered with a galvanized steel apron or parapet plate.
Climatic (weather) conditions
- When working with surfaced roll materials, the ambient temperature and the temperature of the material itself should not be lower than the flexibility temperature of the material (indicated by the material manufacturer).
- In the case of work at low temperatures, it is recommended to keep the rolls in a warm room for at least 1 day at a temperature of at least +15 ° C. Otherwise, the material compressed in the cold will expand under the influence of the sun, which will lead to the formation of waves on the roof.
- Deposition of waterproofing is not allowed during fog and when there is frost or hoarfrost on the surface of the building structure. In such weather conditions, the substrate must be dried, for example, using propane burners.
- If it is necessary to carry out work in adverse weather conditions (rain, snow), it is necessary to use special teplyaki, awnings, awnings, etc., providing the required working conditions.
Surfaced roofing is a reliable way to create a strong, durable, airtight and easy-to-maintain roofing, which is widely used in industrial and civil engineering. Laying of rolled waterproofing by surfacing is mainly used for the organization of flat operated and non-operated roofs with a slope of no more than 2 degrees. The technology for installing soft blood is simple enough to do it yourself, if you know how to properly prepare the bases for the flooring and to fix it in a quality manner. In this article we will talk about the sequence of laying rolled roofing materials using gas equipment.
The technology of laying roll materials by deposition is a technologically complex process for which special equipment is used. Surfaced waterproofing coatings differ from others in the way of fixing to the base, which is carried out by heating the lower layer of fusible bitumen. The use of rolled materials for roof waterproofing makes it possible to obtain an almost monolithic, hermetic and weatherproof coating that will last 10-25 years. Directed roof compared with other types of overlap has the following advantages:
- Tightness of the top layer of the roof. Thanks to the special technology of laying a soft roof by welding, the seams between the layers of materials do not match, so the coating is sealed.
- High degree of thermal insulation and noise reduction. Surfaced roll coatings prevent heat loss through the roof surface, as well as reduce noise during rain, hail, wind.
- Durability. High-quality rolled coatings based on fiberglass and modified bitumen serve more than 20 years without cracking or damage.
Note! The only drawback of surfaced coatings is the high flammability of such materials, as well as the use for laying fire hazardous gas equipment.
Material selection
Surfaced roofing - an extensive category of rolled roofing materials, combined by a common method of laying. To attach such a coating to the roof base, it is necessary to heat the bottom layer of fusible bitumen with a gas burner to a temperature of 150-170 degrees with a gas burner. The composition distinguishes several types of deposited materials:
- Bituminous. The most inexpensive and affordable are bitumen coatings, which are made of roofing cardboard by impregnating the workpieces with bitumen, followed by processing with an armor sprinkle. To that category of materials is roofing felt, roofing material. The disadvantage of such a roof is low weather resistance and mechanical strength.
- Polymer. Polymeric coatings are called roofing products made from modern polymers that improve quality, waterproofing qualities and increase the life of the roof.
- Bitumen-polymer. Such coatings are made of glass fiber impregnated with a mixture of bitumen with additives and polymers. They are characterized by increased wear resistance, weather resistance and elasticity, but they also cost much more.
Experienced craftsmen claim that they are best recommended in the Russian climate. In addition, they have the most favorable price-quality ratio.


Types of foundation
The device of the built-up roof resembles a layer cake, the first layer of which is the base of the roof, where first 2-3 layers of the lining are laid, and then 1-2 finish coat. The technology of laying rolled materials does not allow the installation of roofs on flammable substrates, for example, wood, since fire hazardous equipment is used for this operation. You can perform this method on the following types of floors:
- Overlapping of reinforced concrete slabs with sealed moisture-resistant mortar without leveling screed.
- Monolithic leveling screed made of cement-sand concrete grade M 150.
- Mineral wool insulation boards not aligned with screed.
Keep in mind that the technology for laying a built-up roof implies fixing the material on a clean, dry, leveled, non-combustible base with high agitating ability. In order for the coating to adhere securely to the base, a set of preparatory work is performed.
The correct technology for preparing the roof base for surfacing of roofing materials has a significant impact on the durability, strength, tightness and durability of the coating. Properly prepared for gluing a soft roof, the ceiling should be smooth, dry and dry. To obtain reliable fixation of the material, it is necessary to carry out a whole range of measures:
- Cleaning the roof surface from dust, dirt and other contaminants. This can be done by “blowing” the roof with a building hair dryer and or by abrasive blasting.
- Drying the base of the roof. So that there is no water under the roofing material, it is necessary to carefully dry the floors. In dry, sunny weather, evaporation of moisture from the thickness of concrete occurs within 2-3 days. You can speed up this process with a building hair dryer.
- The seams between the concrete slabs of the base, as well as all irregularities and potholes, are covered with moisture-resistant concrete of the M 150 brand.
- The surface of the base is primed with bituminous mastic using a roller to form a sticky film that improves adhesion between the surfaced roof and the cover.
Important! Before laying deposited materials, the treatment of the roof base with mechanical brushes, grinding discs and other devices leading to the formation of grooves on the concrete surface is not allowed.

Equipment and tools
The technology of fusing the roof onto a concrete base is quite simple and not difficult even for an inexperienced master. To facilitate your work, you need to take care of the tools and equipment used for installation in advance:
- A sharp roofing knife, with the help of which canvases of roofing material are cut.
- Brushes for cleaning the roof from pollution.
- Stitching roller, which presses the deposited coating to the base during installation.
- Bitumen primer for priming the surface of the base.
- Roller for applying bitumen mastic in the process of priming.
- Gas burner and gas cylinder for surfacing waterproofing coating.
Remember that working with surfaced roofing is necessary with the use of personal protective equipment. To protect yourself from damage to the cornea, respiratory tract and skin, use protective clothing, mittens, an eye mask and a respirator. On roofs with a height of more than 2 floors, work is permitted only with insurance.
Surfaced roofs are laid in dry, calm weather at temperatures above 5 degrees. When the ambient temperature is less than this indicator, the melting of the lower layer is difficult, and the gas flow increases. The work is performed in the following order:
- First, fillet is equipped - bumpers with a slope of 45 degrees, located at the junctions of the roofing material with vertical surfaces. They are necessary to prevent abrasion of the roofing material in the joints.
- The vertical surfaces onto which the hydro-coating will be run are sanded to improve adhesion.
- Then glue the lining layer of the coating. To do this, the roll is rolled out, its edge is fixed, and the loan, melting the lower layer of the material with a gas burner, presses the waterproofing coating with a press roller.
- The second strip of coating is glued with an overlap of 10-15 cm to protect the seam from moisture.
- Check the bonding quality of the first layer. The material in the seam area should not go away or bubble.
- Subsequent layers of the overlay coating are similarly glued. However, they are fixed with an offset so that the seams between the strips do not coincide.
Important! Experienced roofers argue that the built-up roof attaches well even on top of the old coating, if you thoroughly dry it, eliminate the bubbles, and repair the cracks.


Video instruction
The modern built-up roof has a service life of up to 25-30 years - current materials retain their properties precisely over such a period of time. But this is subject to the competent installation of each of the layers. Errors are unacceptable, since there is no way to fix them. You will have to dismantle a piece of the roof if the errors are local or all if they are global. Probably, for this reason, many home owners prefer to make a built-up roof on their own - a do-it-yourself roof, as a rule, lasts longer without leaks.
Materials for a built-up roof have a multilayer structure. An astringent is applied to the substrate on both sides, and a protective coating is applied to it. All these layers have several options. Their combinations give various properties and characteristics.
Types of basis
A significant part of the material’s properties is determined by the basis on which the binder is applied. If it can stretch, then the material for the built-up roof can also change its size to a certain extent, if it does not tolerate deformations, then the material breaks. There are the following bases for a built-up roof:

The most durable materials are made on the basis of polyester. Manufacturers say that these materials retain their properties for 25-30 years. So many surfaced roofs can be operated without repair, however, with proper installation. The disadvantage of surfaced materials based on polyester is the high price at the time of the device. But you can save on repair and replacement.
Types of binder
The binder also determines the set of material properties for the deposited roof, but it no longer affects the strength, but the waterproofing properties and resistance to weathering. Also, this layer is responsible for the degree of adhesion (adhesion) to the base or underlying layer. The following types of binders are available:

The best characteristics of rubber-bitumen and bitumen-polymer compositions. They have a wide range of temperatures at which they can be operated. When choosing materials for a built-up roof, be sure to pay attention to this parameter, because part of it tolerates high temperatures (up to + 150 °), and part - low (up to -50 ° C). And you can’t mix them up.
Appointment
Surfaced roofs are usually multi-layered, and materials for different layers should have different characteristics. Those at the bottom should provide waterproofing, sound absorption, and possibly have heat-insulating properties. These materials are called lining materials and when marked, they are indicated by the letter “P” at the third position in the marking.
Surfaced materials for the top layer of the roof must additionally have a high surface resistance to mechanical damage and weather. These materials are called “roofing” and are abbreviated by the letter “K” in third position.
Protective layers
Since the binder in the surfaced materials is sticky, it must be covered with something. Do this using stone chips of various sizes or plastic film. Sometimes, a foil (Folgoizol) is used as a protective layer. Such materials are used in countries with hot climates. Need foil to lower the temperature - the lower layers are heated 15-20 ° C less than when using conventional materials.
Stone crumb (sprinkling) happens:

Since the type of protective coating has a significant impact on the characteristics and scope of the materials (fine-grained and dusty on both sides are applied to the lining materials), their designation is also in the marking - this is the second letter.
This is in brief all the characteristics that you need to know when choosing a surfaced material. Before buying, be sure to read the description, study the scope and specifications.
Foundation requirements
Surfaced roll roofing is most often done on a reinforced concrete base, the joints between the plates should be sealed with a mortar of grade M150 and higher. Also, the grounds may be:

If the built-up roof is flat, it is necessary to form a slope towards the gutter or drainage funnels of at least 1.7%. Usually they do this with the help of a heater. Manufacturers of rolled surfaced materials produce insulation boards with a given slope. They just stack, following the direction.

Another way to form a slope is to set the guides before pouring the screed and level concrete
The composition of the roofing cake
When installing a pitched or flat built-up roof, the pie is the same - with or without insulation, but it must have a vapor barrier. The material for vapor barrier is selected for the roofing used, just as the lining carpet is chosen for it.

It's all about the compatibility of qualities and characteristics, therefore it is advisable to use all the elements of the same manufacturer on the roof. Reputable campaigns even have special tables by which you can choose the desired pie. One of the most famous manufacturers in Russia is the Technonikol company, their table is given below.
What's under the roofing material
Vapor barrier protects the overlying layers of insulation from saturation with moisture, which is especially important when using stone wool as insulation. She is afraid of getting wet. With increasing humidity, its heat-insulating properties are greatly reduced, and if it freezes in the wet state, then when defrosting it will simply crumble into dust and your roof will become cold. Therefore, when laying the vapor barrier, special attention is paid to the tightness of the joints, the correct cutting of the passages.

Roofing cake of the warmed flat roof with a built-up roof
When warming a flat roof, you need to remember the need to create a slope towards the drain or receiving funnels (at least 1.5%). The same slope is maintained when filling the screed. Its minimum thickness is 5 cm, - not lower than M150. The screed that has gained strength (at least 28 days from the moment of pouring) is coated with a bitumen primer, which ensures normal adhesion of the roofing cake to the screed.
On hard slabs of stone wool, surfacing of materials without screed is allowed. Then the surface of the insulation is smeared with a primer, and the layers of the built-up roof are mounted on top.
But it is not always necessary to insulate the roof. In this case, there are fewer layers (see photo).

When installing pitched shafts or a prefabricated screed (from plates and sheets), the roofing cake will be the same, only the vapor barrier layer is stuffed from the side of the room, the insulation is laid between the logs, and the sheets of the prefabricated screed are fixed on top of the logs (sheet thickness not less than 8 mm, laying in two layers with a run of seams).
Surfacing device
The built-up roof will serve for a long time if its layers are laid in accordance with all the rules. Quite a lot of work, they are arranged in the article in order of priority.
Foundation preparation.

In places where roofs adjoin vertical surfaces, build-up surfaced roofing materials to a height of at least 10-15 cm (if there are no special recommendations). In places where the roof is adjacent to the walls of heated rooms (chimney pipes and ventilation ducts, among others), the entrance to the vertical wall should be at least 25 cm. This is necessary so that condensation does not form in the roofing cake.
Vapor barrier installation
Bituminous surfaced vapor barrier material can be laid by welding or can be laid freely, but be sure to fuse all the joints.

Thermal insulation layer
Thermal insulation is laid on the finished vapor barrier layer. The surface must be absolutely dry and clean. The rules are as follows:

Screed device
A screed is poured over the insulation. When using rigid slabs of mineral wool (compressive rigidity of at least 0.06 MPa), the built-up roof can be made directly using insulation, without screed. But for greater reliability, it is better not to skip this step. The order of work is as follows:

The screed is left to gain strength. This takes an average of 28 days. To maintain the required humidity level, immediately after installation, the screed is covered with plastic wrap, tarpaulin, burlap. During the first week, the surface is periodically wetted: at a high temperature several times a day, at a low temperature - one.
The concrete that has gained strength is treated with a primer (and the parapet too), wait until it dries (the time depends on the brand and weather). Surfacing of the roofing material over a non-dried primer is prohibited.
Adjacent to vertical surfaces: the device of the sides, overlaps
In places where the roof is adjacent to vertical surfaces, it is recommended to make a side with an angle of 45 ° to ensure tightness. You can do it:
- using cement-sand mortar (grade M 150, dimensions 100 * 100 mm)
- by installing special fillets, which are produced by the same campaigns that produce materials for the surfaced roof.
Fillets are installed on bitumen mastic, the flange of the mortar after setting the cement is smeared with a primer.

The sides are closed with an additional layer of lining carpet such as Tekhnoelast EPP. A strip of such a width is cut from the roll so that at least 100 mm of material remains at the base of the roof and at least 25 mm winds up on a vertical surface. Lateral overlap of strips - not less than 80 mm. Spread around the perimeter of the material of the additional carpet on the sides is fused over the entire width.

Processing corners of the built-up roof - external and internal
When laying the following layers (underlay and roofing), the lining layer is also first fused, then the main carpet is laid and fused, bringing it 80 mm higher than the side. The width of the strip of the extra carpet depends on the layer.

and horse
If a pitched roof is arranged, in the place of the kink of the roof, an additional lining layer is laid on the ridge. Its width is 250 mm on each side. On complex roofs in places of valleys, the lining layer should be at least 500 mm on both sides of the bend.

When laying on the ridge, the joints of the canvases are placed against the direction of the prevailing winds. The overlap of the panels is at least 80 mm, the joints are necessarily fused. In the valley, if possible, the underlay carpet is laid in a single piece. If the roll length is not enough, rolling starts from the bottom, moving up. The junction is also necessarily fused.
Surfacing roof: rules for laying material
First of all, you need to decide on the direction in which the rolls will be rolled. On flat roofs, this is done along the long side of the roof. On roofs with a slope, the direction depends on the angle:
- less than 15 ° - rolls across the slope (along the slope);
- more than 15 ° - along the slope.
Note! Laying different layers in the perpendicular direction is unacceptable. All layers of deposited materials for the roof are laid in one direction.
If there are several layers, the longitudinal seams of the layers are displaced by at least 300 mm. When laying, standard overlays are also provided: lateral - 80-100 mm, end 150 mm.

Stacking procedure
Begin the installation of surfaced roof materials from the lowest place. Previously, the roll is completely rolled out, providing approaches to vertical surfaces (parapets, pipes, etc.). Roll it out without waves. So that the material does not move, when rolling, one side is pressed with something heavy (you can put an assistant). On the stacked roll, note the length, cut off the excess.

Pre rolls "try on"
On flat roofs, the roll is rolled from the edges to the center. For convenience, you can use an iron pipe. With a slope of more than 8%, this option does not work. In this case, the deposition begins from above, moving down. A piece of 1.5-2 meters in length is left uncrusted. It is processed after the whole piece is glued.
So that when rolling the rolls there are fewer waves, a couple of days before the start of installation they are put upside down. Since they take a round shape, the material then lies flat.
Deposition technology
Regardless of how the material is rolled up, they weld it rolling "on itself". So you can control the degree of heating of the bitumen layer: the whole picture is before your eyes. If you push the roll “away from you”, the quality of the roofing will be very low and the roof will leak quickly.

It is necessary to roll out "on yourself"
Burner movements are smooth and uniform. When laying overlap places are warmed up additionally. In this case, the burner moves along the path in the form of the letter "G". The burner is positioned so that both the base of the roof and the binder on the surface of the roll are heated simultaneously. With proper heating, a small roll of molten bitumen forms in front of the roll.
When fusing it is necessary to ensure that bitumen melts evenly, there are no "cold" zones or zones of local overheating. Some manufacturers (TechnoNIKOL) apply a pattern to the underside of surfaced roofing materials. It is easier to control the degree of heating of bitumen on it - as soon as the picture "floats", you can roll the roll and move on. If the bitumen is heated correctly, it flows along the edges of the roll, leaving a strip of about 25 mm in size. That is, an even seam of dark color is obtained along the edge.

Note! You can’t walk only on the deposited roof. Sprinkling is trampled into hot bitumen, which affects its appearance and protective properties.
When laying the deposited roof in low areas, the corners of the rolls at the joints are cut by 45 °. This sets the correct direction for the movement of water.

Sometimes when laying the top layer of the deposited roof, it becomes necessary to deposit material over coarse-grained or scaly sprinkles. If you simply heat the material and glue it on the sprinkle, there is a high probability of leakage. In this case, it is necessary to preheat the surface of the material with sprinkling, drown it with a spatula in bitumen. After this, it is already possible to reheat and glue it again.


