Installation of furniture fronts on drawers. Self-attaching rails to drawers. Video: installing roller guides
Let's move on to the installation of another facade - drawer facades. Let's analyze this process using the example of a cabinet with a section of three drawers at the bottom.
So, the boxes are assembled and installed, the handles are installed on the facades, it remains only to connect them correctly.
It is necessary to pre-drill holes in the front panel (3 pcs for narrow facades and 4-5 for wide ones).
The main difficulty in this matter is to correctly display the facades in relation to the box, because their adjustment is very difficult and is achieved only by guides (or they will have to be redone).
Simply attaching the facade, aligning it with the box and holding it in place with one hand, pulling out the drawer and tightening the screws is extremely difficult (perhaps - I did it, but it's not worth it - it's too difficult). Therefore, I will advise you such a method as "double-sided tape". Any scotch tape will not work - you need a thick one, that is, on a foam base.
So, we glue the strips of tape on the front wall of the box. (unfortunately, I did not record the process of installing the lower facade, but I think the other photos compensate for this shortcoming.

We peel off the protective film, after which we put spacers on the lower facade (pieces of 2 mm edge or DVPO - 2 and 3 mm, respectively) in order to maintain the same distance between the facades (the lower facade was installed with hands on the edges of the box).
We install the second facade on the lining in a slope, align it along the edge of the box and press it against the box.

After holding for about 30 seconds, you can gently pull out the drawer along with the glued facade. The insides of the cabinet open with holes into which we will twist the screws. (You can additionally press the front with an F-clamp to free both hands).

First we fasten the central screw, then we push the drawer in, check the gaps and the absence of distortions, and if everything is fine, then we tighten the rest of the screws. We also fasten the rest of the facades.

Separately, I note that with this method of fixing, the boxes are not interchangeable, that is, if you swap even the same boxes, then the necessary gaps are unlikely to remain.
If you have any difficulties with installing facades on drawers, then use the instructions below:
- Assemble the frame of the box
- Screw the rails to the sides of the dresser and the drawer frame
- We drive all the collected boxes inside IMPORTANT: WE DO NOT PUT FACADES!
- Using double-sided tape, we align the facades along the walls, taking into account the gaps. In this case, the drawer is in the chest of drawers, and you do not need to remove it!
If the front part is exposed exactly, the boxes do not cling to each other, and all the gaps are observed, then we begin to fix the front to the box body. To do this, take out one drawer at a time and put it on the back panel with the front facing you. After that, with a 5mm drill, we drill through the box body through the hole in the front part and from the inside we pull the front through the handles.

Please note that the adhesive tape serves only to align the facades along the walls, taking into account the gaps, but the facades are fixed with screws through the handles!
Important: When installing the boxes, each of them must be returned to their place in the same sequence in which they were in point (3). It is very important not to violate this order, since when changing the positions of the boxes (the upper box is put down and vice versa), there will be a problem with the fact that they will not snap into place.
If you still have questions about the assembly, then write to us by e-mail, and we will help you deal with all the moments that you do not understand.
High-quality fittings are a prerequisite for the manufacture of high-quality cabinet furniture. The strength, durability and level of comfort of kitchens, chests of drawers, slides, pedestals and wardrobes depend on the technical characteristics of the components.
There are several types of retractable systems that differ in design complexity, cost and ease of use:
- roller guides;
- ball guides;
- metaboxes;
- tandems;
- tandemboxes;
- lightboxes.
Usually, installing drawer rails is a simple scheme that even a non-professional can handle. Installing guides for drawers with your own hands will require a careful study of the instructions, a little time and skills in working with a screwdriver.
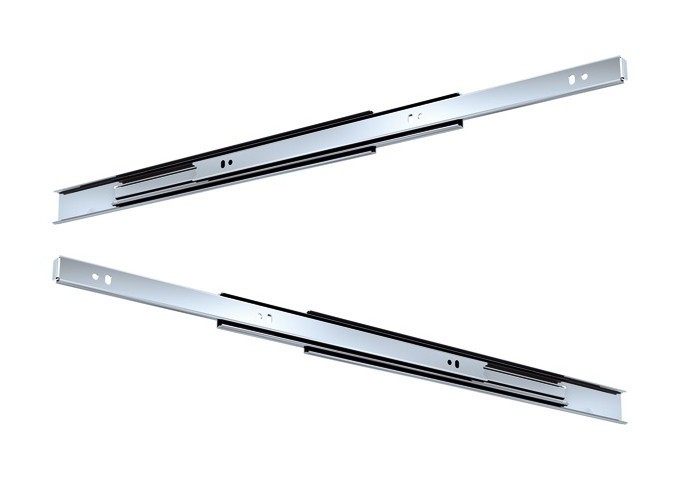
Roller guides for drawers
These guides are commonly used for mass production of furniture. They are made of steel, top coated with epoxy paint in white, gray, black or brown. The length of the guides can be different: from 250 mm to 600 mm in 50 mm increments. It is specially selected for the size of the boxes.

The weight that keeps the roller guides in motion is no more than 15 kg. The significant disadvantages of this type of guides are their noise when moving, fragility and incomplete rolling out of boxes.
Installation of roller guides for requires an accurate calculation. If miscalculated, the lifespan of the rollers will be significantly reduced, and early drawer movement problems are likely.
for drawers
Manufactured from anodised pressed steel. Their design is fundamentally different from roller guides. To slide the box along the runners, a clip with metal balls filled with viscous grease is used. This results in relatively quiet operation and increases the service life. There are models equipped with built-in closers that prevent the box from noisily hitting the cabinet post when it slams shut. The system has two metal elements: one is attached to the inner wall of the product, and the other to the drawer. To separate the two, a retainer must be used.
Ball guides come in full or partial roll-out. The full extension drawer (or telescopic) allows the drawer to be pulled out of the furniture body, maximizing the view of the interior. Incomplete extension guides leave an immense area of \u200b\u200babout 50 mm from the rear of the drawer. The length of the guides is from 200 to 600 mm in 50 mm increments. Maximum load of 35 mm guides is 30 kg. There are also reinforced guides, their height is 45 mm, and the maximum load is up to 45 kg.
Metaboxes
This is a type of roller guide. The steel runners of these guides are increased to the height of the box and completely replace its wooden side walls. Hence the name - metaboxes or metalboxes. The rollers are attached to the sidewalls. The height of the side walls is from 54 mm to 150 mm. You can increase the height with special rails. The bottom of the metabox is made of chipboard, limiting the filling up to 20 kg. The shorter the drawer, the greater the load it can handle.

The fastening of the front to the metabox provides vertical and horizontal adjustment, which allows it to be precisely aligned with the body. Most often, metaboxes are used in the manufacture of serial budget kitchens.
Tandems
Tandems - flush-mounted guides. There are two types: full and partial extension. The box on such guides is attached from above, completely hiding them under the sides and bottom.

Soft sliding (even with a load of up to 50 kg) is provided by the principle of a bearing: a block of steel balls located on four sides of the runners (quadro system), or cylinders - needles. The mount allows you to adjust the position of the box relative to the body and remove the box from the guides without tools. Tandems are available in several versions:
- with a door closer - normal opening by the handle and smooth closing;
- with tip on or push to open mechanism - opens by touching the facade;
- with electromechanical opening.
Tandemboxes
Tandembox is a box consisting of metal sides with double walls, the bottom is usually laminated chipboard, the back wall is made of metal or laminated chipboard and flush-mounted guides. These are the same tandems, complete with double side walls. It is possible to additionally increase the height of the box with rails and a special profile. Some manufacturers make extensions from glass strips.

Additional options are provided for organizing the inner space of the drawer: movable dividers, containers and stands for cutlery and spice jars.
Lightbox boxes
The most modern and expensive drawer runner systems, high on the list of all furniture components. The reinforced structure can withstand loads of up to 60 kg. The brushed stainless steel surface emphasizes the rigor and sophistication of the stylish design of the lightbox.
Installation of this type of systems presupposes precision drilling of facades and side walls, absolutely verified calculations in the manufacture of parts from chipboard. It is also imperative to correctly and accurately milling the bottom.
Manufacturers of furniture fittings offer other ways of using guides. For example, fastening pull-out baskets, nets, containers for various purposes.

General guidelines for installing drawer slides
How to install everything correctly? The calculation of parts when installing rails for drawers can be made according to the formulas that manufacturers provide for their products. Usually all the necessary information is also contained in the instructions.
The key to a successful installation of the drawer runners is accurate markings. All guides must be installed at the same level and strictly parallel to each other. It is most convenient to do the marking before assembling the product on a flat horizontal surface with sufficient lighting.
There are two ways to install the drawer front: external and internal. For outdoor installation, the facade covers the end of the body. Then the guide must be fixed close to the outer end of the product rack. With the internal method, the end of the product rack is in the same plane with the facade. When fastening, the guide must be moved inward from the visible end by the thickness of the facade.
Installation instructions for roller guides for drawers
Now let's talk about installing roller guides. When installing roller guides for drawers, the kit must be divided into the right and left sides, and then into the inner and outer parts. The left outer part has a U-shaped profile, the right outer part is G-shaped, and the inner ones are L-shaped.
On all parts of the guides there are holes for fixing and adjusting them on the parts using self-tapping screws. Along the marking lines, the corresponding parts of the guides are screwed onto the racks of the product body. It is necessary to make sure that the rollers on them are closer to the front end of the part. L-shaped guide parts are attached to the already assembled box. In this case, the rollers must be located at the rear end of the box.
The product is assembled, boxes are inserted, facades and handles are hung. Installation ends.
Installation instructions for ball guides
When installing ball runners for drawers, separate the inside of the runner from the outside. To do this, find a plastic tab on the inside of the guide and pull out the narrow part.
According to preliminary markings, it is necessary to screw the outer part of the rail to the rack, and the inner part to the side wall of the box. Assemble the product, insert the boxes, hang the facades. The installation for the drawers is complete.
What about drawers with a door closer? Installation of rails for drawers with a closer is carried out in the same way. Everything is quite simple here. The installation of Boyard ball guides for drawers or systems from other manufacturers is carried out in the same way.
Before starting the installation of the facades, the entire structure must be assembled, and the drawers must be inserted into the chest of drawers. It is important that the product stands on a flat surface to avoid errors during installation.
Facade installation methods
Today we will tell you about one very convenient way of installing furniture fronts on drawers.
The method is quite simple and popular, and even if this is your first installation, everything will still work out smoothly.
So, how to quickly, conveniently and without problems install the facade on a drawer? For this we need:
screwdriver
screws 4 * 30
clamp
Double-sided tape
probe for determining the thickness of the gap between facades
Before installation, the boxes (which are still without facades) must be in the furniture product, the product itself must be assembled and leveled (without distortions and slopes).
We take double-sided tape, cut several strips and glue them with one side to the ends of the boxes, as shown in the photo.
After that, having previously removed the protective film from the tape, we will need to lean the facade against the box, but before that, even before we "glue" it, it is necessary to align the facade as accurately as possible, both vertically and horizontally.
To provide a horizontal gap of 3 mm (or another one that you provided when drawing up the detailing) between the facades, you can use a kind of marker - a probe. You can use a ruler of a given thickness, pieces of edging, or find another tool at hand.
The hardest thing is to lean the first facade evenly, then everything will go like clockwork. It is better to start from the bottom drawer, it will be more convenient this way.
After you glue the facade to the drawer using double-sided tape, so that it does not "slide out" when fastened with a screw, the facade with the drawer must be fixed with a clamp. After fixing, next to the clamping point, we screw in the screws from the inside of the box, in increments of 15-20 cm.


That is, in order to maintain a horizontal gap, we use a probe, to align the facade on the sides, we use straight arms and an even eye, or you can use a flat board by placing it vertically.
Many may argue that the adhesive tape leaves unnecessary gaps, but I have never noticed such gaps at home, the main thing is to tighten the screws tightly.


In such a simple way, you can easily and efficiently fix the facades on the drawers.
Method 2: no tape
We remove the clamps and put the box in place, check the installation of the facade. If the gaps do not quite suit you, then correct them by striking lightly with a mallet on the facade and shifting it in the right direction. Then fix the facade with additional screws.
After installing the lower facade, proceed to the next one. Between the facades, you need to install a gasket equal in thickness to the 3mm gap. These can be fiberboard trims. We align the facade and clamp it with clamps.


Method 3: fasten to the drawer with bolts that screw the handles
This method consists in the fact that the fronts are attached to the drawer with the help of bolts that screw the handles. In this case, longer bolts are used instead of the standard ones.
We mark the holes for the handle bolts on the facade. We drill holes. Then we attach the facade to the installed box, align it and through the drilled holes we mark the places for drilling with an awl on the box. Now we drill holes in the box, they should be slightly larger than the diameter of the bolts, so that, if necessary, the facade could be adjusted. We fasten the handle and the front to the drawer, at first not tightly tightening the bolts. Align the facade and then tighten the bolts. For better fixing of the facade, two self-tapping screws can be screwed in additionally on the inside of the drawer. I personally use this method! We drill through the facade and twist the shurubas with handles and without clamps and without scoops! It all depends on how you get used to it!
Method 4: the number of holes for self-tapping screws.
To install facades in this way, you need to ensure that certain conditions are met.
After assembling the box, it is necessary to check its diagonals, they must be equal. You also need to check the installation of the box in the box: its front false panel should be set relative to the front end of the box, the box should not swing.
Let's say we start the installation from the top box. In the front false panel of the box, we drill the required number of holes for self-tapping screws. We put the box in place. We measure the distances to one of the holes from the top edge of the box and from the side rack.

Subtract the required clearances from the results obtained.

Now we transfer these dimensions to the side of the facade with which it will be pressed against the box, and with an awl we outline the future hole. We drill a shallow hole for a self-tapping screw. Now we fasten the facade to the box with a self-tapping screw. The point of this installation is to fix the facade correctly on the drawer using one hole. And even if it breaks a little during adjustment, the rest of the screws, screwed in from scratch, will provide the necessary fixation of the facade. In this case, it is important to accurately mark the hole for the self-tapping screw on the facade.
| Created by 27 oct 2014 | |||||||||


