DIY wood window frame. How to make window frames from wood with your own hands How to make window frames with your own hands
Carpentry work on the manufacture of windows is considered to be one of the most difficult, requires considerable skill and understanding of the window structure. Do not flatter yourself and think that a wooden window can be made on your knee, with a couple of simple carpentry tools. In the process of making a window out of wood with his own hands, the carpenter has to spend a lot of time and effort to prepare the material and manufacture additional hinged elements, from glazing beads to awnings and fittings. Therefore, wooden windows simply cannot be cheap and at the same time of high quality if they were made by hand.
How a wooden window is made
In addition, you will need equipment for cutting grooves, cutting chamfers and internal transitions, otherwise it simply will not work to make a high-quality wooden window. To build a window you will need:
- A circular saw;
- Easel and manual wood milling cutter;
- Grooving and slotting machine;
- Hand drill, tape measure, set of carpentry clamps.
The window can be completely blind, for example, if you plan to make glazing in a barn, garage or utility room. For residential premises, as a rule, a ventilation system is used with a window and an opening sash. A general view of the window device is shown in the photo. You can make the main part of the window frame in the presence of tools, equipment and prepared material in a day, if you have a clear idea of \u200b\u200bhow to make a wooden window with your own hands, and drawings for the manufacture of basic parts.
For your information! In order to make a window with an opening sash, you must first prepare a set of awnings and two window locks.
It is clear, before you make a window out of wood, you need to take the dimensions of the window opening and the box into which the window block will be inserted. In this case, a window will be made with an opening sash-vent with a size of 130x110 cm.

What is the best window to make
In order to make a wooden window quickly and efficiently, first of all, you need to select high-quality material. Forget about oak, larch, Karelian pine, all kinds of options for manufacturing a window frame from glued laminated timber. To make a wooden window soundly the first time, you need to buy a well-dried pine blank without knots, without fiber defects and traces of damage to wood by microflora or bark beetles.
To make a wooden window frame, we need:
- Three blanks 115 cm long and 40x140 mm in cross section for vertical window racks;
- Two blanks 140 cm and a section of 40x140 mm for horizontal crossbars;
- Two blanks of 50 cm and two blanks of 110 cm, with a section of 40x50 mm, for the manufacture of an opening sash.
For your information! All workpieces must have perfect geometry, without "propeller" and cracks.
If wooden blanks have been stored outside for a long time, before starting work, let the material soak and collect the original moisture. Wood planks and beams must not be dried in the sun, drafts or in a warm, dry room. It is clear that it is necessary to process wooden blanks with protective compounds in advance, then put the material into operation and dry it thoroughly. If possible, for the first experiment, it is better to make a stock of blanks, since often, due to errors, it is necessary to redo or restore connections or whole elements of the wooden window frame.

The procedure for making a wooden window
If you have the necessary equipment at your disposal, then cutting the material for a wooden frame on a window is quite simple to do in 2-3 hours, you will need a circular and a groove machine.
The order of work is as follows:
- Quarters are stretched on vertical and horizontal blanks;
- Wooden beams are trimmed and cut to size for assembly;
- At the ends of the blanks, an undercut is made for a corner connection into the frame;
- On the central cross member and the left pillar, a recess is cut out for arranging the opening sash.
It remains to assemble a wooden window box, make a window leaf, install awnings and fittings. In order to install awnings and make locks, it will take at least 4 hours. About as long as it took to make the main frame.

We make a wooden box-frame window
The first operation of wood window carpenters is called quarters. In plain language, this means making rectangular cuts at the ends of the blanks, which, after assembling the frame, will be used to install the glasses. The dimensions of the groove are 10x12 mm.

On the side uprights, the sample should be made at the corners of the wide side of the beam, facing the inside of the frame. On the center upright, the quarters are selected along all four edges of the bar.
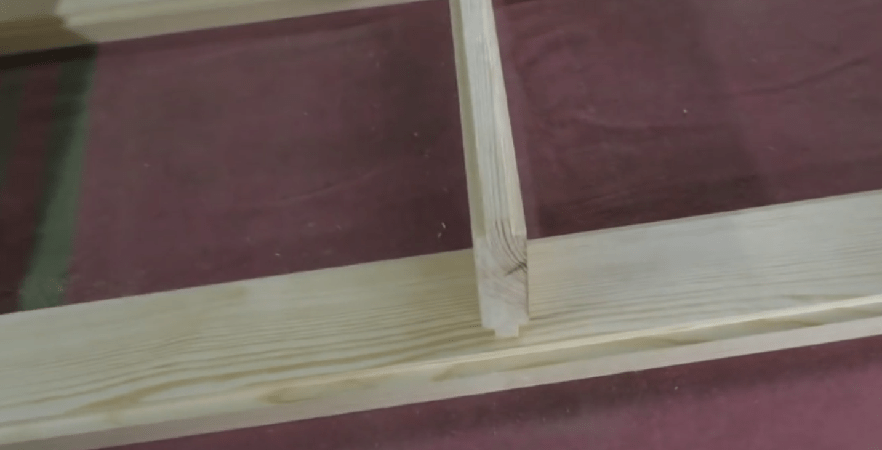
This can be done on a circular, a hand router or any end mill. If the wood is very dry, then before cutting the corner grooves, it is necessary to remove a small chamfer from the edges. This will avoid chipping.
After milling the quarters, it is necessary to trim the vertical struts and horizontal crossbars to size. That is, the vertical posts are trimmed to fit the size of 104 cm. The design height of the window is 110 cm. The thickness of the horizontal crossbars of the wooden window is 40 mm. In order to ensure the insertion of the vertical post into the upper corner of the horizontal bar, you need to make a 10 mm sample in it, the rest of the body is 30 mm. The same selection must be made for the bottom corner and horizontal bar.
The upright strut should be installed in the upper and lower recesses on the cross members. This means that the rack size is 1100-2x30 \u003d 1040 mm or 104 cm. In a similar way, you need to trim the second side and center pillar of the wooden window.

Let's make side selections in the horizontal beams of the window for the sidewalls.

With the side pillars, everything is more or less clear, it remains to choose a place for the grooves in the upper and lower crossbars to install the central pillar, to which the opening sash of the wooden window will close.
For the opening sash, we selected four wooden blocks, two of 110 cm and two of 50 cm. We have already made samples of 40 mm at the ends of the upper and lower horizontal beams. We put aside the width of the future sash from the edge - 45 cm.

On each transverse bar, we will make two cuts with a hand hacksaw to a depth of 10 mm and cut a groove 40 mm wide.

We assemble a wooden window box with self-tapping screws.

We make an opening sash and install it on the frame
Unlike the box, the wooden frame of the sash will be assembled on tongue-and-groove joints. This type of connection will provide high rigidity of the frames and guarantee that there is no deformation and sagging of the sash. If you try to make it on self-tapping screws or even at the corners, the sash will still deform and the glass will split.
First, you need to hollow out the grooves in the horizontal sections with a cutter. An end mill or slot-cutting machine is best suited for these purposes, but if they are not available, the slots can be made manually with an ordinary chisel and mallet.

On the vertical racks of the sash, spikes are cut out with a length of 40 mm. Before making the thorns, it is necessary to sample the quarters under the glass, as was done earlier for the large box.

We assemble the frame on spikes, after having coated the joints with wood glue. After an hour and a half, the assembled sash frame is doweled and polished along the plane of the sash adjoining the main wooden window frame.

The size of the sash frame is 50x1100 mm. In order for the sash to close into the window opening, it is necessary to cut a sample along the perimeter of the frame in the size of 1040 mm.

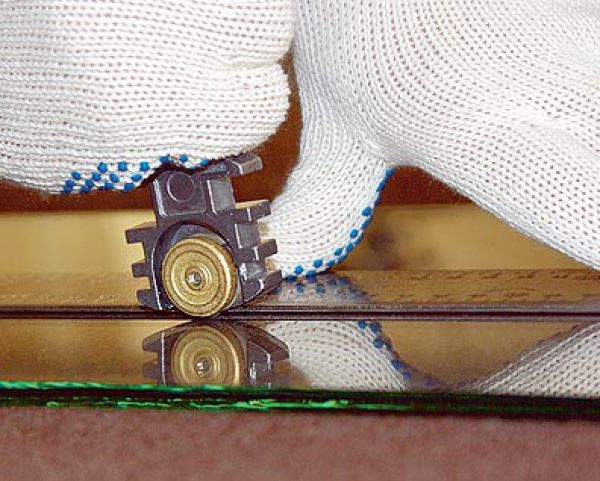
The frame of the wooden window sash is almost ready, now it easily fits into the main box. All that remains is to make awnings and install locks. Small window hinges can be used as awnings, but their installation is quite long and requires careful cutting of secret slots for awnings. In addition, the strength of a conventional canopy for a heavy sash is not enough, and it will already be ugly to sculpt three hinges. Therefore, barrels with pinned mountings are used as awnings.

The barrel can be installed in a couple of minutes, but only if there is an appropriate device for drilling holes in the frame and sash. The problem with installing the barrel is how to perform perfectly accurate drilling in a wooden frame beam at an angle of 45 °, drill diameter 6.8 mm, the thread on the barrel is M8. It makes no sense to try to do this by eye, it is better to spend an extra hour, but to achieve a high-quality result.
In order to make the device, you need an oak bar with a section of 40x40 mm. We cut off one edge of the wooden block along its entire length. The block is positioned on a drilling machine and drilled exactly diagonally.

On the reverse side of the bar along the edge, a quarter of 6x12 mm is selected. This is necessary so that the device fits tightly and rigidly on the edge of the sash and the frame of the wooden window.
Before drilling the sash and frame, you need to make a markup for installing the barrel. To do this, we apply the risk of installing a canopy to the frame, retreat up the rack by 13 mm and transfer it to the sidewall of the sash at the risk along which drilling will be performed for the counterpart of the barrel.

After drilling the holes, it remains to wrap the self-tapping screws of the barrel into the frame and into the sash, after which you can hang the roll on the installed awnings.


We cut in handles and carry out finishing
It remains to make the handles and finish the wooden window. For convenience, it is best to use balcony handles with hidden locks of domestic production made of steel, aluminum will not work, they are enough for 2-3 months, no more.
We fix the sash on the frame with clamps. On the front, we mark points for withdrawing the handle of the lock. From the points, the line is transferred to the end plane of the sash. To install the lock, you need to mill the grooves. It will be most convenient to cut the groove using a hand router with an 8 mm drill. The milling depth of the groove is 28 millimeters, you cannot drill less - the lock will not fit, more - too, can pierce a wooden beam through and through.

At the second stage, you need to mill out the shelf to hide the mounting flange of the lock. Next, you need to drill holes for the installation of the handles and fix the "ears" of the handles on the wooden plane of the sash.

To install the counterpart of the lock, you need to get the point of entry of the lock tongue on the frame. To do this, simply turn with a little effort to make a dent in the surface of the B-pillar. We cut out a groove along this dent and install the counter metal bar of the lock.

Conclusion
Before assembling the window, it is necessary to carefully sand the entire surface of the box and sash, especially the ends and places of sampling of quarters. After sanding, we treat the wooden surface with impregnation, varnish and install the glass. After the varnish or oil-paraffin impregnation has dried, we sew up the glass with glazing bead and install locks and strips, and the wooden window is almost ready.
Thinking about replacing windows? Do not rush to buy popular plastic, because wooden windows are considered to be of higher quality in Europe. In the domestic market, wooden euro-windows are much more expensive than plastic ones, but a window made of excellent quality wood can be made by hand. As a result, it can be even cheaper than factory-made plastic.
Selection and preparation of wood
The main requirements in the windows are imposed on the profile, therefore it is necessary to choose high quality wood. Windows can be made from different types of trees. Mainly pine, oak and ash. For elite windows, modrina or even more valuable species are used.
For beginners, it is better to take a pine tree, in case any part is damaged. Pine is cheaper than other species.
It is not profitable to make a window profile from a whole wooden bar: too much waste is obtained and the product becomes too expensive. In addition, glued laminated timber is a one hundred percent guarantee that the window will not dry out or deform from moisture.
For a window profile, choose glued laminated timber from 2 or 3 layers. What is glued laminated timber? These are 2-3 boards glued together. Modern high-quality glue gives the wood extra strength.
Preparatory stage
To make the work go easily and quickly, it is better to prepare in advance a small set of tools for window production:
- Electric plane;
- Chisel;
- Screwdriver;
- Drill;
- Glass cutter;
- A hammer.
To make a window, of course, it is necessary to take measurements and draw the future product.
How to make a glued laminated timber window with your own hands? First, you should cut a solid bar into planks. Only those workpieces that are sawn radially or close-radially are suitable for the window. What does it mean? If you cut a tree trunk in half, and then cut it into boards perpendicular to the cut, then the boards cut from the central part are worth taking. Of course, we do not accept boards with defects. You can return to them later by cutting out knots, cracks and resinous areas.
Selected boards are glued together and dried. Their optimal length should be no more than 6 meters. When gluing, they should be placed so that the fibers along the bar are directed in different directions. This will get rid of the effect of residual stress in the wood - the timber will not twist.
Many firms buy ready-made glued laminated timber from carpentry workshops. You can do the same.
For durability, all wooden parts must be treated with special solutions before the window is assembled.
Installing the window box
The box board should have a size of 15050 mm. It is necessary to cut grooves in the shape of the letter "L" with a depth of approximately 15 mm on all parts of the box. In this case, the grooves of one board must be aligned with the grooves of the other. After that, the box must be assembled by joining the boards with wood glue. After the glue has dried, through holes are drilled at the joints, into which small wooden rods must be driven. This will provide the box with a strong and secure connection.
The box in the window opening must be securely fixed. To do this, we drill holes in the wall and drive dowels into them. The box will be attached to the dowels with self-tapping screws and fastening strips. We blow out the cracks between the box and the wall with polyurethane foam. It will act as a sealant.
In order for rainwater to drain freely from a wooden profile, the angle of inclination of its horizontal planes should be 15 degrees.
After installing the window, do not forget to plaster the foam: under the influence of the sun, it loses its properties over time and collapses.
Making a window frame
The frame of a standard window is made of 64 cm timber. The shape of the frame will depend on how many glasses you intend to install in it and on the thickness of the glazing beads. For each glass you need 1 rectangular groove. Plus one groove is required for installation in the box.
When all the grooves are selected, we begin to assemble the frame. To do this, we cut the boards obliquely at an angle of 45 degrees. And again we use the spike and groove technology, as in the case of the box. We add additional rigidity to the structure with self-tapping screws.
How to put glasses?
To cut the required glass, the measurement must be taken very accurately. Even 1 mm of error will create a cold bridge. We cut the glass sheet with a diamond glass cutter, and grind the edge with fine sandpaper. We draw a line with a glass cutter using a ruler, which must necessarily be longer than a sheet of glass. Having marked the break in this way, we hold the glass with one hand, and with the other we slightly press on the cut part. In this case, the glass should break off neatly and evenly along the intended line.
The first time we put the glass in the frame for fitting. If it fits well, apply sealant (silicone) around the perimeter and insert the glass for good. The final touch is to secure the glass with glazing beads and thin nails. If you have chosen wide glazing beads, you can screw them on with small screws.

How to make a do-it-yourself window with an opening sash? A vertical bar will have to be installed in the center of the frame. The necessary grooves should also be cut on it. The part of the window to be opened is assembled separately. It will have a slightly thinner frame that will attach to the main frame. On the window sash, be sure to install a handle and cut out grooves with a chisel for all the necessary fittings.
On the veranda, I decided to make two large window frames, consisting of 8 cells with glass 40x30 cm. I also decided to change the frames in the room, to make them of higher quality. In total, I got 5 frames of three different sizes. I did them for 4 days - February 27, March 5, 9 and 10.
First, I'll tell you the frame manufacturing technology. I do not have machines, so I used a handy tool - a saw, a jigsaw and an electric plane. The frames consist of two stitched slats, one of which is 1 cm larger than the other, 2 cm in the middle. Thus, I do not have to “choose a quarter”.


I cut all the slats from the "inch" board. I had the best boards 25x100x3000 laid aside. Using a plane, I bring the thickness of the board to 20 mm. Then, with a jigsaw, I saw it along the slats of the required width.

For 8 glass frames, I needed 50, 40 and 20 mm.
Wood window frame manufacturing technology
For other frames another 70 and 60 mm. With an electric jigsaw, I cut a board with a margin, if you need 40 mm, then a 45 mm saw. I cut off the excess with a plane.

When all the details are ready, I assemble the frame on the table.


I made the frames for the room in the same way. The only condition is that the window opening in the room already exists and has its own size, so I had to "dance" under it.


In the summer, I will sort out the frames and glue the PVA joints with glue. After installing the glasses, I will smear all joints from the street side with a transparent sealant. I will also treat the frames with an antiseptic.
Why are these frames good?
- They are easy to manufacture.
- They cannot be dismantled from the street, since they are bolted to the box from the inside.
- It is impossible to remove the glass, because the glazing bead is nailed from the side of the room.
- The glasses are small; even a child cannot fit through it.
Why did I decide to replace the old windows that I made and are already standing?


Firstly, they are not made of very high quality - large gaps between the slats.
Secondly, I used decorative curves, which are good from the street, but bad from home, as they take away the light (the light opening becomes smaller in area).
In the new frames, the glass opening is only 1 cm smaller on all sides than the glass size, namely by the width of the glazing bead 1 cm.
Old windows will go to the veranda and shed. There will also be a frameless wall window on the veranda. I have already thought about the technology, it remains only to implement.
You can skip reading the entries and leave a comment. Posting links is prohibited.
Arched wooden windows.
How to make an arched window

Many of my readers and subscribers are interested in the question of how to make an arched wooden window? In this article I will talk about my experience and give examples of the work of other masters. This will allow you to familiarize yourself with the theory and get an answer to the question of how to make an arched window.
Before we start studying this topic, I want to say that arched and round windows are used very rarely and for us, "home craftsmen", are not of particular interest in terms of earnings. However, to be a professional in the window topic - this material is simply necessary for mastering.
We will not disassemble the construction of the entire arched window, but consider only the arched element of the window, which is the main one in arched windows.
There are several ways to make a window arch and it depends on the equipment of your workshop with the necessary tools. We will consider several basic methods.
First of all, I recommend making a template for the future arch from a thin dense material (preferably from 3 - 5 mm plywood). This template can also come in handy for working with a hand router. The arch can be made both from a ready-made glued beam (see below)

and from individual blanks with a thickness of 27 - 28 mm, laid and glued together according to the principle of brickwork.

The sketch shows a structure consisting of separate blanks, let's call them lamellas, glued together as ends and planes. The ends of each lamella are sawn off at a certain angle and fit perfectly together.
The assembly procedure for such a structure is as follows:
- We lay the first row of lamellas with their ends, previously greased with glue, to each other.
- In a similar way, we lay the second row of lamellas on the first row, on the plane of which it is also necessary to apply a thin layer of glue.
- The upper third row of slats is laid in the same way.
Thus, a certain three-layer "cake" is obtained, which must be pressed from above with a load or squeezed with clamps to the table surface until the glue pre-sets. In this case, it is very important that the joints of gluing the lamellas to each other of the same row do not coincide with similar joints of the conjugated rows. Further processing of the glued workpiece is carried out according to the template. The outer end of the workpiece, in contrast to the inner one, can be processed not very accurately relative to the template, since it will adjoin the wall of the window opening, but with the inner side you will have to work most scrupulously.
In this we will be helped by a router installed on the milling table with the spindle up or installed above the working surface of the milling table with the spindle down. And even better if you use a milling machine using a thrust washer or other devices.
Now I will tell you about one more method of making an arched window element and, in my opinion, it will be more affordable for making in a “home workshop”. First, we look at the sketch, according to which I will explain the manufacturing procedure.


The profile bar consists of three layers. The left sketch shows the end of the profile, which must be used to make a blind arched transom, and on the right, the profile of the beam for the manufacture of an opening transom. The red line marks the layers from which the timber is glued.

In this case, it is necessary to glue each layer of the future arch from the prepared lamellas. I recommend making a template for each layer, as they have different widths and only have the same outer radius.
How to make a wooden window frame with your own hands
The lamellas of each layer must be glued together with their ends using any method available to you: plug-in thorn, micro thorn, etc.
Then we process each glued workpiece according to the template of the corresponding row. After that, we will use a router and make a fold where a fold is required. It remains to glue all these blanks into an arched beam in the appropriate order. When gluing blanks into a bar, it is necessary to use clamps.
 In the same way we also make the opening sash into the arched transom. It looks like this (picture on the left).
The ends of the arched element of the window are connected to vertical or horizontal parts of the structure with a tenon connection or a "mustache". You are already familiar with this connection of window parts from my book "How to Make a Modern Wooden Window".
Now let's look at some of the more common arched window designs than others. Personally, I divide them into two categories. Wide - more than 1 m and narrow - up to 1 m. The thing is that the width of the arched window affects its filling. It is necessary to embed a vertical or inclined (depending on the design) impost (even into a dull window) into the wide windows of the arched structure. This strengthens the window structure from possible vertical loads, gives the window a peculiar design, shares a large clearance


windows on the ability to install multiple glass packages, which greatly facilitates the work.
In the designs of narrow arched windows, I try not to embed an impost to separate the window arched clearance into separate sections. In such cases, I make a thin slab on the outside of the window, which cuts into the overlap of the arch bar, and on the inside, a decorative lattice is made, which repeats the pattern of the outside of the arched part of the window and at the same time plays the role of a glazing bead for fixing the glass unit in the window structure. A good example is the right figure.
How to make a round window

A round-shaped window is made in the same way that we discussed above. The only difference is that for the manufacture of the arch we used a certain shape of the arch, and in order to make a round window, we must make blanks corresponding to half the circumference of the size of the manufactured window.
We also glue the blanks from lamellas, butts. The workpiece glued and machined according to the template should be exactly half the circle. Naturally, in the first layer of the future window, there should be two such blanks, which will form a circle. In the same way, we make parts for the other two layers. We collect each layer consisting of two semicircles on a dry one and stack it in the sequence we need on top of each other.
Do not forget to shift the joints of the lamellas of one layer relative to the joints of the adjacent layer, i.e. top or bottom. Only after careful adjustment can the semicircles be glued together. As you can see, everything is not as scary as it seemed.
Friends, I'm waiting for your impressions in the comments at the bottom of the article. Do not forget about the contest "Commentator - Leader".
http://paradoxkem.ru
How to make window frames
Modern special technologies make our life much easier; tea is now quite allowed to make a window frame with our own hands. If you will not make window frames in industrial volumes, then for this business it is absolutely enough to have a hand mill or an electric planer. Let's consider the production of a double-leaf window.
You will need
- Boards with a section of 50x150 mm, a bar with a section of 50x50 mm, glass of a certain size, electric planers.
Instruction manual
1. Take a cool dried planed board, it will allow you to avoid warping the window or shrinkage. Make a box for a wooden window. For its manufacture, it is allowed to use boards with a section of 50x150 mm. On the board, make a groove so that in profile the board has an L-shaped shape. The resulting ridge will help seal the window.
How to make a window of wood yourself
Use an electric planer for this work.
2. After that, in accordance with the size of the window opening, saw the board into 4 pieces and combine them together. It is cooler than anyone to make such a connection using a straight tenon and a straight groove. In order to make such a connection, it is necessary to cut a spike on one board (which will have a horizontal arrangement), and on the other - a groove. This work can be done with the help of a saw, hammer and chisel, or use a manual cutter. After that, coat the joints with wood glue and assemble the box. When assembling, it is important to ensure the connection of the parts at an angle of 90 degrees. To ensure a rigid connection, drill a hole in the end and insert a wooden pin greased with glue into it. At the corners to the ends, install window metal corners in order to strengthen the box. After the glue dries, the box is ready.
3. Now it is necessary to make a window frame, for which a beam with a section of 50x50 mm is used. The sequence of its production is the same as for the boxes. Make a profile using a hand router or an electric planer. In order for the frame to open and close easily, a gap between the frame and the box of 1-2 mm is needed.
5. Insert the glass, install the hinges on the frame and the box. Everything, the self-made window frame, is ready. When a wooden window is assembled, it must be rigorously processed and painted in order to protect it from moisture.
Related Videos
Note!
Do-it-yourself wooden windows can be used on porches, balconies, in a bathhouse i.e. where the wooden window will act as a fence from the environment. Let's consider the manufacture of a single-leaf wooden window with our own hands. Now let's see the construction of a wooden window. The window consists of a box that is attached to the window opening and the frame itself with glass. A box is allowed to be made of boards, say with a section of 50x150mm.
Useful advice
Consequently, without special equipment, it is unlikely that it will be possible to make a frame out of wood, like the one that is sold in stores. But for rooms in which there are no special requirements for windows, it is absolutely allowed to make frames with your own hands. Let's see how to make a window frame with our own hands, in a home workshop. To begin with, let us focus on the production of a primitive, single-wing design. Everyone knows that wooden frames dry out over time, losing their shape.
Do-it-yourself metal shutters on windows - types and manufacturing technology
DIY metal shutters on windows
Metal shutters are the most preferred option for protecting a residential building or utility room from burglary and penetration.
In contrast to wooden shutters, metal is a more durable material, which significantly affects the safety of the window and property inside the house.

This solution has a lot of positive aspects, since metal shutters are extremely difficult to break. In addition, such shutters can be harmoniously combined with the facade of the building and fit perfectly into the surrounding architecture.
It is best to think over the protection of windows from penetration, it is best even at the first stages of construction, because this way it will be possible to choose the most optimal installation technology.
Modern iron shutters are available in a variety of variations - designs differ in the number of wings, their size, as well as the method of decoration. In most cases, the sash frame is made of shaped pipes, to which a steel sheet is welded.
With any design, shutters must be installed in such a way that moisture does not penetrate the walls and window frames. Water ingress through cracks in the products will lead to the development of mold or mildew, which will gradually destroy the materials.

Metal shutters are the easiest way to protect your home from burglary
The problem is solved not only by ensuring the tightness of the seams, but also by using drains that remove moisture to the side.
If the house or suburban building is not planned to be used in the cold season, the best option would be to use removable metal shields. Fastening of such products is carried out using easily detachable threaded connections.
Since there are no fasteners on the street side of the structure, metal shutters for the summer cottage are almost impossible to open. The only drawback of metal shields is the high mass, but this does not apply to products from aluminum and other alloy metals.
Separately, it is worth mentioning X-ray protective types - such products are required for installation in X-ray diagnostic rooms. Such products are made from thick metal sheets with additional shielding inserts.
Types of metal shutters

Deaf structures are the most difficult to hack, even with the right tool
Among modern iron shutters, two types of products stand out:
- Solid or solid structures;
- Shutters, blinds.
All the features of the first type have been described above. Among other things, metal window shutters are equipped with stoppers and trim.
External fastening can be present only in the presence of slopes, when the windows and walls are not in the same plane - in this case, a frame is placed on the outside.
For summer cottages, removable blind shutters can be installed - such protection can be removed in the summer. The elements of blind shutters are protected not only from burglary, but also from external influences.
Improve the appearance and further enhance the corrosion resistance can be due to the use of primers and coatings. A solid surface can also be decorated with forged elements - in this case, the degree of protection will remain at a fairly high level.

Solid metal products can have from one to three flaps
Summing up the intermediate result, the installation of solid structures is carried out if:
- Requires protection of the house from daylight and the eyes of passers-by;
- You need maximum protection for buildings in which you will be absent for a long time;
- You want to provide the best possible protection for your home at the lowest cost.
Shutters-blinds are completely similar to solid structures, except that instead of solid steel sheets, lamellas are used that form the translucent structure of the blinds.
Of course, such products are not as reliable as solid ones - nevertheless, cases of breaking them are not common. The slats allow air and daylight to pass into the room, even with the shutters closed.
As in the case of solid structures, the component parts of the lattice are shaped pipes with a cross section of 4 × 2.5 cm. The main parts of the product are already hung on this frame.
Along with the shutters, the kit includes platbands, locks, locks, as well as devices to avoid accidentally closing the sashes. Lamellas on lattice types of products are designed in such a way that the ingress of moisture between them is completely excluded.

Double-leaf louvered structures made of metal
Metal shutter shutters will be preferred in the following case:
- A high degree of protection of window openings is required;
- You are going to be in the house and do not want to feel discomfort due to the lack of natural light;
- You want to make an extraordinary decorative design for your windows.
For a detailed comparison with protective external blinds on the windows, you can read the individual material and conclude which design will fit more successfully into the exterior of your building.
Locking device
Locking mechanisms are located on the inside of the house, on the outside there is just a dull smooth surface.
Locks for mechanisms are similar to locks used in the design of safes.
Available for locks and protection against accidental closing of the doors. The number of locking devices starts from two - top and bottom. Additional mechanisms can be installed if necessary.
Making metal shutters

For the manufacture of solid structures, it is best to use galvanized steel in sheets
Steel doors can be ordered not only in specialized workshops, but also in workshops for the production of metal doors.
If complex metal decoration is not required, then you can make shutters with your own hands.
To do this, you need the following blanks:
- 50th corner for loot;
- A sheet of galvanized steel with a thickness of 2-3 mm;
- Corner, channel or square tube to reinforce the structure.
Before starting work, it is important to accurately align all dimensions. Do not use indirect calculations, be sure to measure each size directly - you will need the values \u200b\u200bof the vertical and horizontal sides of the windowsill, slopes, the length of the diagonals and the magnitude of the angles.

Corner 50 × 50 mm
The contour frame is welded from a steel corner. Further, the steel sheet is cut to the desired size and mounted on the prepared frame. Fastening is carried out either by welding or by self-tapping screws for metal.
In the case of the use of self-tapping screws, do not make the mounting step greater than 50 mm. When the sheet and frame are fastened, it remains to process all the joints with silicone sealant. Please note that the composition must be resistant to low temperatures and moisture.
For each sash, it is necessary to make stiffening ribs - they are fastened horizontally or in the form of a cross.
Hinge holes are drilled in the vertical parts of the frame. The hinges themselves are fixed with bolts or self-tapping screws. On the side of the slopes, it is preferable to use anchors.
If necessary, you can install metal sheets from the inside - for this it is better to use aluminum shutters, so the total weight of the product will noticeably decrease.
How to make window frames yourself
The design and installation process is in many ways similar to those of steel counterparts.
Approximate purchase price

When purchasing suitable products, you need to take into account that the cost of installation is 15% of the total cost
The cost of metal shutters depends on the number of sashes, the area of \u200b\u200bwindow openings, the number of component parts, the availability of painting, as well as the order of a professional installation.
It is worth noting that if a sash of less than one square meter is required, then you will be required to pay for a whole square meter.
Blind shutters from one sash cost from 2,200 rubles per square meter, double-leaf shutters will cost at least 3,500 r / m2, solid shutters from 3100 r / m2. Single-leaf shutters-louvers - from 3800 r / m2, double-leaf - from 4200 r / m2.
It should also be borne in mind that each sash will take two hinges (350 rubles / piece), and it will also be necessary to use latches (simple - 350 rubles / piece, end - 550 rubles / piece, crab system 1000 rubles) and locks (500 r / pcs.).
A metal platband costs from 750 rubles, anti-locks - 350 rubles, painting will cost 350-1850 r / m2, depending on the chosen coating.
Installation work is usually estimated at 15% of the total cost of all products.
If you are considering whether to install shutters on your windows, photos will help you make a decision. Modern shutters can not only protect your home, but also give window openings a complete and aesthetic appearance.
Now one of the most popular windows in private homes is wooden. First of all, this is influenced by the easy availability of the production material. It will be more convenient to build a window yourself if its shape is non-standard, while the number of fittings, sashes and the shape will be selected by a specialist. Below is a detailed description of how to make wooden windows with your own hands.
In connection with the structural characteristics, wooden windows are divided into:
Aluminum wood
Wooden windows can be covered with aluminum. In this form, the period of their use is increased and does not need timely painting.
The load-bearing part of aluminum-wooden windows is constructed of aluminum, which will then be covered with wood. In this case, thanks to aluminum, the strength of the window increases, and the wood transforms the appearance, making it more attractive, and increases the warmth of the window. However, this type of window is not very popular due to the high price of aluminum and complex production.
German
German (or as they are also called - European) have installed accessories that appeared in Europe. This type of window has the property of adjusting the angle of inclination and height of the sash, have locking mechanisms, and ventilation of the window is also available.
Euro windows include sashes and window frames. Thanks to the double-glazed unit, which is built into the sash, the window is thermally safe. It doesn't take much effort to open it. Due to the glued beam, which is used in the manufacture of windows, the room is reliably protected from drafts. It’s also very convenient that it’s very easy to take care of Euro-windows.
This type of window is extremely reliable, stands out for its warmth and durability in use. Their service life is over sixty years. This is facilitated by the presence of a glued three-layer beam that is not amenable to deformation and drying out.
Russians
Separate wooden parts are installed in Russian windows, in which there are 2 glazed sashes with a thickness of 4 centimeters or more. Pine is used as the material. Of the minuses, it is worth highlighting easily deformable windows, as well as a complex combination of sash and window.
Finnish
This type of window is distinguished by its two sashes, predominantly sequential opening mode, and a wide frame. The inner sash has a single-chamber double-glazed window, while the outer sash has one simple glass. Both aluminum and wood are used to produce the outer sash. The sashes are interconnected by a sequential opening mechanism. The window frame and sashes are made using solid wood, not glued beams. The design of the window is very attractive, however, its quality characteristics are worse than that of the German one.
- Double-winged impost wooden windows - several wings are connected into a single structure with the help of an impost, this option is reliable, durable and easy to use;
- Deaf, in which there is no casement. There is no ventilation function in them. Due to the ease of manufacture, the cost of such windows is low. It is necessary to consider caring for the front of the window structure and airing before proceeding with installation;
- Bobbin bivalve - the opening mode is similar to bivalve impost windows, however, here the first sash has a rotary folding handle, and the second without a handle. The second sash can be opened only when the first one is closed;
- Swivel-tilt and swivel - have, opening inside the room, sash. Thanks to the ventilation mode and reasonable price, they have become quite common.
Swedish windows made of wood are also noted. They are a kind of merger of Russian and German. It has an internal frame with a single glass unit and an external frame with a single glass unit. This leads to a high degree of thermal and sound insulation.
Carved wood windows are characterized by multiple patterns, which makes them the most beautiful.
To make the features of wood windows more understandable, it is better to disassemble their main advantages:
Ability to breathe
Only a tree has this property. The regulation of a healthy microclimate in the house depends precisely on wood. After all, wooden surfaces with a large amount of moisture absorb it, and with small give it away. Houses have a healthy and comfortable environment if they have wooden windows.
Plastic and other windows have the effect of moisture accumulation on the windowsill near the underlying surfaces.
Due to the ability of the tree to breathe, there is a smooth air circulation in the room. The micropores in the tree create airflow, even if there has been no airing for a long time. Returning home, after a long absence, you can feel the fresh and renewed air.
Attractive design
On a wooden window, the structure of the wood that was used in the manufacture stands out perfectly. In addition, wooden windows are well suited to every type of interior and exterior. Usually, the dwelling is furnished with wooden furniture and doors that perfectly match wooden windows. In addition, the wooden windows are very beautiful and highly functional.
Compared to wooden windows, plastic windows have an unattractive appearance. Wood gives the room more comfort and warmth.
Long period of operation
With the help of the current composition and impregnation, the quality of the wood that is used in the manufacture of windows becomes much higher, despite the fact that wood is a rather vulnerable material, especially against fire or moisture. Today's impregnations and dyes, which increase resistance to moisture, give wooden windows the most durable operation. In addition, at the time of use, the appearance of such windows retains its original state. For example, plastic windows, when used for more than 10 years, will need to be replaced, while wooden windows retain their solidity even after two decades of operation.
Low thermal conductivity
This characteristic can be explained by the use of a glue bar in the window manufacturing process. In addition, following the technological aspects of window installation affects the thermal conductivity.
High quality durability
The quality, like the wood itself, is assessed at the time of purchasing the material. But the strength level of plastic windows is not possible to appreciate, because the metal profile is located inside the building. And also, in the manufacture of a wooden window on your own, you can choose wood of quality that is suitable for the owner in both operational and material terms. It is recommended to choose a three-layer glued bar, the minimum thickness of which reaches 7 cm. The resistance of the window to deformation and resistance to the effects of various external stimuli will be ensured by the glue bar.
Ease of repair
Such an advantage will make it possible to reduce the cost of repairing the restoration of a wooden window with your own hands. This type of windows is very easy to maintain and repair.
Safety and environmental friendliness for human health
This advantage is the most important during the selection of wooden windows. Since wood is a natural material that does not emit various hazardous or harmful substances to human health.
Before you start making a wooden window yourself, you need to prepare all the necessary tools. So we need:
- screwdriver;
- square;
- drill;
- chisel;
- glass cutter;
- roulette;
- milling cutter or jigsaw;
- plane;
- a hammer;
- ruler.
After this, it is necessary to prepare the following materials:
- sealant;
- glazing beads;
- dowels;
- self-tapping screws;
- wood glue;
- glued laminated timber for the box (oak or pine).
Let's take a step-by-step instruction for constructing wooden windows ourselves:
Box making
Wooden windows are:
- small size;
- large sizes;
- medium sized.
It is necessary to select a window material before starting work. A less expensive and more optimal variation is pine. Due to the fact that the composition of this tree species has a large amount of resin, it represents the most warring moisture and other external irritants.
Oak is considered to be of higher value and corresponding quality. Although, in order to exclude the fear of damage to expensive wood, pine is more suitable for beginners. Boards must be dried correctly, they must not have cracks, knots and deformations. It should be remembered that the box is the main supporting structure that takes all the load.
And also it is possible to apply glue bar, strength characteristics and durability value of which is greater.
For the construction of the frame, boards with dimensions of 150 x 50 mm are suitable. The workpiece should have a groove opening having the shape of the letter G and a depth of 15 mm. The parts are fastened to each other with wood glue, and then - with a wooden rod, the minimum length of which is 3 cm. The role of clamps for each part of the box falls on the rod.
Now the installation of the box in the opening, which was previously prepared. This activity involves drilling holes in the wall, screwing dowels into them and fixing the box with self-tapping screws. To seal the joints and seal the joints, polyurethane foam is used.
Do-it-yourself wooden windows drawings:
To create the frame, you will need a timber with dimensions of 7x5 cm. However, the thickness of the timber can be changed if the strength and size of the window allow. The set amount and thickness of the glass in the window will affect the shape of the profile.
Enough and manufacturing two groove holes in the shape of a rectangle, if you plan to install a profile with one glass. Otherwise, the holes should be larger.
For the construction of a profile of a specific shape, a router or electric plane is required. With a glass thickness of 5 cm, a glazing bead is required, the thickness of which reaches 10 mm.
The frame is assembled after preparing all the parts. To do this, you need to cut the boards at an angle of 45 degrees. Further, a tongue-and-groove connection is made using a prepared profile. To fixation level was higher, self-tapping screws are additionally applied. It is worth noting that each hat must fit tightly into the tree, so the attractiveness of the window's appearance will improve, and the manifestation of corrosion will decrease.
Glass installation
To prevent condensate collection in the window and the absence of cold bridges, it is necessary to correctly measure the height and length of the glass, which is planned to be installed in it. The minimum permissible error during measurement is 1 mm.
Diamond screws are best suited for cutting glass. A fine-grained sandpaper for polishing the edges.
Now it is necessary to attach a ruler with a margin to the glass and draw a line on it with a glass cutter. Then the glass must be put on the table and broken off. After that, the necessary piece of glass must be installed in the window, then the edges of the glass are lubricated with a sealant and re-laid if there is no need for touch-up. Using glazing beads, the glass must be fixed. Small carnations are hammered on the surface of the glazing beads, if they are wide, then it is more reasonable to use self-tapping screws to fix them.
When studying the technique of making wooden windows with your own hands, the final collection of the whole structure should also be noted. If the window is large in size, and also consists of two parts, then first of all, the installation and assembly of the vertical beam is carried out, then it is necessary to fix it with hinged sash hinges. And lastly, handles and other fittings are attached.
The last step will be to install the fully assembled window into the window frame and fasten it using self-tapping screws, which first pass through the surface of the box, and then through the wall. To seal all the cracks, foam is used for installation, and after it has completely dried, the walls are plastered. You can put an end to this work by installing the ebb of the part and the window sill.
If you have any difficulties, here you can find and watch wooden windows with your own hands video.
So, we told everything about wooden windows: what types and varieties they exist, from what and how to make them better, how to install and what is required for this. We hope our tips will be useful and will help you in your endeavors. Thank you for reading to the end. See you soon in the next similar publications.
Wooden windows can be made with your own hands. The main thing is to observe the tightness and geometry of the structure. It is believed that it is impossible to achieve the same quality as for windows made on machine tools, but this is not the case.
If you make windows with your own hands, then it will cost much cheaper than ordering a finished double-glazed window. This is especially true when you need to replace an old window that has become unusable in the country. Soundproof and heat-saving properties of wooden windows are lower than that of plastic ones, but they are environmentally friendly. You can make a window frame in two versions:
Before you make a wooden window, you need to select the material. The main attention is paid to this stage in the manufacture of windows, because the quality of the product depends on it. Oak windows are expensive, but they are considered the most durable. Oak is quite difficult to process, but it is beautiful in the finished product. In addition to oak, for the manufacture of windows are also used:
Larch windows can be distinguished separately, they look beautiful and serve for a long time. By using this breed, you can be sure that the windows will have:
Larch releases special substances - volatile, which kill pathogens. It also contains antiseptic substances that fight the appearance of fungus. Larch is the best option for windows in rooms with high humidity. You can use not solid boards, but, for example, glued beams. This material is practically not subject to shrinkage. And this means that after installation, the windows will not move anywhere. Making wooden windows with your own hands involves the use of special tools. There are not so many of them:
If necessary, these tools can be replaced:
But since the main thing in the manufacture of frames is a high-quality and accurate fit, it is better to get a good tool. After all the necessary tools are ready for making a wooden window with your own hands, you need to make measurements and make good drawings. Having a drawing, it is very easy to calculate how much material is needed. And then proceed directly to the manufacture of the box.
Making a wooden boxFor the manufacture of a wooden box, pine is usually used - this is one of the most affordable and inexpensive materials. Oak is an alternative to pine, but it is too expensive, and usually they make their own windows from cheaper materials. The board for the window box needs to be well dried, to see that there are no knots, cracks or other deformations on it. It should also be borne in mind that the main load will go to the box fixed in the doorway. The board should be 150x50 mm in size. To make a wooden box you need:
The peculiarity of such a fastening of a window box is that the board is mounted without taking into account its mobility from the temperature drop.
Window frame manufacturingTo make a window frame, you need to take a beam, the dimensions of which depend on the design of the window. In the standard it is 60x40 mm. The profile shape is determined by the number of glasses, thickness, glazing bead size. The single-glazed profile has two rectangular grooves: one for glass and the other for installation in a box. If the profile is two-glass, then it has one more groove for the second glass. The shape of the profile is made using a router or an electric planer. Glass must be selected with a thickness of 4 mm, and a glazing bead - 10 cm. To assemble a frame from the prepared boards, you need to saw them strictly according to size and obliquely along the edges, at an angle of 45º. Using self-tapping screws, the profile is given additional immobility, but the hats need to be twisted so that they drown in the wood.
GlazingIn order for the glass to fit snugly and the cold does not pass through it, you need to correctly calculate its dimensions. Measurements must be taken with millimeter precision. The glass is cut with a diamond self-tapping screw, the edges should be polished with fine-grained sandpaper. When working with glass, remember the safety precautions:
The preparation and insertion of glasses is done in this way:
For the final installation, the window must be inserted into the window block and fixed in the grooves with self-tapping screws, they must enter the wall through the box. You can perform this procedure with a mounting gun, it will shoot metal dowels into the wall. The cracks need to be filled with mounting foam, and after it dries, plaster the wall. Finish the work by installing the ebb and the window sill.
Repair of wooden windowsDespite the fact that today more and more people are installing plastic windows in their homes, there are still a lot of wooden structures. And over time, they need repairs:
More details on how to make a wooden window can be seen in the video. |


In recent years, plastic insulating glass units are confidently replacing wooden counterparts. However, their reliability and technical indicators are firmly established, time-tested. In addition, this is a budget way to change the window, especially if you decide to make a new one yourself.
Wooden structures are an environmentally friendly and reliable construction item. Everyone knows about their advantages: firstly, wooden windows “breathe”, secondly, wood is an affordable material, and thirdly, they can be made by oneself without the use of sophisticated equipment.
Windows for summer cottages, outbuildings or verandas can be made by yourself, having studied the technology a little. When manufacturing it is necessary to pay attention to the correct calculations of the size of the window and its geometry. Not only aesthetic operating factors depend on this, but also the functionality of the design.
How to make a wooden window with your own hands
The main point in assembling the details of a new wooden window is jewelry precision. If you are unsure of your abilities, then it is better to contact a professional or order a ready-made window made at the factory.
Required tools:
- screwdriver;
- drill;
- glass cutter;
- electric plane;
- a hammer;
- chisel.
Stage number 1. Preparatory work
In order to make a window, you need to create a sketch. To do this, you must clearly know the dimensions of the future window and its functionality, for example, will it open or not, the number of doors and vents.
The sketch is drawn to scale. This is important in order to correctly calculate the amount of material, the location of the bolts and hinges, handles and latches. The presented video contains examples of window drawings, maybe you will find here what you need:
In addition, the material is calculated for this window. Calculation is best done with a margin, in case the part can be spoiled due to lack of experience
Important! Decide in advance on the type of window in order to purchase the necessary accessories.
Stage 2. Manufacturing blanks for the window
An important point is the choice of the type of wood. The most popular windows are solid pine; in addition, oak can be an alternative.
The board must be prepared for processing, namely dried, not have deformations and damage.
According to the drawing, the necessary details are cut, which will later be connected to each other.
A skill is needed in working with a milling machine, so it would be more advisable to use an electric planer and a jigsaw.

In addition to the array, glued beams can also be used as working material. It has a durable texture and is also resistant to deformation.
For work, you need a board 150x50 mm.
Stage No. 3. Production of a box or frame
In the blank boards, a groove or groove is made, the depth of which is 15 mm, the groove is a groove in the shape of the letter G. We need to make four identical parts of such parts.
Connect the box parts using wood glue or PVA glue. In the finished rectangle, holes are drilled in the corners and a 3-4 cm core is hammered. This wedge provides reliable connection of parts at right angles.
The box is ready. It is placed in a window opening and fixed with dowels. Along the perimeter, gaps are foamed with polyurethane foam.
Stage number 4. Making a window
A 6x4 cm beam is needed for the frame. The shape and design depends on the number of compartments, glass and glazing bead size.

There are two types of profile:
- one-glass;
- double glass.
The single-glass construction includes two grooves: one for installation in a box, and the other for glass installation.
The double-glazed profile is a more complex structure with three grooves for two glasses and a box.
Usually glass with a cross-section of 4 mm is used, while the size of the glazing bead will be 10 mm.
The base of the frame is assembled from the blanks. To make assembly convenient, the ends of the blanks are cut off at an angle of 45 degrees. And the previously prepared profile is joined by the thorn-groove method, which ensures reliable adhesion of parts and the immobility of the structure.
You can also consider another reinforcement option - a metal corner. This part is sold in any hardware store. Corners are attached to each corner of the structure using self-tapping screws. Currently, builders began to abandon this method, believing that it is not aesthetically pleasing. However, if the window will subsequently be painted with paint, this option can be considered.
Stage No. 5. Installation of glass
The importance of the correct calculation of the size of the glass is due to the fact that this factor determines the tight fit of the glass to the frame, which is responsible for the thermal conductivity of the window. If during the installation process gaps have formed, then such windows will blow.
Important! Glass measurements before cutting are made with millimeter precision.
Glass cutting is carried out with a glass cutter, after which the sharp edges are treated with sandpaper.
When implementing this process, you must follow the safety rules:
- work must be carried out in gloves with a dense rubber coating in order to protect the palms of the hands from cuts;
- a mask is put on the face;
- eyes are protected with glasses, as there is a threat of glass fragments and shavings.
Working with a glass cutter also has its own subtleties. So how to cut glass. The movement of the glass cutter on the glass surface should be smooth with a moderate degree of pressure. If you do not apply enough pressure, then the cut will be of poor quality and with further action, you will get a jagged chip. On the contrary, excessive pressure can push through the glass, and you risk being injured by splinters.
A ruler is used to cut the glass. The material from which it will be made does not matter. If you don't have a ruler, you can use a flat bar.
Important! The ruler must be longer than the glass.
After processing with a glass cutter, the blade is moved to the edge of the table, and lightly pressed by hand. If you all performed the right glass in place of the cutting line break. Thus, we cut out all the glass for the window.
For final assembly, we apply sealant to the wooden parts. It is better to take the product colorless, so that the aesthetically pleasing window looks flawless. Next, we apply glass and let the sealant dry. From above, the canvas is fixed with a glazing bead. The glazing bead is a triangular rail that simultaneously presses against the glass and frame. Its task is to fix the glass and hide the seam.
The rail is mounted using thin nails, less often with self-tapping screws, if the glazing bead is wide.
Stage 6. Installation of a window
The finished window is mounted in the box using self-tapping screws. The slots between the frame and the box are sealed with polyurethane foam or sealant. Next, the window sill is mounted in place. You can familiarize yourself with the process of making a wooden window in more detail by watching the video:
Production of a frame in two parts
When a window is required to open, the technology changes slightly and becomes more complex. Such a window is made a little differently. In the center, a bar is mounted in a vertical position, which has grooves similar to the frame. The second half of the window is made separately and has a frame that is several centimeters thinner. It is attached to the main structure and is a “door”.
Making a wooden window is a fun and rewarding process. In addition, how pleasant it is to look out the window, created with your own hands, which keeps your warmth and a piece of your soul.


