Convert an old barn into a terrace. Alteration of an old barn: an amazing transformation. All that is at hand
In recent years, the trend is gaining more and more popularity not only to build new wooden houses, but also to restore houses and already battered buildings. It's no secret that over time, wood loses its original beauty: the golden, warm color of this natural material fades and darkens after a few years. And constant exposure to precipitation, temperature changes and other factors lead to the appearance of mold and fungus.
How to restore old, darkened wood, returning it to its former attractive appearance? At the moment there are several various ways solutions to this problem.
Someone prefers the use of radical methods, such as sheathing with siding or facing a wooden structure with bricks. But such options initially do not imply the preservation of WOOD, so we will not dwell on them in detail. Consider only those methods that allow you to restore, renew and refresh the affected wood, and not hide it out of sight:
| Recovery methods | Advantages | Flaws | Result |
| 1. Grinding- a mechanical method that allows you to remove existing biodamages and remove the top darkened layer of wood |
|
|
The wood will look absolutely new and fresh, but we must not forget about the need for its MANDATORY further processing with bioprotective and antiseptic compounds. Otherwise, the result will be very short-lived. |
| 2. Coloring– as a rule, inexpensive enamels or paints |
|
|
A building treated in this way will look refreshed and updated for some time, but, unfortunately, it will no longer be very wooden. And non-breathing coatings that form cheap paints and enamels will lead to the destruction of wood from the inside. |
| 3. wood bleaching– the most popular currently are chlorine bleaching compounds |
|
|
As in the first case, we will get almost new wood of a fresh and light color. But there is still a lot of work ahead - bioprotective treatment and, if desired, giving the wood the right color. |
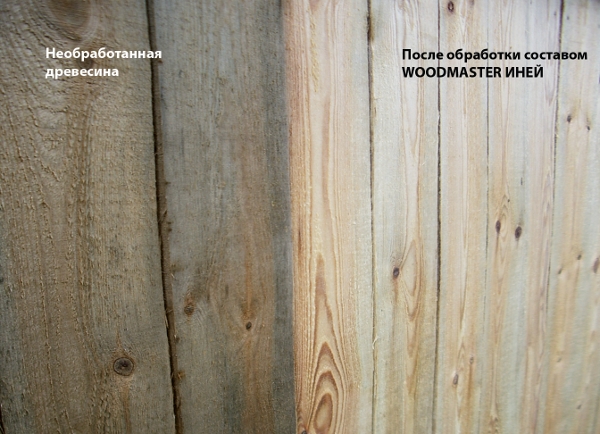
|
|||
| 4. The use of restorative composition– for example, Aquatex Restorer
|
|
|
The result is impressive. After applying only two layers of the composition, we get not just renewed wood, but a durable coating of the desired color immediately, providing bioprotection and strengthening the aged wood. |

There can be no consensus on how best to renew wood that has darkened over time. Radical measures are necessary only in extreme cases, most often the problem can be solved with minimal effort. When choosing the method that suits you best, remember that we are talking about your home and the comfort in it. It is hardly appropriate to over-economy. It is worth considering all the circumstances and giving preference to the maximum effective remedy, which will allow you to restore wood efficiently and quickly.
|

|
Old unpainted house | House covered with Aquatex Restorer |
Of course, all of the listed methods of wood renewal are quite viable and have the right to exist. But even now it can be argued that the use of a restorative composition, such as Aquatex Restorer, is just the way by which we get the desired result with minimal effort.
The product appeared on the Russian market relatively recently, but its effectiveness has been repeatedly confirmed in practice.
IN country design even utility blocks can be not just a barn, but a real work of art. I bring to your attention interesting ideas utility sheds, houses for inventory and workshops. All these structures can be made to give with your own hands, decorate to your liking.

Hozbloki can be without windows to prevent easy theft of the tool if your site is located in a not very quiet place.

The wall of the shed can be decorated with painted plastic plates screwed on with self-tapping screws. At my dacha, the northern wall is decorated in this way, I painted them myself.

Your workshop may also have a small porch where you can sit and take a break from country affairs and worries.

The classic design of a cute hozblok, decorated with ampelous flowers, as well as tub and tray compositions.

The octagonal guest house can be used both as a workshop and as a utility block.

Hozblok combined with a garage. Even a shed can have a beautiful front garden with flower beds.

A stylish guest house made of foam blocks can also serve as your workshop.

Here's another one nice idea hozbloka enthusiastic summer residents. Doors, as I like, with floor-to-ceiling glazing.

A wonderful idea for a utility block combined with a guest house.

The idea of imitating windows with trays of flowers will revive plain walls barn.

A nice composition of a shed and a pergola with a seating area.

Classic barn in the country or private courtyard.

Still, it's nice that there are people who create from ordinary, familiar buildings, also beautiful solutions landscape design.

It would seem like a barn, but here is the porch, here are the flowers - and already a completely different feeling! Some joy...

If the shed is painted in light shades, then the site will immediately become more fun.

Old tools can be hung on the walls, decorating them in a rural country style.

Neat guest house, lined with shingles.

A beautiful idea for a shed in the country is a flower bed and flower trays, a stone slab path leading to the building.

high barn with pitched roof and windows for light from the ceiling.

The original hozblok for storing inventory in the country.

The idea of a workshop in a summer cottage - I can assume that an artist creates his masterpieces here!

natural roof in scandinavian style- in Norway, on old houses you can find turf. Well, here the designer's idea was to plant a flowering lawn.

Some ideas are so good that they can even become the basis of a small country house, and not a hozblok.

In the photo - a completely working option for a summer house on a plot of 6 acres.

Wenge-colored shed - stylish solution in color!

A stone hozblok in an English estate is a construction for more than one century, and more than one century is ahead!

A simple idea for a shed for storing inventory in a summer cottage.

Beautiful frame shed, sheathed with plywood.

A squat hozblok is a design idea for your dacha.

The original solution is an imitation of shutters on the window.

You can make such hozbloks with your own hands in a week, thus you will find a place where you can store the tool. But do not turn the room into a pantry!

The idea of designing an approach to outbuildings in the country.


It would also be good to provide a canopy over the door so that in the rain you can open the door without standing under falling drops of water.

An unusual solution for the entrance group made it possible to create an additional door.

A solid barn built in Western style.

The idea of the hozblok is a square-shaped workshop.

The idea of a hozblok with an asymmetric roof.

Hozblok with a beautiful front door on massive loops.

Unusual hozblok with walls made of wood cuts. I have repeatedly met a similar solution, I wonder how labor-intensive and reliable it is?
On this, let me say goodbye to you today, see you tomorrow! Stay tuned for updates, share ideas with your friends, get inspired and create unique beauty on your site!
Cozy country interior for a penny!
background
My sister and I were on fire with the idea of acquiring a small country cottage area when we were 22 and 25 respectively. Both of us are fond of decorating and we wanted to bring various interesting ideas to life, as well as to have a place where you can just relax from the bustle of the city and enjoy being close to nature.
The place was not chosen by chance - overlooking the ancient Pinery, on the other side of which our grandparents once lived a long time ago and with which our happy childhood is therefore associated.
View of the pine forest from the attic
Buying a house
The plots in this SNT are small - only 3 acres, but we were primarily interested not in the garden, but in the house. Therefore, we immediately rejected proposals with plots turned into one continuous bed.
... And, finally, luck smiled at us - according to an ad written by hand, an elderly man responded - his old friend was selling a plot with a house. When we saw him (the house, not the man) - it was love at first sight! A wooden house with an attic and an overgrown garden! We asked for the landlady's phone number and immediately agreed to purchase without haggling the price (and it turned out to be much lower than we expected!). So we became his happy mistresses.
Transformation. Start
The house was made with love, but already very "launched". We wanted to breathe into it new life making repairs without spending a lot of money. We initially decided that it would be a "budget" repair, and wanted to prove that beautiful and comfortable does not mean expensive.
This is how the house looked at the time of purchase and the start of cleaning: old wallpaper, yellowed from time and smudges of the roof, an old bed and gray chairs:

Spring bed USSR

The wall opposite the bed (let's call this place so that it would be convenient to compare later 😉)

This is what the house looked like from the outside

I will not show even more terrible places on the ceiling - so as not to scare you))
Paragraph 1
So, my sister and I started the repair with cleaning.
They raked out and sorted out the rubbish stored in the shelves and “lockers” - it was old clothes, jars, bottles, bottles, etc. They swept garbage, dirt, dust and, of course, mouse poop everywhere (tying the respiratory organs with handkerchiefs just in case and wearing masks). The rubbish was partially taken to a landfill, something was put on rags, something was sent for washing, something was left for use or decor.

We immediately called this place "tea" - because here, as you can see, there is a small table with a couple of chairs for tea drinking and a gorgeous view from the window (topmost photo of the post)
Point 2
We washed everything with bleach!
Literally EVERYTHING: floors, walls, ceilings and even furniture.
Point 3
Started painting old furniture in more "cheerful" colors. For example, it was decided to make the bed white.
The paint used was acrylic. And for painting window frames used cheap alkyd enamel.

Bed painting

Chairs - in "lavender"!

The paint emphasized the structure of the tree
Gradually, a kind of "concept" of this mini-room developed - and we called it "lavender tea room".
I decided to paint one of the doors here like this:

I write in English "lavender tea room"
By the way, we called the main room in the attic "blue bedroom". It was decided to use a warm, joyful shade of sky blue in it and, of course, white for the combination (association with white clouds in the blue sky).
Item 4
Plywood on the ceiling in places of smudges was replaced with a new one
Item 5
They tore off old wallpaper from the walls and some paper from the ceiling. Once again washed the walls with chlorine, dried and started wallpapering.
Wallpaper for the main wall of the bedroom chose white in a blue flower
"Feodosia" - 200 rubles / roll
Blue wallpaper (for combination) - 80 rubles / roll
Wallpaper on the ceiling - free of charge (found the old ones in the barn and pasted them on the wrong side)

View from bedroom to tea room

Rolling into new wallpaper ..

We continue ...

It is not easy to paste over the ceiling - the hands become numb, but then the hand gets stuffed)
In the meantime, the walls in the tea room are covered with the remnants of wallpaper that was kept at home (pink), and the lilac ones were bought for 70 rubles/roll in the store. The cabinet door is painted pink.

I'm in the tea room
Well, you are probably tired of looking at the phone photos of our “flopping” and you want to see what came out of all this?
We specially arranged a “photo shoot” for the resulting interior on the camera:

lavender tea


Tea room


And now the blue bedroom.
The photos are arranged as if we are turning to the right:

blue bedroom

Bedroom

Table by the window

Shelves and suitcase for storing linen (hand-decorated)


Sofa opposite the bed

View from bedroom to tea room

blue bedroom
And from the outside, the house now looks like this (we painted it mint and pink - we tinted it ourselves).
They painted with rollers, using a folding ladder, and leaned out of the windows to paint where the ladder did not reach:

House in autumn


And here we are with my sister Lyalya in the garden near the house. The peony bush has not yet blossomed, but it has already grown - we made it a “holder” from an old chair with a holey seat (which was simply torn off) found in the attic in the village of my grandmother.
My story ends, but the story of the transformation of the house does not. The plans are to "shoulder" the first floor. Be sure to share the result with you!
We are slowly equipping the garden: we dream of a lawn, flowers, a fence and garden furniture.
Thank you all for your attention! We hope that we have inspired at least someone else to create and create))


