What can be made from siding residues do it yourself. Original crafts from the residues of building materials shelves and much more from drywall
Installation of vinyl siding without the use of accessories is possible. Despite the fact that some builders say the opposite. But not all. Usually, the installation of vinyl siding is carried out using accessories (window strips, framing, joints, etc.), which is bought separately from siding, pre-picked up color and type.
But is it worth buying it? After all, it is not a secret that the quantities for siding are about 1.5-2 times more expensive, although they have the same composition, share, strength, etc., only the other form, although it should not be a reason for increasing the price. Many believe that without them, the installation of siding is almost impossible and, by spending their blood earned, they buy them too much. But it is not at all so! You can do without them, and the mounting of siding will cost you much cheaper and without prejudice to the aesthetic species. It can be used instead of these accessories. wooden craftsYou can make with your own hands, or siding trimming, which in the process of installation will be less than a lot and throw them sorry. For example, corners can be made from thin boards, and the window strips make from unnecessary siding residues using a special glue. It will cost cheaper and not less efficient. Some confuse the fact that the tree is very "painful" tolerate adverse weather conditions, quickly "aging" and requires constant care. It is easy to correct if the HMBB antiseptic tree is treated and apply a special lacquer for protection against ultraviolet rays to the surface, the service life will be increased to 20 years. Mounting siding should start marking throughout the perimeter of the house of a single horizontal, most convenient for this purpose to use laser level. I have repeatedly made the installation of vinyl siding without using fittings. It is best to do this in cloudy weather or in the evening, when the Sun will "sit" to the laser beam well visible. All the walls are strengthened by a frame of wooden rails, to which siding will be located, you can certainly use and special metal bars, but it will cost more. Then install the lower start panel along the line, which was noted earlier in terms of the level. It is very important here to install it smoothly, since all subsequent sheets will accurately copy the horizontal of the starting panel. Taking into account the fact that vinyl siding can expand and shrink depending on the temperature, when installing, it is necessary to leave the gap between the joints: 10 mm if the work is carried out in winter, and 5 mm, if in summer. When installing the walls, it is advisable to dock the panels "into the backstage", because so the joints will be almost not visible and the house will look out of the side more beautiful than when docking any other way. The top, the upper panel must be made in the finish bar, which is in advance attached in the upper inner corner between the eaves and the wall of the house and fix at least two self-testers along the entire length, otherwise it can jump out when the wind is the first rushing. After mounting the walls, you can proceed to the windows. Of course, as they say "the taste and color of the comrade is not", so there may be different variants: deprive either with wooden boardsor use siding residues. As you can see, the installation of vinyl siding without the use of fittings is not so complicated.
Repair of refrigerators Automobile Plant http://master-nnov.ru.
Imagine the beautiful: you bought a cottage. Or removed a house for a couple of months. Alas, rarely who sells and gives Russian country houses with gorgeous furniture. At best, you will get the shaded chairs and truncated cabinets. But do not hurry to the hypermarkets of furniture for a cheap atmosphere. Look around: interesting furniture can be made from anything. Almost.
It all starts with hangers
Dacha can be different. Maybe with lace napkins and Gzhel, and maybe with racks from drawers and a bar as shelves hanger. Why not? As you can see, the role of hooks are capable of performing different unexpected items - even nails, at least hammers.
Photos from the site houzz.ru, author Tip: If you liked the idea with a bar, consider the solid weight of the material when calculating the mount. Six-meter pine timing segment 20 by 20 cm weighs about 210 kg! A 10 10 cm - just over 50 kg.

Photos from the site houzz.ru, authorVeritas Fine Homes Inc
Compromise option for thin walls - decorative hooks on old board (for example, a stakeholder).

Photos from the site houzz.ru, author From the textured tree you can make a spectacular frame for the mirror in the hallway.
Sleeping place
If there is a bed or mattress - already good. It remains to be established sleeping place Original headboard. To do this, cutting boards, painted and compounded in the figure composition. However, the old sawn timber can not be given to a civilized species, but, on the contrary, choose colorful, "broken life" instances.
Photos from the site houzz.ru, author I do not want to throw the mattress to the floor - build the podium. Minimum height Beds - 30 cm, Maximum - 75. As a podium will be used, for example, the remaining timber. But remember that not every overlap will withstand the bed weighing a ton.
Photos from the site houzz.ru, author A frame of beds from bars, plywood and boards will be much easier than a monolithic array. Yes, and in production such a design is very simple. Do not be afraid of a handicraft type of product - the fact that in the urban apartment looks like a challenge "renovation", it looks cute fun at the dacha without complaints.
Photos from the site houzz.ru, author Tip: As headboard wooden bed Wide euro pallets will rise. Be sure to sand wood, treat it with an antiseptic from the fungus and bug, and cover with varnish - glossy or colorless matte.
Sofa
Wooden euro pallets (pallets) for the transportation of goods have been left at the peak of the interior fashion for several years. Of them make low coffee tables, frames for sofas and beds, headboards and racks. It is fashionable, and most importantly - cheap: Palests are sold at construction bases at a price of 200 rubles per piece (used). Paint or cover with colorless varnish after grinding is a matter of taste.
Photos from the site houzz.ru, author Palests were especially well established as frame for sofic zones. It is clear: if the homemade chair from the pallet can be replaced with a cheap plastic, then it will not work with the sofa.
Table
Put the pallets on each other - get a spacious table. Finish the roller wheels to the pallet - and now you have a mobile designer table. Close it on top of the sheet of plexiglass or glass - the dirt will not be absorbed into the tree, and nothing will fall through the slit.
Photos from the site houzz.ru, author But it is not necessary to go beyond the pallets specifically for the table - it can be done from the old door. The loss will be a cloth, the color will be the tabletop. If you sat down a small table, then the legs for it look for no need - just cut the door cloth into three parts, from the inside the crepension corners.
Photos from the site houzz.ru
From the old suitcase, living eyelids in the attic, will also come out coffee table decent capacity. And from two or three suitcases, the chest of drawers or bedside tube.
Photos from the site houzz.ru
Bar from this point of view is a much more convenient material. We clean and fasten the pieces of joinery glue.
Photos from the site houzz.ru, author
In addition to the boxes, we need furniture wheels, corners, self-tapping screws and carpentry glue. For the stability of the design, the boxes can be fixed on the frame of the board or plywood.
Paint, Morilka, Varnish - at will.
Rack
Still have boxes? Perfectly. They are easily combined into interesting racks and hinged shelves. Such furniture can be painted inside or outside, go with wallpaper or cloth.Places for storage
Separately, it is worth mentioning about the withdrawal stairs, "goats" and the stepladers. These are ready-made heated towel rails, clothes hangers and racks.Any basket will give a ladder even more opportunities for storing things.
Photos from the site houzz.ru, author If there are niches in the house, fenced corners - make a built-in wardrobe there. And let you not bother the modesty of decoration. Boldly use pipes instead of rods, drawers instead of the shelves - the entire stuffing can be hidden for a bright curtain. It will be much cheaper than the doors, and even decorative.
- Excellent material for lining at home. At its affordable cost, it has many positive operational and technical characteristics.
You are offered detailed instructions by independent installation Siding. Guide is universal. Following his provisions, you can fulfill the finish of any, providing for installation on the crate: fibro-cement, wooden, metal, vinyl, etc.

Mount the cable
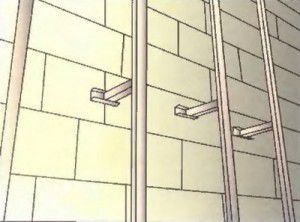
Siding is best attached to a pre-mounted crate. We work in the following order.
First stage - choose the material

Frame can be collected from wooden bar or metal profile. Metal products are more durable and durable. In addition, the metal case is much easier attached to an uneven base.
Find out, and also familiarize yourself with the algorithm of computing with an emphasis on possible nuances.
Installing profiles is performed with a half-meter step. For mounting to the wall, suspensions are used. This technique will reduce surface drops and consolidate the framework elements by level.
Wooden cheaper cheaper. When choosing this option, pay attention to the state of the wood. It is forbidden to:
- material layered;
- was deformed;
- had blue spots and traces of rot, etc.
Elements of a wooden crate need to be soaked with antipiren and antiseptic. If the house is built of wooden elements, the walls should also be treated with listed drugs.

Second stage - prepare the foundation
The crate is easiest to fix to a smooth base. First, remove any details that may prevent. These are all sorts of tiles, bars, platbands, waterproofs, etc.
Third stage - install guides
Siding is best attached horizontally. Bruks or profiles of crates in this case are fixed vertically.
For fastening the guides to the wooden walls, we use nails or self-tapping screws. If the house is built from concrete blocks or bricks, crepim dowels, the holes in the wall of the house are pre-drilled for them.
Each rail align in level.
Important! If you are planning to perform an outdoor, the siding clamp is best fixed after the completion of all insulation works. In this case, the crates will be two: for insulating materials And for cladding. At the same time, the rails of two frames should be placed in parallel to each other.


You can, of course, try to put insulating layers after fastening the siding crate, but not very comfortable.

Mount J-profiles
Starting guides must be fixed perfect, because The quality of all cladding is depends on the correctness of their installation.

First step. We take the level and find the lower point on the crate. We retreat from it up 50 mm and put the label. To do this, we screw the screws in the rail.
The second step. We consistently move around the building and continue to put the tag screws for fixing starting profiles. Also screw in the corners of the house.
Third step. We stretch between the corner marks of the rope.
Fourth step. We celebrate on the rails of the installation of angular profiles. We take a profile itself, we apply it to the corner frame design And put on the edges of the label using a pencil.

Important! Between the profiles, we leave a 1-centimeter clearance to compensate for temperature deformations.
Between the starting guides and nail straps, we leave a gap.

In order not to make a 6 mm indent, you can cut off parts of the nailed slats so that at temperature changes they do not rest in the J-profile.

Important! Starting profiles need to be mounted strictly horizontally! Correct the deviations as much time as you need.
If you set the guides with deviations from the level, siding will also bother. Fix it will be extremely difficult.
Prices for fastening for profile
Fastening for profile
Intim the external angular profiles

First step. Location Sophia. We need to see where the edges of these elements will be located in the future.
The second step. Apply the guide to the corner of the frame. We do it with a 3-mm gap to sofit or roof. Fresh profile with self-draws.
The lower boundary of the element is 0.6 cm below the edge of the starting profile.
Third step. Check the vertical installation. In the absence of deviations, fix the bottom, and after - the rest of the place. Specialists do not advise fixing fasteners in angular elements too often.

If the house is above 300 cm, the profiles will need to be applied one to another. To do this, cut the upper profile. As a result, there should be a 9-millimeter gap between the planks of the connecting elements. When laying elements withstand 2.5 cm.


Important! Profiles docile on the same level on each side of the house.
If the base has a protruding structure, the profile is shortering that a 6-millimeter clearance remains between it and the basement.
Helpful advice! Instead of an angular profile, it is allowed to install 2 J-elements (starting). So you can save money. But this solution has its own drawback - the angle will not be so sealed, as using a special angular profile. Deciding to take advantage of this method, pre-cord the wall at a similar angle strip of the rolled waterproofing material.

Mount the internal angular profiles
The order of installation of these elements does not have significant differences from the technology of external angles - between the profile and sofit, we leave an indent to 3 mm, the lower end of the profile omit below the J-strip by 0.6 cm.
If there is a protruding base or another element, knocking out of the general level, then between it and the profile also leave a 6 mm indent, it is impossible that the profile of the inner corner rests on it.
There are 3 methods of arranging internal angles, see the drawing.

If the height of the wall is more than 300 cm, perform the splicing of profiles. The technology is the same as during the arrangement of external corners.

There are 9-millimeter indent between the planks, carefully cutting the extra material. The backstage of the top element on the lower - 2.5 cm. Fasteners set with a 4-centimeter step, placing them strictly in the center of the holes intended for this. Exception is the top point. Here the fasteners must be installed in the upper part of the hole.
Mount the framing of the openings

Most inexperienced masters are difficulty at the framework of the framing and door openings. The order of work will vary depending on how the openings are equipped with respect to the wall plane.
Operactions in the same plane with the facade

In this case, we do the following.
First step. We carry out waterproofing of openings.
The second step. Breeping on the openings of the platbands or the J-profiles. Each opening is equipped with 4 platbands: vertical and pairs of horizontal.
Third step. Connect profiles.

In order for the connection of the platbands to be as neat as possible, we do this:

The platband is connected in the same way, only the bridges will need to be cut and bend on the side elements for their further overlay on the profile at the bottom.
The openings are recessed in the facade


When installing a near-room profiles, we work with the observance of the same recommendations as when installing the platbands, i.e. Create on the profile of cuts, corresponding to the magnitude of the depth of the opening, and then bend the bridges and insert them into the finish elements.
Do not be lazy to figure out the principles of flexing such bridges. We make them so that they cover the joint of the cladding elements. As a result, the moisture will not be able to penetrate inside.

Mount the first panel

We begin cladding with the least noticeable wall wall. So we can practice and work out all sorts of inaccuracies.

First step. We insert the first facing panel in the angular profile and in the lock connection of the starting strip.
Important! Between the first element of the facing and the bottom of the castle of the angular profile, we leave a 6-millimeter temperature gap.
The second step. Attach the panel to the crate.
It is important to comply with the size of technological indents. If the facing is carried out in warm weather, withstand a 6 mm indent, if in the cold - increase the gap to 9 mm. When installing cropping panels, the indentation can be reduced.

Establish panels

Facing elements are increasing the brass or using the H-profile.
When fastening the flashes, you need to pre-shorten the locks of facing panels and the fastening frames so that the backstage has a 2.5-centimeter length.

Installation of the H-profile is performed like angular elements - at the top of 0.3 cm from sofa, lowered by 0.6 cm with respect to the starting profile.
Important! Between the n-profile and any obstacles to home, we leave a 6 mm indent.
Mount the rest of Siding

We continue the facing of the house by siding. The technology of work is similar to the order of fastening the first panel.
Important! Each 2-3 row check the horizontal facing with a level.
Having reached the opening, remove an unnecessary piece of panels falling on the opening.
Reliable mounting panels are provided with the help of "hooks". To do this, we will need Puinson.

Intim the additional finishing profile at the bottom of the opening. It will allow to align cladding on the plane.

Mount under the roof

Under roofing design Confirm J-profile.
We work in the following order.
First step. We measure the distance between the bottom of the lock of the finish element and the castle of the penultimate facing panel.
The second step. We take away from the obtained measurement of a 1-2-millimeter indent.
Third step. We place a whole panel, cut off its upper part with a lock connection.
Fourth step. Create "hooks" at the top of the element with a 20-centimeter step. To do this, we make cuts and flex them on the front side.
Fifth step. Insert the cropped item in the penultimate siding panel. Light movement up snap inserted element in the locking of the finishing profile.

Mount Fronton
We are wearing the frontout around the perimeter. All fasteners, except for the top, install in the center of the holes. Top mounting element Install at the top of the opening. You can sow as profiles to arrange internal angles and starting profile.

Installation order is similar wall panels. Cut the edges of the elements and connect with the castles of host profiles. Remember the 6-millimeter indentation when installing in warm weather and a 9-millimeter when performing work in winter.
The last element of the Fronton plating is secure directly through the panel material - you can only do here.

Facing completed.
Learn how, as well as consider calculations and step by step guide, from our new article.
To finish the houses of the panels passed the most successfully, you need to know certain subtleties of the execution of such work. There is a list of general recommendations for any siding, as well as individual tips for panels made from a particular material.
Now you can perform yourself at the highest level.

| Name (model) | Provers | Length x Width x Thickness, mm | Number in packing, pcs |
|---|---|---|---|
| Vinyl siding "Kanada Plus" | 1. Coloring B. dark tones It is performed using the Cool Color method (heat absorption), which implies the use of superconcentrators. 2. Excellent appearance It remains unchanged even when exposed to high and low temperatures, the range of which ranges from -50 ° C to + 60 ° C. 3. Keeps impaired, even if the ambient temperature is lowered to the indicators -20 60 ° C. 4. Not subject to microbiological corrosion (fungi, mold). | 3660 x 230 x 1.1 | 20 |
| Acrylic Siding "Kanada Plus" | Among other useful qualities of Acrylic Siding "Kanada Plus" is worth highlighting: Increased resistance to direct ultraviolet rays; Excellent tolerability to acid and alkaline solutions, as well as to various fats; Good tolerance of washing with chemical detergents; High degree deformation resistance (perfectly tolerate temperatures up to 75 ° C). | 3660 x 230 x 1.1 | 20 |
| "Alta Siding" - vinyl siding | "Alta Siding" is: one of the safest finishing materials on the Russian market; frost resistance and ability to maintain strength even at very low temperatures (from -20 to -60 ° C); Resistance to significant temperature and exposure drops external environment; Durability: the life of Alta Siding - up to 30 years; Resistance to aggressive substances (for cleaning siding, you can use detergents); Infertility infection with mold mold fungi. | 3660 x 230 x 1.1 | 20 |
| Facade metal siding insi | Siding "INSI" is made of galvanized steel coated with a layer of polymer composition, which means that all the advantages of this material inherits: resistance to temperature drops (-50 ° C - + 80 ° C) and mechanical damage; long service life with preservation of initial properties (about 50 years); environmental friendliness; nonseasing; the possibility of mounting both horizontally and vertically; protection of the building from overheating (in the system of the ventilated facade); And when choosing one of two new colors (alder or rosewood) - complete imitation of the appearance. | Length up to 6000, width up to 200, Thickness 0.5. | - |
Good job!
Prices for siding
Video - Siding installation with her own hands
Catering, repair and finishing - processes that take out a lot of free time and finance, and when after completing useful cases, many remnants of various materials notice, it becomes a little offended for the money spent. But we will not get upset, because all the remnants can be applied with benefit, throw them out optionally ..
Never hurry to throw out the construction trash and the remnants of building materials. All that is not included in the main works can still be useful for giving.
Crafts from drywall
Truly, universal material can be useful to you and in the form of cropping and broken pieces.
From drywall, you can do the following:
- Small vases for dry bouquets, it is worth only to cut GLCs on smooth pieces and fold it into a form with a mounting profile;
- Various geometric shapes for dacha house decor, gazebos and patio;
- There is enough interesting solutions And for miniature furniture items in a children's house on a tree. For example, the same shelves, racks, various decor.
If you cannot apply the plasterboard, give it to the kids, because any piece of spoiled material can be simply painted on asphalt or stoves, applying material as chalk.
What can be done from pieces of tin
This material It is very practical, because it, like slices of stainless steel, can be bent in any forms. This makes it possible to create the most unusual crafts For giving.

- First of all, it original lampswhich, with the help of scissors for metal or bulgaria, acquire bizarre forms;
- Also, from a similar material, fine steel or trimming, you can make small country urns and ashtray;
- If pieces big size, of which there may be quite good containers for flowers, even suspended;
- It is possible to use stainless steel and thin steel for more useful cases, for example, put patchballs on a cracked linoleum, strips of tinted to connect the shakes of the flooring in the country house, making clamps under the bolts and nuts, chop the washers, pulling slices of material wooden buildings And fences, install them as a lining when godpading the large branches of trees so that their bark do not cripple on the rope.
Useful use of balances and cutting boards
From the tree you can make almost anything, as if, in reasonable limits, of course. Naturally, we are talking about the garbage residues, because we create a lot of useful things at the cottage from whole sawn timber.
- So, if a thin rail remained, it can go to drawers, as, in principle, and a small board with a timber;
- Trimming furniture shields, for example, from the press will become excellent containers for vertical landscaping;
- Larger boards can be seized and cut into the kitchen accessories - tables for cutting and cutting, coasters under hot;
- Naturally, if there are good quality materials, they will always rise to country furniture - shelves and racks, small stools and chairs, stands for shoes, so on;
- It is worth noting that the benefits of the dacha bring and sawdust, but all our readers know it perfectly.
From the tree you can make a lot of interesting things, and therefore it is not worth throwing away from his residues.

If among readers there are masters of a wood thread, they will find all the materials another original application!
Useful trimming plates OSB and plywood
The construction trash obtained from these materials will become a find for people with a fantasy.
But what would you come up there, we also have ideas:
- A nesting house and a lodge for proteins - the first thing that comes to mind!
- Further, bird feeders and even for animals, where the material will perform the function of the roof base;
- OSB trimming and plywood can turn into sufficiently good drawers for storing food and non-food products, a variety of bulk;
- An interesting idea is the use of plywood pieces and slabs to create a formwork in the construction of small architectural forms;
- To participate like garbage can both in the production of country furniture, together with lumber, about which the conversation was above;
- If there is an electrolybiz available, you can always cut from the remnants of the original materials garden figures Or their fragments.

Using old polyethylene
In addition, the old film can be covered by anything ... the same heaps of sand for construction, stacks of bricks or decorative tile For the arrangement of cottages, bulk materials, feed. It is worth only to fold it several times, and even the old and thread polyethylene film will become a good protection against moisture.

Excellent use will be found in the capital construction. Film You can cover the foundations and only flooded platforms so that the concrete does not save and not cracking in the sun.
In the question with the film, we moved a little from the main topic of crafts and residues building materialsBut now we come back to her.
Foamed insulation: Using trimming in the country
Most often, such materials are applicable to new Year holidaysSince they can no problem cut snowflakes and stars of a wide variety of forms. But it is often possible to use them for standard decoration of the premises.
One side of such a foil material or reflective material. That is, she glitters. This makes it possible to create bright shapes that will be transferred. sun glare on the walls, gender and ceiling. It is especially interesting to watch such crafts in a suspended state, on a fishing line or thread.
More often all the work on thermal insulation, where such materials are used, occur with the insulation, follicitized on the one hand. But if you need a bilateral object, you can cut two mirror-reflected forms, and glue them back side. Then a star, snowflake or a figurine, will glitter on both sides.
Clariy dackets find a lot of other applications with foam, for example, additionally warm the greenhouses on the sides, make small portable refrigerators with their own hands, simply navigating the material inside on the walls of a small drawer. But the fun use is tailoring from the material of children's suits and various elements.
Crafts for giving with their own hands (video)
Remains of plastic, polycarbonate, acrylic
- First of all, various lanterns come to mind. We have learned a lot of lighting options for the garden and cottage territory, and therefore it will be easy for you to come up with lights and plastic lamps and polycarbonate, especially if the trimming materials are colored;
- It looks very nicely colored plastic and polycarbonate with shades in the fence decor. Somehow we have already raised a similar topic and even showed you a photo of such decorations of fences;
- From small acrylic trimming, you can make boxes and chests that can perform both decorative and economic functions;
- In addition, these materials can be fully participating in the production of garden figures. Combining wood, steel, plastic and other materials, you can make with your own hands of garden gnomes, fabulous locks, various animals.

Remains and fight bricks
Construction garbage of this plan We are perfectly used as the outerness of the territory and materials for alignment. But today we suggest thinking about more useful facilities.
- It may be the same decorative fabulous castles located in the garden, which will act as a basis;
- In addition, small luminaire columns can be built out of the brick;
- Application Building Material will find in the production of heavier and overhaul, for example, as a base for a bench or even under the table in a new gazebo.

What to do from PVC plastic panels
Cleaning walls and ceilings, different buildings Outside and inside plastic - quite popular dacha refurbishment processes. But, in mind the small cost of the material, or for the causes of the wrong counting, we often buy PVC panels with a margin. Then, when the material remains, we think for a long time where he can still come in handy.
We have previously mentioned certain options, but there are more interesting ideas:
- The miniature fence from PVC panels will last for several years until the material deteriorates due to the influence of atmospheric phenomena;
- Great material and for distinguishing garden beds, flower beds. It turns out a multi-colored and very colorful decor;
- If you return to the country's crafts, then the plastic can become the roof of small garden buildings, to be used as a gutter for collecting rainwater, even simple, but quite attractive shutters for the windows of the country house, if you combine the panel with a wooden bar.
Bulk mixtures and use of their residues
It can be both several scoops in the package and a whole bag of material. Naturally, such material in the country will not disappear - to smear, dress cracks, repair the garden paths and so on.

But you can use mixtures and decorative purposes, for a wide variety of crafts.
- We have already talked about how simplest, even homemade forms produce decor blocks for walls;
- Also, they told you how to make colder from cement, quickly and quite simple;
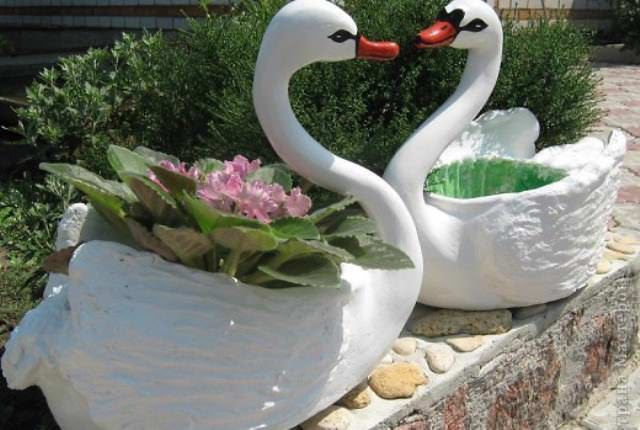
- But you can turn on the fantasy, pick up special molds and pour out whole figures for the garden, which will easily serve until ten years even with the most bad conditions on the street. It is only necessary to treat ready-made crafts with protective paints, which will give and brighter.
Remains of ceramic tiles and mosaic
It is said that materials of this kind in the country are indispensable, but mainly in the economic plan.
- Tile residues can be separated by the base of the house to protect it from external influence;
- The same material you can cover a new breakfast;
- If there are few tiles, and it is a fight, then it, like a mosaic, should be transferred to the garden. Here are pieces of multi-colored, glossy and with a variety of material drawings, garden figures can be decorated. For example, you do garden gnome... So now it is optional to paint, you can decorate it with pieces of tiles. The turtle from the remains of cement in the garden will also receive an exclusive shell. Tile or mosaic will serve as an unsurpassed trim and a small decorative pond at the cottage.

We have hundreds of advice in the arsenal, but we simply cannot put them all in one article. We mentioned almost all the popular materials used in the country, and now you can only focus on the fact that it is not necessary to immediately send to the garbage, because any piece or trim can be useful.
Crafts from building materials and useful use of construction debris - topics interesting and popular. Thousands of summer houses across the country every day come up with an incredible decor of metal and wood, residues of foam and paint, polyethylene trimming and dry mixtures. So why don't we try? We are confident that with our experience crafts will not get worse!
From the old tree you can make a garden track, steps, dacha furniture, woodcut. See how to use unnecessary boards, for gardening inventory.
Many familiar with this picture, when you go to the country shed, the shovel does not strive to fall, and the rake, if you come on them, hit the head. Sometimes it is so difficult to find the necessary tool, so the organizer must be done for the country's inventory. Here is another problem regarding where to go old wood, or rather, the boards will be resolved.
Organizer for Garden Inventory from PVC Pipe Criming
Convenient when each garden tool is in its place. In addition, it is good when the organizer looks beautiful for him, but is made of the remains of the old material.

If you have done the water supply for the cottage, probication of PVC pipes remained. They will be useful for the next idea. For such an organizer, take:
- narrow thick powder;
- self-tapping screw;
- pVC pipes or their trimming;
- hacksaw;
- screwdriver;
- level;
- saw for wood.
To sprink PVC use the hacksaw, a permeable saw, plastic pipe cutter or a special cutter.
Make marking by helping themselves level, draw on the wall on which the boards three horizontal lines will be fixed. Measure the length of the boards, disconse them. With the help of self-sufficiency, attach two to the wall. Lower needed for support so that the garden equipment does not touch the earth. Brepping it with a small bar.

On other boards, make marking at the same distance. Attach PVC pipes up.
If you have a wall in Saraj straight, then look at what other crafts for giving are designed to keep the hand-made garden tool in them.

For such an organizer, you will need:
- pVC pipes;
- double-sided assembly tape;
- hacksaw;
- scissors;
- roulette;
- pencil;
- soft rag.
With the help of roulette and pencil, apply markup on the wall. Cut fragments of the mounting tape of the desired length. Removal protective layer On the one hand, attach it to PVC, then remove the second protective layer to attach to the wall.
In order for the ribbon more stronger, avoid hitting it when mounting dust, dirt, do not touch the sticky surface with your hands.

After you recorded the segments of PVC on the wall, remove the gardening inventory in the section for convenient storage.
Attach the colored woodcarce with a lacquer to the wall, trimming PVC pipes. Thus, you solve the problem of storing extension cords. And the brushes can be sprinkled on the nails featured to another wooden board.

If you have pallets in the country, they can also be accommodated for storing garden inventory, attaching those to the wall.

Boards and small glass jars turn into a system for storing nails, screws and other small metal objects that are needed in the country.

To implement this interesting idea, take:
- a small one;
- nail;
- a hammer;
- self-tapping screw;
- screwdriver;
- little jars with screwy lids.
- First you need to do holes in the lids. To do this, turn them over, putting on a one. Make three holes at the same distance with a nail and hammer.
- Attach the lid below to wooden shelf, Attach the screws.
- Place in the jar of all trifle for needlework at the cottage. You will remain fastening it to the lid.

Organizer for shoes from the old tree
Another problem faced in the country concerns shoes. Not always enough space to accommodate rubber boots, shale, slippers of all households. Interesting ideas will help this.

If you have an old hanger with hooks, do not throw out this thing. Enough to paint it, nourish on the desired height, after which the problem of storing shoes will be solved.
In the presence of wooden pallets, it can be done like this: to cut it into several parts so that there is a transverse bar. The bottom of such sections do not need. It is enough to cover the shelves with a varnish for wood, place the shoes in them. Teenage and adult will well hold on.

If desired I. wooden boxeswhich store fruits and vegetables will turn into original crafts for giving, for example, an organizer for shoes.

To create it, take:
- wooden boxes;
- impregnation for wood;
- self-tapping screw;
- sowings.
On small sidewalls, find the middle, attach a lump here on which the shelf is holding. Now the sections are connectible with each other as shown in the photo. That is, first, they are fixed in pairs, then rows, slightly shifting those in one, then in the other direction.
But what other interesting ideas can be implemented using such boxes.

For the first, you first need to paint them when dried, arrange vertically and horizontally. For the second, it is not even necessary to spend on the paint. These elements are connected to each other using large paper clips.

There are many pairs of shoes on such a staircase. You only need to nail the horizontally bakery to the steps. If you wish, you can fill the angular space if you attach rectangular shelves here here.

Beautifully folded firewood at the cottage
Easy to clean up not only in the barn, in the country house, but also on the street. Such woodnings will not only be a place for firewood, but also add a spat. Fracture is good to clean the oven. Make a knitting, put in woodcut. For its manufacture, you will need so little:
- boards;
- self-tapping screw;
- true paint.

Such a building is easy. The basis is the four vertical pillar, which can be made from narrow wide widespread or bars. They are fasten with horizontal horses, which are at the same time the lower shelf. In the center, make another one. Roof is double. Do not forget to cover all elements by antiseptic impregnation.
If you have an old rack, it can also be placed folded firewood. But you must first paint that antiseptic to wooden elements They served as long as possible. Put the woodcut near the wall, then it will take a little space, and atmospheric precipitation will not come here.

The following fusers will decorate the old fence, if you place them ahead of it.

For one such structure you will need:
- four bars with a cross section of 50 or 40 cm;
- nails;
- self-tapping screw;
- singness of the same width;
- metal bitch;
- impregnation for wood;
- saw;
- roulette.
- Fly bars pairs in the form of the letter L, attaching to the transverse bar.
- Measure the distance between two racks, set the boards of such a length. Surround them, starting below. At the same time, each top should go a little on the lower.
- Bottom, see the horizontally two bars, attach the boards on which there will be beautifully folded firewood. Attach the horse.

If you want to decorate the woodcut, then under the upper "leg" pallets come up to the board. Put the film in the resulting drawer, pour the land, put flowers or greens.
A place for beautifully folded firewood can simultaneously become a bench for recreation, see how easy it is to do so. This idea will also tell me how to save space.

Place the firewood near the street focus, under the bench. When it is dry weather, put decorative pillows on it, on which it is so convenient to sit.

Saw birch firewood can be issued original. Put the thick and thin branches of this tree in the center, around - fragments of the trunks, fix everything with a cable rope. A pair of pots with flowers, the lantern will complete the natural picture.
Where to do an old tree?
If you got a plot on which several trees grow or, perhaps, there are those that broke the storm. So that you do not spend money on the removal of this natural material, see how many interesting things can be done from it.

For the device such garden track You will need:
- old tree;
- electrical or chainsaw;
- antiseptic;
- geotextile;
- brush;
- rubbank;
- sand.
Take a high density geotextile so that it will serve as long as possible, and the weed grass could not exist through it.
Separate a tree on a clogs with a thickness of 4-5 cm. Cover them with an antiseptic from all sides. If you want to give these glitter elements, then after drying the last layer of impregnation, paint a lacquer for wood intended for external work.

Put the wide chocks first on the marked and prepared platform, located between them, are smaller. You can help yourself wooden or rubber CyansaTapping on the billets for better adjacent to their surface.
If you have few such elements, place them stretch or pour into the soil the crossbank layer, and open the wooden chocks on top in the form of a pattern.
By the same technology, secure the second board at the top so that when the seat could be relying on her back.
If you own the work of electrical or chainsaw, then you can make such a street chair.

If you are looking for more simple ideas where you can do an old tree, then pay attention to these.

Churbachki need to be treated with a lacquer for wood, they will become kashpo or other interior decor objects.
The old tree, its branches can turn into such a stylish mirror, for this you will need:
- plywood;
- paint;
- primer;
- wood;
- lobzik;
- round mirror;
- liquid Nails;
- glue for wood.

Attach the mirror to the plywood, outline it. Return from this mark from all sides of 10 cm, outlines this outdoor circle, cut down on this markup.
Apply the primer when it dries, paint this place. Stick to the center of the mirror, "putting" it on liquid nails. Apply glue on wooden circles, secure them on the frame. You can pre-cover them with varnish for wood, then glued to plywood.

That's how much useful can be made from wood, PVC pipe residues. If you are interested in ideas related to how the organizer is for shoes can be made, see the following video.
The second plot will teach the shop from the log without a single nail.


