What can be done from small paper. We create beautiful paper crafts with our own hands. paper penguin
Today we will learn how to interesting and original crafts from paper with or for children.
And first, let's see what we need for this:
To create crafts, we will use different types paper and cardboard:
napkins for decoupage on boxes;
newspaper to create balloons from papier-mâché;
old magazines for crafts with beads;
crepe and wrapping paper;
colored double-sided paper;
corrugated and plain cardboard;
paper plates, cardboard tubes, various boxes and much more.
For creativity, the child will need such basic materials and tools as scissors, glue, paints and felt-tip pens.
Does it happen to you that you collect a lot of small necessary items, but there is nowhere to put them? Let's make a fun pocket in which everything will fit and which can be hung in a conspicuous place.
Paper crafts for kids: USEFUL POCKET
What will be required:
colored paper
pencil
lace scissors glue
Work sequence:
Draw the outline of the muzzle of an animal, such as a bear.
Cut out two such shapes along the contour. Make details for the ears and nose, as shown in the photo.

Apply glue along the edge, connect the parts to make a pocket inside. Punch two holes.

Glue on the ears and nose. Draw a ribbon for hanging.

This pocket is perfect for storing small items: hairpins, combs or stationery.

Paper Craft for Kids: RACE RACE
Did you know that you can make unusual racing cars with your own hands? Let's create them and have a real race. I wonder what car number will win?
What will be required:
cardboard tubes of paint, felt-tip pens
colored paper, cardboard
glue scissors
Work sequence:
Color the tubes in bright colors.

Cut out parts for cars from colored and white paper (for wheels, it’s better to take black cardboard - then your “car” will stand firmly). Use a felt-tip pen to draw what you need.
Make a hole in the straw as shown in the picture (you can ask an adult to help).

Now glue all the details. Wait until it dries - and go ahead, play!

Paper crafts for kids: PAPIER-MACHE BALLOONS
Who doesn't dream of flying in a hot air balloon? Someday you will definitely do it. Now let's try to make an unusual balloon from an ordinary newspaper.
What will be required:
glue bead
needle spoke
cream paint
Work sequence:
Inflate the balloon, lubricate it with any cream. Prepare a newspaper for crafts - for this you need to tear it into small pieces. Wetting them in water, glue the ball so that there is no gap.

Now apply a layer of glue on the ball and glue it again with pieces of newspaper soaked in water - so you need to make 2-3 layers. You may need the help of an adult.

When the ball is completely dry (for this you will need to wait 1-2 days), pierce it with a needle - we don’t need it now - and cut the ball, as shown in the photo.

Now color the ball with paints.

Now let's make a basket. To do this, the newspaper sheet was divided into 4 parts to make rectangular blanks. Then, starting from the bottom corner, roll the newspaper into a tube with a knitting needle, and glue the tip.

Take 5 tubes and put them side by side, and stretch the sixth tube across under the first, over the second, under the third, etc., alternating. The next tube must be weaved in reverse: what was below will be on top.

To secure our base, take one tube and weave it around, also passing it between the other tubes through one.

Now you can make the basket itself: to do this, bend all the ends up and start weaving them around in the same way as you did before. Weave 4 rows.

Unnecessary ends weave on top and glue, some you can just cut off. Color the basket with gouache.

Make holes at the bottom of the ball and secure the basket with a thread. The balloon is ready!

FUNNY ANIMALS
It turns out that you can quickly and easily make yourself a striped friend. And in order to be able to play with friends, let's find out how to make not only a tiger, but also other animals.
What will be required:
colored paper
glue scissors
Work sequence:
Take a sheet of colored paper and fold it as shown in the picture. Glue the ends to make a strip.

Bend the strip "accordion" in three places to get the letter "M".

Cut out blanks for the animal from colored paper.

Glue the blanks to the base. Ready! You have a tiger.

HOME THEATER
But what if you arrange a real theater in your home? It will be possible to invite adults to the performance and show them some kind of fairy tale, for example, "Gingerbread Man". I think they will definitely appreciate your skill!
What will be required:
colored paper compasses scissors glue
markers stick
Work sequence:
Draw a blank on a sheet of colored paper, as shown in the photo.

Cut out the blank and glue.

Cut out the base for the animal from colored paper
Glue the pieces to the base. Look who we got

Take your favorite animal fairy tale as a base and make all the characters out of paper. If sticks are glued to the blanks, it will be possible to show a performance from behind a screen, as in a puppet theater.
Paper crafts for kids: FUNNY CATERRORS AND SPIDERS
Have you ever seen a real spider? And the caterpillar? Let's make it out cardboard box from under the eggs of funny animals with furry legs. They will look like the real thing!
What will be required:
egg carton
glue scissors
colored paper
wire
Work sequence:
Cut out blanks from a cardboard box: three cells for caterpillars, one for bugs and spiders.

Color the blanks with gouache.

Prepare details for animals: cut out eyes from colored paper, make legs from fluffy wire.
Make holes in the blanks and stick the legs. Then glue on the eyes.

Try to make them exactly the same.

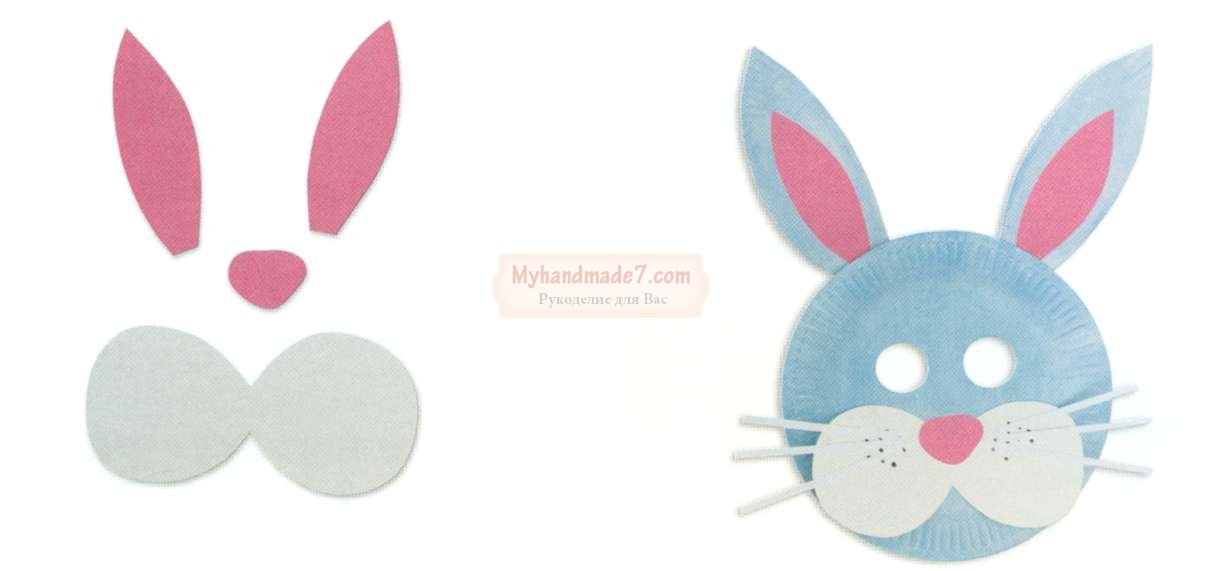
AMAZING MASQUERADE
You can celebrate your birthday in an unusual way by throwing a masquerade. Invite your friends and have everyone make an animal mask for themselves. It will be fun!
What will be required:
cardboard plates
colored cardboard and paper
scissors
Work sequence:
Color the plate blue.

Cut out the ears and color them too.

Prepare parts for a bunny from colored paper.
Cut out holes for the eyes and glue the pieces as shown.

PAPER BEADS
What girl doesn't love jewelry? Let's try to make beads from old magazines. You will get bright ones that you can wear with your favorite dress or give to your mother.
Work sequence:
Cut out the details from the magazine sheet: strips about 1 cm wide and elongated triangles.

Wind the blanks on the knitting needle - these will be paper beads. Glue the tip well.

Make as many beads as you need for the entire decoration. Take a needle and thread and carefully thread all the beads onto the thread.

This is how easy it is to make unusual ones: original multi-colored beads, bright bracelets. You can even give them to someone: what girl would refuse such beauty?!
Paper Crafts for Kids: PRINCESS DECORATIONS
All girls dream of becoming real princesses. What is a princess without a crown? Let's make it from a regular cardboard roll.
What will be required:
cardboard tubes of paint
colored paper
scissors
Work sequence:
Cut out the crown. You can do a few things.

Color the blanks in different colors.

Decorate crowns. To do this, you can use beads, ribbons and laces.
Make holes on the sides and thread the elastic so that the crown can be put on.

You can make a decoration for a real princess from an ordinary hoop: use colored paper to turn it into a beautiful diadem.
Paper craft for kids: TOY LOCKER
Probably, like all children, you have a lot. Sometimes there are so many of them that it becomes difficult to neatly fold. Let's make a beautiful storage cabinet for small toys.
What will be required:
boxes different sizes
white gouache
patterned napkins
stationery knife
tassel pen
Work sequence:
Paint the boxes white so that the pictures and text on them do not show through.

Glue the box on all sides with a napkin. To do this, put it on the box, pressing along the edges, and with a brush, apply a thick layer of glue on top so that it sticks.

Cut out the doors with a clerical knife - here you will need the help of an adult. Glue the handles with superglue and fasten the boxes together to make a cabinet.
All! Our dresser is ready. Now you can put your toys there. Mom will be delighted when she sees what order you have!

CREATIVE BOX
Do you like to draw? Or maybe you like to carve or craft something? This is cool! Let's make a creative bag-box where you can put everything you need for creativity.
What will be required:
shoe box
wrapping
colored paper
adhesive lanyard
Work sequence:
Tape the box and lid on all sides. If it's hard for you, ask one of the adults about it.

Make blanks inside the box. At the bottom of a sheet of colored paper folded in half, make an incision to the middle, as shown in the photo. Cut two pieces of the same length as the width of the box from top to middle.

Insert the blanks into each other and place them in the box - these will be the compartments of our bag.
Make holes on the sides of the box: they should be at such a level that the box can be closed with a lid. Make the handles of the same length from the cord so that the box is comfortable to take in your hand.

HANDMADE PHOTO ALBUMS
Where did you last go on holiday? Maybe it was a trip with your parents to the sea or a vacation in the village with your grandmother? You must have some memorable photos. Let's make a suitcase-shaped photo album for them.
What will be required:
colored paper and cardboard
hole punch scissors lace
Work sequence:
For the cover of the photo album, take a sheet of colored cardboard and fold it in half.

For pages, take sheets of double-sided paper of different colors and also fold in half.

Now connect the cover and pages together: for this, fold everything together and make holes on the side with a hole punch. Tie the sheets with a rope or cord.

Cut out the details for the suitcase from colored cardboard and glue them to the photo album.


Paper Crafts for Kids: FUNNY BOOKMARKS
What is your favorite book? Or maybe several? It's great that you love to read. Let's make an interesting bookmark for the book.
What will be required:
colored paper
Work sequence:
Use a ruler to draw three squares on a sheet of colored paper, as shown in the photo. The triangles that are filled in are not needed.

Cut out the piece.

And it, as shown in the photo: first bend it to the inner corner, then another on top of it. Glue them together. Cut out the details from colored paper.

It turned out great, right? Now it will be easy to find the place in the book where you finished reading. You can also make a bookmark in the form of another animal, such as a dinosaur with sharp teeth.

CARDBOARD BAG
Do you know how you can make a bright bag out of an ordinary box? Very simple! Let's dream up and make a handbag that you can take with you outside in sunny weather.
What will be required:
cereal box
colored paper
glue scissors
Work sequence:
Color the box with gouache.

Cut out a bag with handles from the box. This may require the help of an adult.

Cut out a strip and a circle from colored paper - this will be the core of the flower. Fold the strip with an accordion and glue the ends. To keep the flower, stick it on a small square. Glue the core on top.

For butterflies, cut out blanks from 1 colored paper. To make the figure voluminous, you need to make 5-6 identical parts. Glue them together in the middle. Glue all the pieces to the box.

DIY Paper Crafts: Pencil Stand
Do you want to give a gift to a friend, but don't know what to choose? Don't be upset, I have an idea! Make an original stationery stand out of an ordinary cardboard box. Your friend will definitely love this gift!
What will be required:
boxes
the same width
white and colored paper, cardboard
adhesive tape
Work sequence:
Build a ship out of boxes: cut off the lids and cut them to height. Make the bow of the ship and pipes out of cardboard.

Tape each piece with colored paper inside and out.

Cut out and glue the windows, lifebuoy, steering wheel, anchor.

Glue the boxes together and glue them to the base, cut along the contour.

PUZZLE APPLICATION
Do you have unnecessary puzzles in which a lot of details are already lost? I have an idea how they can be applied. Let's make an amazingly colorful application with autumn leaves.
What will be required:
unnecessary puzzles crepe paper
paint glue
Work sequence:
Color the puzzles in the colors of bright autumn leaves: yellow, orange, red.

Cut out a rectangle from crepe paper. Brown- this will be a tree trunk - and make green grass.

Glue the brown blank in the form of a trunk: for this, somewhere you need to compress the paper in layers, and straighten it somewhere.
Make a crown of a tree from the prepared puzzle pieces. Also glue several layers of grass to make it voluminous.


Paper crafts for kids: 3D PICTURE
Wanna do voluminous application? It's quite easy! You will get a real picture that you can give to your grandparents.
What will be required:
candy box
corrugated cardboard
double tape adhesive
Work sequence:
Cut out the necessary details for the picture from corrugated cardboard.

Glue the first layer of applique on the bottom of the box - what will be in the background.
Paste other details on top.

What a beauty! It turned out real three-dimensional picture. In this way, you can make a city where there are cottages and high-rise buildings, or an underwater world with shells, algae and fish.

BOUQUET IN A POSTCARD
Do you want to give your mom unusual flowers? Let's make a card-bouquet of colored paper. Trust me, she'll love it.
What will be required:
double-sided colored paper
scissors ribbon
Work sequence:
Draw a blank on a sheet of colored paper, as shown in the figure.

Cut out the blank and separately a triangle.
Glue a small triangle on the bottom, and fold the large part as shown in the picture.

Draw, and then cut out flowers of different sizes and colors. Make leaves for the bouquet.

Glue flowers inside our postcard in the form of a bouquet, tie a ribbon at the bottom.


3D POSTCARD
Surely you watched the cartoon in 3D and noticed how the characters come to life with a three-dimensional image. It turns out that making objects three-dimensional is quite simple. Let's try to make a postcard with a 3D effect.
What will be required:
colored cardboard, double-sided colored paper
scissors ribbon
Work sequence:
Take two sheets folded in half: one is cardboard, the other is colored paper.

On a sheet of colored paper, make cuts on the fold side, as shown in the photo. You should get 3 even squares of different sizes.

Now what you cut, push forward and inward. You should get a ladder, as if from boxes.
Glue the blank onto a sheet of colored cardboard. Decorate the boxes: glue colored paper and ribbons.

By this principle, you can make a card with balloons

CARD WITH PALM
Do you want to make another unusual postcard? You don’t need anything special for this: just a sheet of colored paper and cardboard, scissors, glue and your wonderful pens.
What will be required:
colored cardboard and paper
Work sequence:
Circle your palm on a piece of cardboard.

Cut out the piece with scissors. You will need two of these items.
Cut out a strip of colored paper and fold it like an accordion.

Glue one end of the accordion to one "hand" and the other to the other. Cut out from colored paper or write a congratulation with felt-tip pens.

ENVELOPE
Do you know how to decorate a small gift? To do this, you do not have to be an adult and do not need any special devices. Repeat after me and you will definitely succeed!
What will be required:
colored paper glue
ribbon
Work sequence:
Draw 4 identical circles on a sheet of colored paper. This is easy to do if you take a mug, put it upside down and circle it.

Cut out the circles and fold them in half.

Glue the circles together as shown in the picture.

Bend the free halves of the circles so that one turns out on top of the other. Then pull the bottom from one side up.

SWEET GIFT
Have you ever seen a gift shaped like a candy? Maybe they gave you something similar? Let's make such a surprise, and you can "treat" someone to them.
What will be required:
cardboard tube
wrapping paper glue
scissors ribbon
Work sequence:
Cut out a square from the wrapping paper. In size, it should be larger than a cardboard tube.

Cover the tube with paper. Tie one end of the candy with a ribbon.

Put candy in a gift and tie the other end.
3D FIGURINES
Have you ever wanted to decorate your room in an unusual way? Let's make voluminous figurines-decorations from colored paper. They can be placed on a bedside table or hung on a string from a chandelier.
What will be required:
colored paper glue
scissors ribbon
Work sequence:
Draw a half of an apple on a piece of colored paper folded in half, as shown in the photo.

Cut out the blank and, using it as a template, make 5 such copies. Additionally, cut out the details for the apple.

Glue the blanks together, as shown in the photo.

Glue the rest of the details.

Fruits and vegetables can be anything!
Crafts from cardboard and paper: bright flowers
Do you want to grow bright flowers in your window? Let's make them out of cardboard tubes, but in such a way that no one guesses what material they are from.
What will be required:
cardboard tubes of paint
colored paper glue
scissors skewers
Work sequence:
Make cuts on both sides of the tube so that they do not reach the middle.

Color the tubes in different colors.

When the blanks are dry, straighten the petals, as shown in the photo.
Glue the centers cut out of colored paper.

Paste the skewer with colored paper, cut out the leaves.
Connect all the details. Poke a hole in the center of the flower with a skewer.
Such a flower can be put in a vase and presented to someone.

FRAME OF UNUSUAL FLOWERS
Do you have a boring monochrome frame at home? Let's make it a real masterpiece!
What will be required:
egg carton
glue scissors
Work sequence:
Cut out petal blanks from the cells of a cardboard box, as in the picture.

Color them the same color. You should have 15-18 such sets of different colors (depending on the size of the frame).

Glue the petals together in the middle, carefully press and let them dry.
Glue the flowers to the frame. You won’t be able to attach everything at once, so do it in stages and wait until everything dries.

The frame is ready. Now you can insert your favorite photo into it.
CUTE CACTUS
How do you like such a cute cactus? It is completely safe for children because the thorns are painted on it. Let's make such a cactus and put it on the windowsill.
What will be required:
markers
Work sequence:
Draw a cactus in a pot on cardboard.

Color the picture on both sides and make another one exactly the same.

Make cuts: on one cactus from the bottom to the middle, and on the second - from the top to the middle.

Insert the blanks into each other. The cactus is ready.
In the same way, you can make a rocket or a teddy bear.
COLORED LANTERNS
Your birthday is coming up and you want to decorate your room to make it festive and beautiful? Then let's make unusual colored lanterns.
What will be required:
toilet paper tubes
crepe paper
ribbons
glue scissors
Work sequence:
Cut out a square of crepe paper and glue one side of the tube.

Make blanks from crepe paper: cut out strips and make cuts on one side along the entire length.

Start taping the tube from the bottom. You should get a skirt, as in the photo.
Thus, glue the entire flashlight. Make holes on the top sides and thread a ribbon through them so that the craft can be hung.

Such lanterns can be not only decoration, but also useful thing. For example, at a holiday you can arrange a game with prizes: hang lanterns on a rope and put something valuable in them by gluing the bottom. Each blindfolded guest must cut off a gift with scissors.

ROOM DECORATION
Would you like to have a bird? Of course, nothing compares to the real one, but still an unusual and beautiful bird can be made from ordinary colored paper. See how it's done.
What will be required:
double-sided colored paper
crepe paper scissors
ribbons
wire
Work sequence:
Draw bird silhouettes on a sheet of paper.

Cut them out. Make a few of these. They must be different colors.

Make wings out of crepe paper: to do this, cut out rectangles of different colors and fold them like an accordion.
Make cuts in the blanks of the birds and insert the wings there. Tie ribbons to the figures and hang them on a circle made of wire.
What to do on a rainy or windy evening with a baby? Of course, creativity! We share ideas for express crafts for autumn evenings.
Even if you're the busiest mom in the world, don't forget that it's important for your child to spend time together and engage in fun activities together.
Nothing brings people together like solving problems and spending time together. A win-win option is hand-made. By doing small crafts, you can analyze your child's behavioral patterns, assess abilities and give the most important thing for any person on the planet - communication.
We have compiled a selection of the most easy crafts and quick crafts that you can do with your baby. Even if you hated labor lessons at school, here you will definitely find something to your liking.

1. multi-colored pebbles
If in the summer you collected not only shells, but also pebbles from the sea, it's time to decorate them.
What do you need: acrylic paints, pebbles, water and a brush, a non-spill cup.
 2. A bottle of sand
Making another beautiful piece of furniture together is very simple.
What you need: colored sand (you can take colored crayons, rub them on sandpaper and mix with fine sea salt), transparent dishes.
N.B. In order for the loose mixture to fall directly into the narrow neck of the bottle, you need to make a small cone with a hole out of paper.
 3. P
anno
„Cooking
jam"
.
3. P
anno
„Cooking
jam"
.
What you need: A4 paper or cardboard, scissors, apples and pears, gouache, brushes.
Cut out the shape of a jar from cardboard. Cut apples and pears in half. With a brush, apply gouache to the cut halves and press them down to leave prints on the cardboard. We finish the bones, leaves and ponytails after the prints are made.
You can also make such an application using leaves. Apply to one side of a leaf or flower with a brush and gently press onto colored paper for printing.
 4. Craft "Kapitoshka"
(or Christmas toy
)
4. Craft "Kapitoshka"
(or Christmas toy
)
What you need: colored cardboard, balloon, PVA glue, a small container in the form of a bowl, thread.
Inflate the balloon and tie it. Pour PVA glue into a small bowl, smear the thread along the entire length with glue and wind it around the ball in a chaotic manner. Let it dry and pop the ball, decorate with different details - nose, eyes, hairs.

5. Educational toy for hand motor skills
What you need: Flour, watering can, balloon, marker, multi-colored threads.
Using a watering can, pour flour into a ball and tamp it down. We tie a filled ball, draw eyes, tie a thread in the form of hair.

6. Butterfly — pin
What you need: A4 paper or multi-colored cardboard, pencils, clothespin.
We cut out “wings” from paper in the form of two eights: one is larger, the second is smaller, and we clamp them closer to the base of the clothespin.
7. Underwater world
What you need: Paints (acrylic or gouache), colored cardboard, scissors, disposable plates, fantasy :)


8. Mouse on a plate
What you need: Paper, felt-tip pens or paints, a disposable plate, scissors, thread.
First you need to cut out a circle from A4 paper, paint it in one color, roll it into a cone and glue it. Cut, paint and glue the ears. Cut out eyes from cardboard. Glue the thread like a ponytail.
9. Crafts from disposable cups
What you need: Disposable cups, colored paper and cardboard, glue, scissors (needle and thread optional) .

 10. 3
D
aquarium
10. 3
D
aquarium
What you need: An old box, threads, shells, scissors, colored paper, regular tape, double-sided tape, PVA glue, felt-tip pens, paints (gouache or acrylic), you can additionally take cling film to “close” the aquarium.
On the “bottom” of the box, with felt-tip pens or paints, draw a “background” of the underwater world. We cut out fish, seahorses, algae from colored paper or cardboard. We hang fish on the "ceiling" of the aquarium on strings. Glue "algae" to the opposite edge. At the bottom we glue shells on double-sided tape. We wrap the aquarium with cling film.
11. Lamb from napkins And cotton wool
What you need: Cotton wool or napkins, divided into small pieces, one sheet of cardboard, colored paper, PVA glue or glue stick, felt-tip pens.


12. Hand jewelry -made
What you need: Threads, a set of large beads (can be found in Monpasier stores), cardboard and scissors.
 13.
feeder
13.
feeder
What do you need: Plastic bottle, two tablespoons, thread and knife
We all know that with the onset of cold weather, the birds have nothing to eat. With older children, you can make just such a feeder at home and hang it in the park near the house.
 14. Bookmarks for books
What you need: Floss threads, multi-colored cardboard, stickers, rhinestones, felt, colored paper, scissors and glue.
For your favorite books, you can make such bookmarks and teach your child to discipline from childhood.
 15.
Mask
15.
Mask
What you need: colored cardboard, scissors, glue stick or double-sided tape, a needle or a hole punch, an elastic band.
You don't need a reason to make masks. A mask can be a great excuse to have a masquerade!
16. Angel
What you need: Napkins for glasses, wooden beads, scissors, woolen threads, floss threads, PVA glue
We cut out the napkin in the form of a “candy”, as shown in the figure, make small cuts in the form of unfinished triangles and a hole in the center of the circle. We bend in half and get the body of an angel. We take 6-8 pieces of thread, tie them together in the middle with floss threads, which we throw on one side, string a bead on them and thread them through the hole in the center of the circle. We tie a knot. We stretch another thread through the bead so that you can hang the toy.

17. Herringbone of wine corks
What you need: wine corks, paint, glue, paper.
To make a Christmas tree out of wine corks, you need to prepare a cone shape, drape it with colored paper and stick wine corks on top, which will act as “needles”.

18. Button appliqué
What you need: A lot of multi-colored buttons, double-sided tape, PVA glue, threads, cardboard, colored paper, glue stick.


 19. Chest of drawers with a secret
What you need: matchboxes, PVA glue, felt-tip pens, colored paper.
We glue together 4, 6 or 8 matchboxes (you can use 9 or 10, the main thing is to get a rectangular shape), wrap the fixed part and glue colored paper on it. We draw decor with a felt-tip pen - pens, coils, flowers, etc.

20. Hedgehog
What you need: plasticine, sunflower seeds
We sculpt a small oval and press it down on one side to make a “muzzle”. With a sharp end in rows, we insert the seeds into the body of the hedgehog. Don't forget the eyes and nose.
Depending on the season, you can also consider certain types of activities. In the fall, collect and dry a herbarium together, carve or paint a pumpkin for Halloween. In winter, cut out snowflakes or garlands, decorate Christmas balls, sculpt a snowman. In the spring, decorate Easter eggs, plant seedlings or just small flowers. And in the summer ... Imagine what you can do together in the summer.
Quick article navigation
Making paper crafts with your own hands is a simple, inexpensive and very interesting activity for both children and parents. All you need is paper, scissors, glue and some interesting ideas. In this material you will find 7 step-by-step needlework workshops from different varieties paper and 50 photo ideas for your inspiration.
Idea 1. Volumetric crafts
We offer the smallest needleworkers to make a simple voluminous paper craft in the form of such a cat.

Materials:
- Sheet of A4 paper;
- Scissors;
- Glue.
Instruction:
- Download and print the template (see cat template below) on white or colored paper;
- Cut out the template with scissors, and then make 4 cuts in it along the outlined solid lines;
- Bend your neck according to the markup with an accordion and twist the tail;
- Bend the fold lines marked with a dotted line on the paws and glue them to the cardboard.
For older children, there is a more difficult task, namely a master class on making voluminous paper crafts in the form of a bird.

Instruction:
Step 1. Download and print the layout diagram (see below). Please note that the file contains a colorless template so that you can print it on colored paper.
Step 2. Cut out all the details exactly along the solid lines with a breadboard knife.
Step 3. Fold all the fold lines according to the principle: bold dotted line = fold inward, thin dotted line = fold outward.
Step 4. Glue the parts to each other, treating their corners with glue (with Glue inscriptions). Stick to the following order:
- First glue the beak to one side of the bird, then to the second.

- Glue the back of the bird starting from the beak, as shown in the photo.

- Glue on the wings.

- Now take the part, which is the breast of the bird, and at one end of it, fold and fix the triangle with glue as shown in the photo.


- Assemble the legs, make sure the knees are at a 90 degree angle, then glue the legs to them.

- Well, that's all, it remains only to glue the legs to the body and your voluminous paper craft is ready. If you wish, you can make a whole flock of such birds in different colors with your own hands.


Idea 2. Wall panels, paintings and applications
It is known that you can draw not only with paints on paper, but also ... with paper on paper. Such activities are no less exciting and useful for the development of hand-eye coordination, fine motor skills, perseverance, the ability to plan your work, combine colors, shapes and materials.
The following selection of photos presents ideas for paintings, panels and paper applications for children of different levels of complexity.


By the way, the application can be made up of parts of the same shape, but different sizes and colors. It can be circles or hearts. The following slider provides examples of such paper crafts and schemes for their manufacture.


And here are some more examples interesting crafts from different types of paper.

Now we offer you to get acquainted with a master class on making an original, but very easy paper craft. We have no doubt that such cute figurines will help instill in your child an interest in reading books.


Materials:
- 1 sheet of A4 colored paper;
- 1 sheet of A4 white paper;
- Scissors;
- Glue stick;
- Markers, pencils and paints.
Instruction:
Step 1. One half white sheet Fold A4 in half and let the child independently draw the cover of their favorite book on it, also signing the title and name of the author.
Step 2. Cut three long strips from a colored sheet about 2.5 cm wide. You will have 4 parts: 2 strips for the legs, 1 strip for two arms and one rectangle to create the torso of the figure.

Step 3. Take two strips (for the legs), fold them like an accordion, and then glue them to the rectangle torso.
Step 4. Divide the remaining long strip into two equal parts, draw fingers at the ends and glue to the body.
Step 5 Bend the top of the figure to the front side and make her bangs with scissors as shown in the photo.

Step 6. From the remaining half of the white sheet, cut out circles and glue on the figure as if it were glasses.
Step 7. Draw the details: eyes, mouth, nose and temples of glasses with a black marker.
Step 8. Now glue the book to the hands of the figurine and finally put it on the table or hang it on the wall, for example, near the bookshelf.

Idea 3. Hats
All children love games with reincarnations and for this they use everything that comes to hand. To provide a child with props, you can make fantasy hats with him. By the way, such colored paper crafts can be made for one or more children for a performance, a masquerade, a themed birthday or any costume party. In the next selection of photos you can see examples of a variety of paper "hats" - from pirate cocked hats to wigs.


Today we invite you and your kid to make a hat in the shape of a dinosaur head. This workshop is so simple that a child as young as 3 years old will need very little help from you.

Materials:
- 3 sheets of colored paper;
- Glue stick or PVA;
- Scotch;
- Scissors.
Instruction:
Step 1 Cut 4 strips about 3 cm wide along the long side of the paper. Two of these strips will turn into a headband, and the other two into the crossbars of the “cap”, on which dinosaur spikes will be glued.

Step 2 Take two other sheets of paper and cut them into strips about 5 cm wide along the short side of the paper. You can measure and cut the strips by eye, but in the end you should get 5 strips from each sheet. We need these blanks for the manufacture of spikes.

Step 3. Fold each spike blank in half and, stepping back from the fold by about 1.5 cm, draw a markup in the form of a triangle up to the very edge (see photo). Next, just cut out future spikes.

Step 4. Glue the two crossbars, and then glue the spikes on them in a row as shown in the photo below.

Step 5. While the glue dries, fit the two pieces of the headband to fit the circumference of your child's head, and then connect them in a circle with tape.
STEP 6 Now let's get back to the spikes. Turn the crossbar over so that the spikes are on the table and carefully bend each of them (see photo). Form the first spike: cover one side of it with glue and connect it to the other. Use paper clips to secure the spike until the glue dries. Repeat these steps with the rest of the spikes.

Step 7 After the glue has dried, remove the staples from the spikes and simply glue the crosspiece to the headband at the front and back.

Idea 4. Toy figures from a toilet paper sleeve
Toilet paper rolls are great crafts for kids that just need a little embellishment. For example, you can make such wonderful toys out of them.


A great way to spend time with your child is to make beautiful and easy paper crafts.
Go shopping for colored paper and your kids will be delighted with paper flowers, origami, 3D toys and appliqués.
Children's paper crafts can also serve as a wonderful gift for your relatives and friends.
Applications. Creating paintings by gluing parts of an image made from colored paper onto a paper surface.
Origami. The art of creating Japanese paper figures by folding a sheet of paper in a certain way.
Volumetric crafts. Create voluminous paper toys by gluing cut-out parts, such as a garland.
Quilling. Create paper crafts and decorations by simply twisting paper.
Unusual crafts
Sunglasses design. Together with the children, cut out various small figures in the form of rhinestones, shells and starfish from colored cardboard and invite the kids to glue them on children's sunglasses. The same can be done with flip flops, a summer hat, a handbag, an apron or a brooch.
Stone applications. Can collect flat stones on the seashore or near railway tracks and using colored paper and glue, make small appliqués on the flat side of the stones.
Collage of autumn leaves. In autumn, you can pick up bright yellow and red fallen leaves and put them under the press. From pressed leaves, glue, felt-tip pens and a sheet of paper, you can make a bright collage, where the leaves of the trees will replace the body of animals, the wings of butterflies or the crown of trees in the forest.
Stylish garlands from old cards. Children will love sticking cut-out circles from old cardboard cards on a thread so that later their creativity will become part of the interior of your home, such as decorating curtains.
Sultans for the support group. Girls will be delighted when you show them how to make a bright big plume out of wrapping paper and thread.
How to make paper crafts with your child
Firstly In order for the process to turn into an entertaining game, it is necessary to pay more attention to the pleasure and acquisition of skills during the lesson itself, and not to direct all efforts to the result.
It should be pleasant for a child to create crafts, and not a paper figure that you yourself will make while the baby is “catching flies”.
Remember! Better an imperfect craft made by the hands of a child than the correct paper ship made by you.
Secondly, the child will take the paper in his hands if you also take up this craft. Children perfectly imitate adults, on which their development in society is based.
Try making a paper boat and give a piece of paper to your child so they can do the same. Make another craft with him, step by step.
Third, Your child can also do the difficult steps of creating paper crafts on their own if you break it down into simple steps.
When helping children decide where to glue the pieces, you can make a small dot on the template with a black marker and say "put the glue on the dot", and then "put the animal's eye on the glue" and so on. In this way, children learn to follow the instructions and develop coordination their hands.
If your child is tired, take a short break. Instead of gluing a paper toy together, you can sing a song together about the item you are gluing, like a frog, to inspire your little one.
Easy colored paper crafts for kids
Craft from paper strips - napkin
You will need:
- Scissors
- Scissors for decorative cutting
- Decorative materials: buttons, stickers, rhinestones, etc.
- Sheets of colored paper
 Instruction
- Cut out a square from one sheet of colored paper.
- Fold the square in half.
- From the side of the folded edge and up to 1 centimeter to the end of the opposite edge, cut evenly cuts with scissors.
- Expand the square.
- Cut out strips of colored paper that should be longer than the length of the side of your square, and about 1.5-2 centimeters thick in thickness.
- Take one strip and pass it through all the slots in the square so that it passes above and below the surface of the paper square.
- Start the next strip from the opposite side of the beginning of the first strip.
- Weave the strips in turn in a checkerboard pattern until the entire square is filled.
- Flip the twisted square over and apply glue between the paper square and the ends of each strip.
- Fold all the edges of the strips that extend outside the square and glue them to inside square.
- Turn the braided square over so that the edges of the stripes are not visible.
- As a frame for your woven napkin, cut out a square piece of thick paper using decorative cutters to make the edges of the frame wavy.
- Glue the woven square over the cut out frame.
- Decorate the edges of the frame with prepared decorative elements: glitter, buttons, rhinestones and other materials.
Zoo made of origami animals
 A real zoo of voluminous animals will be able to please your children, which can be made using ordinary colored paper and instructions for creating origami animals.
To do this, you will need sheets of colored paper, pencils and scissors.
Instruction:
Draw according to the picture of animals: tiger, rhinoceros, elephant, giraffe and others.


- Cut out the drawn paper animals.
- To make the animal stand, bend the cut out pattern in half and straighten it back.
- The animal will stand on its feet if both sides are folded inwards near the beginning of the legs and then extended.
- Fold the neck of the animal so that the head and neck are fully pressed against the outside of the animal's back.
- Holding the neck, fold the animal's head into reverse side to show his face.
- Release all folds and fold the animal in half lengthwise again.
- Holding the folded fold along the middle, fold the animal's head slightly diagonally to the side so that the head is facing up as shown.
- Fold the animal's head to the other side also slightly diagonally, as shown in the figure.
- Again, fold the animal's head in the opposite direction diagonally, but now so that the head looks down, and the previous and new diagonals on one side form an isosceles triangle.
- Do the previous step on the other side.
- Open the carved animal and along the crease of the head at the base of the neck fold the paper again so that the head is fully attached to the outside of the animal's back.
- Clamping the folds of the triangle on the neck, press the body of the animal inward in the middle, the head should rise slightly.
- Starting at the base of the head, fold the head back inward.
- If the animal has a tail, twist it up or down and place the origami on a hard surface so that the animal is standing up.

paper mosaic
Paper mosaics will help you get your kids interested in creating unusual gifts that can be hung on the wall or used as a coaster.
To create a mosaic you will need:
- White cardstock or thick paper
- colored paper
- Pencils
- Scissors
- Glue stick
- Wax paper
- Transparent food film
- Frame
Instruction

- Cut out white cardboard or white colored paper as the base of the mosaic in the form of a rectangle, for example, 14 * 16 centimeters. It is better to cut out a rectangle rather than a square so that the picture looks more natural and looks like a real mosaic.
- Cut strips of colored paper 1-2 centimeters thick, and then cut out small triangles, squares and other simple geometric shapes from these strips.
- Draw a simple landscape of a few trees, sun and clouds on the prepared rectangular sheet or cardboard. You can also draw a simple animal or fish. The main thing is that the objects drawn should be simple and include a lot of inner space, which can be filled with a mosaic.
- Pre-paint parts of the picture with different colors, so that later it would be easier to choose which color and in which places to glue the prepared parts of the mosaic, in the form of triangles, squares and other figures.
- Slowly paste the mosaic in sequence according to the painted parts of the picture. It is necessary to stick the particles of colored paper tightly to each other so that the surface of the drawing sheet is not visible between two adjacent mosaic figures.
- Let the mosaic dry.
- You can give the mosaic as is or place it in a frame. To do this, place the mosaic between two cling films, which will provide a kind of lamination to the picture. You can also glue a cardboard sheet to the back of the mosaic and place it in a photo frame.
As a rule, at the age of about a year, children have their first interest in creativity. They begin to scribble with a pencil with pleasure, it becomes interesting for them to pinch off pieces of plasticine, and if you introduce the baby to glue, then he will generally be completely delighted. Any undertakings and talents in a child need to be developed, so now is the time to offer the baby the first classes in, and applications.
The basic rule for creative activities with a child at this age is give only those tasks that are feasible for the baby . Your task is to instill interest in creativity, and not to discourage it. If you offer the baby too difficult crafts that are not appropriate for his age, this will most likely lead to the fact that the child will not succeed, and he will just watch how you do everything for him. Classes should be held in such a way that the main part of the work is done by the child, and not by the mother.
It is important to remember that creative activities with a child of this age should not be more than 5-10 minutes. Always be guided by the mood of the child. If a child loses interest in work, then this most likely means that it is too simple or, conversely, too difficult for him. Or you delayed the lesson, and the baby is already just tired.
I divided all applications and crafts with children 1-2 years old into several groups in order of increasing difficulty:
Stage 1. Chaotic gluing pieces of paper on a piece of paper, gluing geometric shapes
Before making any crafts and compositions, first you just need to introduce the baby to the glue. The child must catch the very essence of the application and remember the basic scheme of actions: first we smear a piece of paper with glue, then turn it over, apply it to another piece of paper and smooth everything well with the palm of our hand to hold it tighter.
At first, you can simply glue pieces of colored paper onto the base sheet. Most likely, your kid will really like this activity. At this age, children are more attracted to the process itself than the result. We will work on art pictures later.
Now all your attention should be focused on teaching the child correct application technique . And it is very important to do it right now so that you do not have to retrain later. What is the correct technique?
Firstly, show your baby how to hold the glue stick. As a rule, children tilt the glue stick, which only complicates the spreading process for themselves. Teach your baby to place the glue strictly perpendicular to the leaf!
Secondly, explain to the child that when he smears a piece of paper with glue, it must be held with the palm of his left hand (if the child is right-handed). Most likely, at first, the paper will jump out from under the baby’s finger, so lightly fix his palm with your hand. Just do not do everything completely for the child, he must participate!
My daughter Taisiya met glue at about 1 year 3 months. In the beginning, we were just busy sticking small pieces of paper randomly into the album. Daughter absolutely loved this activity. A little later, I was struck by the idea that you can combine business with pleasure and stick geometric figures, voicing their names during gluing. At that time, Taya already knew all the flat geometric shapes, even such as a trapezoid and a parallelogram (we studied them with the help), therefore, while doing the application, we simply fixed them in memory.
Stage 2. Simple crafts with a chaotic arrangement of elements
After the baby gets a little comfortable with the application technique itself, you can begin to create the first crafts. I would like to bring to your attention a few simple ideas crafts-applications. All of them imply a free arrangement of parts on a sheet. Those. the child will not need to get to any specific place, but simply glue it wherever your heart desires.
Important! Give the child the opportunity to decide for himself where exactly on your Christmas tree the ball will hang or where the fish will swim in the aquarium. I noticed by myself that all the time I want to correct my daughter's creativity, to make everything beautiful and smooth. And if you think about it, why do it? Our work is not to be exhibited. It’s better to let the child be sure that he glued it as he wanted, and no one interfered. Sometimes you can just give a hint and explain why the way you propose will turn out more beautiful.
I think, based on the ideas presented, you can easily come up with many of your own options. Also in the article there is an opportunity to download the simplest b / w templates for the presented crafts. You can pre-color them if you wish.
All the necessary elements for the application, the mother will need to prepare in advance.
- Christmas tree with balls . First, together with the baby, we glue the Christmas tree itself onto the base sheet, then the balls, stars and other decorations you have prepared. Or you can stick decorations on ready template Christmas trees - DOWNLOAD TEMPLATE.

- tree with apples — DOWNLOAD TEMPLATE

- Hedgehog with apples and mushrooms — DOWNLOAD TEMPLATE

Vitamins in a jar for a girl — DOWNLOAD TEMPLATE

Berries in a basket — DOWNLOAD TEMPLATE


- Fish in the aquarium. The idea of the application from the manual "". The child sticks only fish.

Stage 3. Crafts with gluing elements to specific places
Now the baby will have a more difficult task, he needs not only to glue the application element, but also to get to a specific place. In my experience, such crafts should be switched to no earlier than 1.5 years. But, of course, everything is individual.
At first, on the base sheet, draw the outlines of the objects that you will glue. So it will be easier for the child to understand what should happen. Then you can gradually move on to gluing without contours.
So, here are some slightly more complex crafts with children 1-2 years old:
- Caterpillar . We glue the caterpillar from the circles. When all the details are glued, mom finishes the face of the caterpillar. To make the task easier, you can stick circles on the template - DOWNLOAD TEMPLATE.

- Cotton pad snowman. We cut out a bucket hat in advance from colored paper. When all the details are glued, mom finishes the face.

Cotton pad dandelions — DOWNLOAD TEMPLATE.

- Air balloons . The kid sticks only balloons to the finished drawing. DOWNLOAD TEMPLATE.

block house

Christmas tree made of triangles . Glue the triangles one on top of the other.

- House with windows. We glue square windows to the house. You can also make a door. DOWNLOAD TEMPLATE

- Car . We glue windows, wheels, and, if desired, headlights to the silhouette of the car.

Cut pictures from magazines . You can cut out pictures from magazines, cut them into large, baby-friendly pieces, and then glue them together with your child. For example, you can cut out a car, a face or a human figure completely.

- We put the toys on the shelf. Application idea from the manual " It could be your baby. Stick a picture»

- Snow tree from napkins . Application idea from the manual " My first masterpieces»

- Traffic light. Application idea from the manual " My first masterpieces» — DOWNLOAD TEMPLATE
 By the way, ideas for crafts for New Year and winter themes can be found.
In your creative pursuits, you can also use various tools. They have a lot of ready-made ideas, before class you will only need to cut out all the necessary details or use ready-made stickers. For example, we used the following publications:
- (Ozone, My shop, KoroBoom)

- (Ozone, My shop, KoroBoom)

- Application. Mishutka and his friends (Ozone, labyrinth, My shop)

- Educational stickers for kids. Form (Ozone, My shop, KoroBoom)

And in conclusion, I would like to say one more very important point. One of the main principles of the world-famous is to provide the child with as much freedom and independence as possible. And this does not mean at all that you need to leave the child to himself "Go, play as you want!". This means that the baby needs to be taught to play so that he can subsequently do it on his own. So that he could prepare himself for the game, he himself knew how to handle the materials, he himself was able to clean up after himself. That's why, when you are doing creative work with your baby, be sure to immediately accustom him to certain rules .
For example, we have this order: first we go together to lay a special tablecloth on the table (it can be a modeling board), then we take out all the necessary accessories from our “creative” locker (glue, album, colored paper). After work in the reverse order, we put everything in its place. We apply such rules from 1 year 3 months. Now, a year later, I can say that my daughter knows all the rules well (although she already learned them a month later) and performs without any resistance. There are times when she cleans up after herself without a reminder, but mostly with a reminder, of course.
I wish you and your baby creative success! I hope you enjoy our craft ideas. I will be glad to make friends with you in social networks, come


