How to make a toilet for a summer residence - a wooden house for reflection in the garden. How to build a toilet in the country: drawings, dimensions. Detailed diagrams of the toilet Hut and Birdhouse Country toilet do-it-yourself teremok drawings
It is difficult to imagine our man without a summer cottage in the suburbs, but even more difficult - a summer cottage without an equipped toilet. Suppose you don't have a house to live in your dacha, but still, there is a need to build a toilet. Even if you came to the site for a short time, in order to work, water the land or relax, in any case you will need a toilet. The building instructions are very simple and inexpensive to build.
Before you start building a summer cottage toilet with your own hands, you need to find the photo drawings first, and then choose a place for construction.
Despite the first glance, the simplicity of the toilet design is summer cottage, it belongs to the main buildings. The most important building on the site is a bathroom, many will confirm that it is simply impossible to be outside the city without it.
Of course, a toilet built on the street is no substitute for a comfortable toilet; it will provide only a few conveniences. But without it, it is impossible to fully work for personal plot.
You need to know the sanitary standards for the construction of a toilet and create the building specified by them.
The construction of a toilet is not particularly difficult and does not require the involvement of specialists.
But in the building you need to observe some features.
Basic standards:
- Convenient place to build a toilet. An unsuccessful place can lead to pollution of the area around the structure, soil, water. Therefore, non-compliance with sanitary standards and ignorance can lead to health problems and the attraction of fines from the sanitary service.
- Make sure that construction does not create inconvenience to neighbors.
- Consider a method for how the sump will be emptied.
- If the water table is high, then the toilet structure should be well sealed to avoid water pollution.
How to choose and build a country toilet with your own hands photos and what types of their design are there:
There are enough options for choosing the construction of a toilet, but the choice may be influenced by:
- The budget allocated for the construction of the toilet;
- The frequency of use of this facility;
- Groundwater elevation level;
- Funds allocated for the repair and disposal of waste.

The most popular and most common are toilets where the base is a cesspool. It contains waste, which is then absorbed into the soil, but sometimes you still need to call a sewer service car to clean the pit. The frequency of cleaning and calling the sewers depends on how deep the waste pit is, but this procedure can be very rare. Basically, the problem of disposal can be solved with the help of earth, crushed stone, sand with which the pit is filled. After that, you have to choose the right site for the construction.
Toilet can be built from different materials it could be:
- boards;
- metallic profile;
- brick;
- slate.
The most important part in the construction is ventilation and the quality of the frame base.

The main preference is given to buildings made of wood. The construction cost is not large and does not require special skills. A wooden toilet can be built in the style of a log cabin or small house... If you come up with a drawing of a country toilet yourself, then you can get not only the necessary, but also a building that will decorate your site. As a decoration, you can take a lining. The advantage of a wooden toilet is that it can be easily rearranged to a new place.
disadvantages wooden buildings.
- under the influence of the sun, the wood deforms, dries quickly and bursts;
- burnout of wood from the action of ultraviolet radiation;
- moisture and dampness contributes to the deformation of the building frame;
- due to dampness, fungi form that destroy the wood, and it begins to rot and give off unpleasant odors.
In order to extend the service life of the building, it must be treated with special means in the form of impregnation. Wood can be primed and painted.

To build a toilet from a metal profile, you need to build a frame made of wood.
You can also build a frame from shaped pipes that can be connected by welding, but for this you need to have some skill. The frame is sheathed with profile sheets and reinforced with screws or rivets. The disadvantage of this design is strong heating in the sun, so it is advisable to find a place in the shade in advance. To prevent the toilet from getting so hot and cool inside, you can use expanded polystyrene sheets for upholstery.
The advantage of this design is protection from moisture, since the metal-profile sheets are sprayed.

A brick building cannot be moved, so this structure has difficulties.
A brick building also requires concrete floors. You also need to think about a way to clean the cesspool in advance. The cost of building such a toilet is higher, but it will already be a full-fledged building that does not need repair for a long time.
You can build a toilet out of the same brick that, for example, a garage or house was built. If you build a country toilet, the drawings should be sized immediately before building the structure. This makes it possible to fit into appearance patio and save money on construction.
The weight of this building is more than wood, so you need to put a strong foundation under it. You can build a foundation of a strip or columnar type, but the strip provides a number of advantages: low land costs, reduces the consumption of cement for pouring, safety and reliability.

The cesspool is the most inexpensive and in a simple way when building a toilet in a summer cottage, but there are also a number of restrictions and conditions for installation:
- limestone or shale soil;
- pass high groundwater;
- to use the toilet a large number of people;
These factors do not allow the construction of a toilet based on a cesspool in a summer cottage, but you can solve this problem by building a bathroom without a sewer hole: a backlash closet, a powder closet, a dry closet or a chemical one.
The backlash closet is based on a cesspool, but it is sealed. It is often installed near the toilet walls. The backlash closet requires the use of the services of a sewer to periodically empty the pit. The disadvantage of this structure is that it cannot be cleaned in winter, this requires heating.
Powder closet small tank size about 20 liters. This gives the advantage of the low cost of building this toilet. Its installation is necessary if the groundwater flows high.
The do-it-yourself country toilet created in this way bears the name because of its principle of operation. The waste in the pit is, as it were, “powdered” with a dry composition. For falling asleep, a peat-sawdust mixture or peat is usually used. This helps to get rid of the bad smell. All waste is sent to a compost pit for composting.
A dry closet is a popular type of toilet among summer residents. He has the same principle as the powder-closet - waste is recycled using a peat mixture. You can also use biologics that contain bacteria.
Chemical toilets - chemical agents are poured into them. Do not forget about the safety when using this drug. For these purposes, substances such as bleach, formaldehyde are often used, but you need to be careful, they are very toxic.

The most important requirement for the construction of any toilet is that waste does not fall into the ground. Its construction is possible only when the water level in the ground is more than 2.5 m. The choice of location for the toilet is influenced by:
- the distance between the toilet and the water source, the farther, the better the nearest distance is 30 m;
- the building should be built at a distance from the cellars and basements;
- buildings with pets must be no closer than 5 m;
- from the fence to the toilet should be 1m.;
- the choice of material for the construction of a toilet is important;

There are several types of toilets in the form of a birdhouse, a hut, a hut or a house. A drawing of a country toilet with dimensions of the "Birdhouse" type is made of wood, and sheathed with any other material. It is being built over a cesspool. If you find it difficult to draw up a drawing yourself, you can use ready-made projects.
During construction, a building level should be used to control the even placement of the structure. Do not forget about the presence of ventilation, which can be a pipe. It must be above roof level. In order to insulate the toilet, you can use foam, you can decorate the inside as you wish.

Based on the drawing of the "Birdhouse" country toilet, we are building the "Shalash", it has a more complex design, but the result is worth it. "Shalash" has many different options registration, for this you can use your imagination or the Internet. Dimensions can be used from a previous project.
You need to start construction from the toilet pit, it will contain concrete blocks.

A special feature of this building is the triangular gable roof. If this is a country toilet, the dimensions are selected individually in connection with the number of people who will use the toilet.
The construction consists of several stages. Initially, we mount the foundation using insulating materialwhich will protect against moisture.
The construction of the "Shalash" begins with the installation of the foundation, then the lower part of the frame 1 by 1 meter and the construction of a cesspool. The base must be treated with an antiseptic.
The toilet can be sheathed with forcing or boards left over from work. The roof can be made from various materials 1.8 m long, it rests on the front and back of the frame and is fixed. Roof material can be selected according to your taste. It can be metal, wood, slate roof or corrugated board.
When installing the door, immediately attach the handle and hook to the door. At the end of the work, you need to treat the toilet with varnish or paint to improve the appearance of the building.

If it is impossible to dig a toilet pit, the solution is a homemade peat dry closet. It is easy to maintain and inexpensive. Detailed drawing country toilet can be found on the Internet.
Even if you have big house with conveniences, this is not a reason to give up the summer toilet and shower. In summer, late spring and early autumn, we spend most of our time outdoors. Dragging dirt into the house every time you want to go to the toilet ... This is not only irrational, but also fraught with scandals with those who clean this house. Output? Buy a ready-made toilet cubicle? But the simplest one will cost 6-7 thousand rubles. We suggest you make a toilet in the country with your own hands. Drawings, dimensions and recommendations for the construction of cabins such as "teremok", "hut", "birdhouse" you will find as you read the article.
Regulatory requirements for the placement of toilets in a private household
You should know that:
- If the toilet project provides for a cesspool with a volume of more than 1 m 3, then its construction should be agreed with the local authorities for the protection of groundwater.
- SanPiN 42-128-4690-88 gives clear instructions on the placement of a toilet within your site:
- the distance from the cesspool to the well is 20-50 m (depending on the type of soil);
- the distance from the cesspool to the house is at least 15 m, but by agreement with the neighbors it can be reduced to 5-8 m;
- from the toilet to the road at least 1.5 m.
- If the maximum groundwater level to the bottom of the cesspool is less than 1 meter, then the only option available to you is a “dry” toilet, or, as it is also called, a powder closet. Details in the article "".
- The depth of the pit should not exceed 3 m.To ensure normal ventilation from the top of the pit to the level of sewage, it should be at least 0.35 m.
- If the area of \u200b\u200bthe local area does not allow to carry the toilet away from the house, then the latrine is equipped at the blank wall of the building, away from the terraces and windows. In order to pump out sewage, there must be a free entrance to the back wall of the structure.
- How much volume to make a cesspool? It is believed that, on average, one person "produces" up to 600 liters of urine and feces per year. Family of 4 people - 2400 liters or 2.4 m 3. A hole with a volume of 4-5 cubic meters per eye is enough to meet the needs of a small family.
- The bottom and walls of the cesspool must be concreted (the walls can be laid out of bricks, rubble, logs), and then carefully plastered from the inside. The bottom of the pit is made at a slope (at least 15 o) so that urine and feces flow towards the hatch, as shown in the picture of a backlash closet with a birdhouse-type booth.
Materials for building a toilet cubicle
How to make a toilet "for ages", but not go broke on building materials? First, conduct an audit of the local area. Perhaps, after construction work, you still have a sheet of corrugated board or pieces of unedged board. You will need all this in order to build a toilet in the country with your own hands. Well, we will supply you with drawings and advice.
According to the type of materials used, all booths can be divided into three groups:
Toilet with metal frame:
- Vertical racks: shaped tube with a section of at least 40 x 40 x 4, or a corner from 63 x 63 x 5 and more.
- Transverse stiffeners: corner 50 x 50 x 5.
- Wall cladding: corrugated board.
- Toilet floor and toilet seat: edged board, 40 mm thick, preferably larch.
- Roof lathing: edged boards, 10-15 mm thick.
- Roof: corrugated board PS-10, metal.
Wood framed toilet:
- Upper and lower strapping: bar 100 x 100, 150 x 150.
- Racks: timber 50 x 70, 50 x 100.
- Wall cladding: edged board, 10-25 mm thick. If you do not want to admire the cracks in the walls in a year, sheathe the frame with planken.
- Floor and toilet seat: planed board, 30-40 mm thick.
- Roof rafters: timber 50 x 100.
- Lathing for soft roof: unedged board 10-25 mm, OSB boards or moisture resistant plywood.
- Roof: bituminous shingles, professional flooring, metal tiles.
Brick toilet:
- Walls: brick. If you lay in half a brick, then 51 bricks will be required for 1 m 2 of walls (including seams). A small toilet with dimensions of 1.5 x 1.5 x 2.0 m will need about 230 bricks. Expensive? You can make walls from a foam block. Although this material requires additional decorative finishing, but it is warmer, cheaper and put much faster.
- Floor and toilet seat: edged board, 40 mm thick.
- Roof: any roofing material - from slate to soft roof.
- Sheathing and roof truss system: timber 50 x 100, unedged board, OSB sheet (for soft roofs).
The list did not include: concrete, formwork, pipes and hood for the hood, door leaf, fittings, hinges, windows, waterproofing between the foundation and walls.
"Birdhouse"
One of the simplest and most common toilet designs in the local area. Below is an instruction on how to build this suburban toilet with your own hands step by step.
- Digging a hole. We accept its dimensions (volume), guided by the recommendations given at the beginning of the article. If it is planned to concrete the cesspool, then we make the formwork.
- We lay the base (bottom harness) for the toilet cubicle. It can be welded from channels, but for the option shown in the figure, they used wooden beam 150 x 150 mm. Pay attention - the rear base beam conditionally divides the cesspool into two equal parts. After the base beams are exposed and fastened, concrete is poured into the formwork. A prerequisite is that the top of the concrete and the top edge of the timber must be in the same horizontal plane. We process the tree with bituminous mastic. In places where the timber is in contact with concrete, we lay roofing material.
- We collect the frame of the booth from a bar of 50 x 100 mm. We make the two front vertical posts 30-40 cm higher than the rear ones. This is how the silhouette of the booth is formed, for which the toilet was nicknamed the "birdhouse". We close the cesspool behind the booth with an inclined shield structure.
- We sheathe the walls of the building with clapboard or edged board. In the panel structure, we make a hatch for pumping out feces. Hardwood (30-40 mm) is used on the boardwalk and toilet seat.
- In the upper frame of the frame, slots are made, where the rafters from a 50 x 100 mm bar are inserted. An unedged board is attached to them with self-tapping screws. The top layer of the roof is a sheet of metal or slate.
- Sheathing, floor boards and toilet seats are sequentially covered with an antiseptic, stain and varnish. The last are the ventilation pipes, which are fastened with clamps to the sheathing boards.

Drawing of a country toilet Birdhouse
"Shalash"
When the groundwater comes close to the surface, the only option to equip the latrine is a powder closet. There is no cesspool in such a toilet, and a container (tank) is hidden under the toilet seat, which must be periodically emptied. To prevent odors from the toilet from spreading throughout the site, a tank with sawdust, ash or peat is placed next to the toilet seat. After visiting the toilet, the feces are "powdered", and as the container is filled, they are taken out to the compost heap.
For powder closets, booths in the form of a hut are often placed. You can make such a toilet design with your own hands in a couple of days, and the cost of materials, frankly, is inspiring.
The booth is installed in the following order:
- For the foundation, you can use sand-cement blocks or lay out a red brick tape around the base of the hut. The foundation is covered with roofing material.
- A drawing of the "hut" toilet is shown below. The first step is to make the front and back walls of the booth. They are connected together with a 100 x 100 mm bar and an edged board, which will play the role of a roof sheathing. A toilet seat frame is assembled from a bar and attached to the back wall.
- The toilet is sheathed from the inside with clapboard. In the flooring of the toilet seat cut out a hole "points". Install the booth on the foundation.
- The roof can be made of metal or corrugated board by screwing it to the sheathing boards with screws. The building will look like a real forest hut if the roof is sheathed with boards 2.0-2.1 meters long, which must be pre-treated with an antiseptic. They are nailed to the sheathing, starting from the lower edge of the roof, so that each upper board overlaps half of the lower one (overlapping). A shingle roof is made in a similar way.
- The ridge is reinforced with a galvanized sheet, as shown in the drawing of the toilet "teremok". The boards of the toilet seat are polished, all wooden surfaces are covered with stain and varnish.
The roof in such a booth reaches almost to the ground, so the walls and floor inside remain dry even in the heaviest rain.

Dimensions of the toilet for a summer residence Shalash
"Teremok"
The toilet "teremok", hidden in the dense greenery of your garden, looks like a real fairytale hut. But its beautiful and unusual shape is not its only advantage. The rhombic (in section) shape of the building prevents the accumulation of snow on the roof and protects well from the wind.
In the "house" you can put a dry closet, but in principle, such a booth is also suitable for arranging a backlash closet - a toilet with a cesspool. The assembly of the "teremok" and "hut" cabins is carried out in a similar manner:
- Hammer the base (bottom harness) of the booth from a bar of 150 x 150.
- Separately, the front and rear walls of the booth are assembled, after which they are connected together with a 100 x 100 bar and an edged board (crate). The structure is attached to the base. A toilet seat is formed from a bar and edged board. To connect the timber to each other, a fastening metal corner is used.
- Lay the floor and seat of the toilet seat from a planed board with a thickness of at least 30 mm.
- The booth is sheathed with clapboard.
- To the crate gable roof self-tapping screws fix the OSB sheet, on top of which bitumen (soft) tiles are glued.
- All wooden surfaces are treated with an antiseptic, and the base bar is coated with bitumen mastic.
The dimensions of the "teremok" toilet for a summer residence can be taken from the sketch given in the article. The main difficulty in buildings of this type is to maintain the symmetry of the right and left sides of the booth.

Teremok country toilet project
Toilet combined with shower
The article, with several examples, shows how to build a country toilet with your own hands, but no, not a single mention of the soul. We are in a hurry to correct this mistake, and we will tell you how to build an outdoor shower and toilet under one roof. This idea will save you not only money, but also the area of \u200b\u200bthe local area. The diagram shows that a toilet with a shower is separated by a wall (separate entrance), but the foundation, load-bearing walls and they have a common roof, which means that construction costs will be reduced by about a third.
Installation of the structure takes place in the following order:
- We mark the axes of the foundation and dig holes for filling concrete pillars... At the bottom of the pit, 50-60 cm deep, we pour 10 cm of sand, ram and pour concrete. If you do not want to mess with the formwork, then instead of a columnar foundation, you can put a tape of red brick around the perimeter of the building. The upper part of the support structure should protrude from the ground by 70-100 mm.
- On the pillars, through a layer of waterproofing, we put the base (lower strapping) from a bar of 150 x 150 mm. We install on the corners vertical posts made of timber 50 x 100. For the connection we use the mounting angles. We put the upper strapping from a bar 100 x 100 on the racks.
- Shower. Digging a trench and laying sewer pipe, through which the water from the shower will drain into the septic tank. Cover the floor in the shower with expanded clay and fill it with concrete. We distribute expanded clay so that water flows by gravity into the drain hole in the center. We cover the frozen concrete with a layer of bitumen-rubber mastic. From above, on the square of the strapping, we lay the shower flooring from edged boards, leaving 15-20 mm gaps between them. Water enters the room from a tank, which with one side rests on the roof of the building.
- Restroom. The room was built for the installation of a peat dry closet, so a cesspool under it is not provided. The floor in the restroom is filled with concrete, and tiles are placed on top.
- The frame is sheathed from the inside with clapboard, from the outside with corrugated board, and we put expanded polystyrene plates into the pier. In the back wall of the toilet we make a door through which it will be possible to change containers with feces.
- We put rafters (50 x 100) on the upper strapping beam, sew on them an unedged board, 10 mm thick. The top layer of the roof is corrugated board, which is attached to self-tapping screws. The dimensions (dimensions) of the country toilet and shower combined in one building are 1.45 x 2.8 meters. This area is enough for the shower room to have enough space for a bench, and in the toilet for a box of peat.

Dimensions country toilet with shower
About ventilation
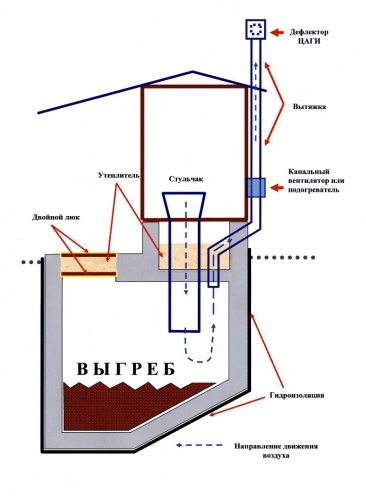
When building a toilet for a summer cottage, do not forget about ventilation. The latrine must be equipped with:
- Supply ventilation. It is a small hole at the bottom of the toilet. This is done only in stone toilets. Closed with a grill or mosquito net.
- Exhaust ventilation from the top of the pit. If it is planned to close the cesspool with a concrete floor slab, then at the stage of assembling the formwork for the ventilation pipe, a mortgage is left. Asbestos-cement and sewer pipes are the most commonly used material for ventilation. They are allowed on the back of the cabin (outside) and fastened to the sheathing with clamps. To improve the natural draft, the pipe is brought out to the sunny side and painted black. The head is raised above the roof by 70-80 cm.
- Exhaust ventilation from the top of the booth. In order not to make another head, the pipe is connected to the ventilation of the cesspool.
Interesting! A homemade deflector made from an old bucket without a bottom and a cap attached to the bucket with staples will help to increase the traction in the ventilation pipe of the toilet. A schematic of this original design is shown in the figure below. 1 - a cap made of galvanized sheet, 2 - a bucket without a bottom, 3 - brackets (8 pcs.), 4 - a clamp, 5 - fasteners, 6 - ventilation pipe.

Deflector do it yourself
The first thing an owner does when building a house is to build a toilet. Without this structure, even minimal comfort becomes an unattainable dream. We hope that the information and sketches provided will help you make your own project of a country toilet. If you have your own ideas, or you have found errors in the text or pictures, please write to us. We invite theorists and practitioners to discuss.
You should not deny yourself comfort even in the country. There are a huge number of country toilet projects that every person can implement. But first you need to decide on the drawing and, according to it, build the future structure.
A huge amount of materials and all kinds of projects of country toilets leads to the fact that people are simply lost against the background of all this diversity. That is why the theoretical part is so important. Based on the data in this article, you can choose the best project for your summer cottage.
Typical projects of country toilets
Basically, to create a country toilet project, the following types of structures are used:
- toilet house with a cesspool,
- dry closet,
- powder closet.
Each of these designs has its own advantages. That is why it is so important to decide on the type before starting construction.
Country toilet with a cesspool
In the project, it is imperative to provide a foundation pit. You also need to take care of its arrangement. For this, a plastic barrel or brickworkreinforced with fittings.
In the project, you must provide for the required amount of brick and cement, also do not forget about the reinforcement. The walls you create are subsequently covered with plaster. It is the pit that sets the character of the ground structure. Usually this is a small wooden house made from scrap materials. It can be in the form of a hut, a miniature house, and even a terem.
According to this project of a country toilet, all waste will accumulate in a pit. For its further cleaning, you will need a flusher. The main disadvantage of the project is bad smell... That is why it is very important to provide ventilation at the planning stage.
Ventilation can be either natural or forced. In the first case, two holes are made in the structure from the bottom and from the top. Their purpose is extremely simple - to create air disturbances. Thus, the unpleasant smell will not linger inside for a long time.
Forced ventilation is a simple fan that blows all unpleasant odors out of the toilet. When installing it, you need to think about an expansion hole through which air will penetrate inside. Its diameter must not be less than that of the fan. All this is written in the project.
Important ! Don't forget about the cesspool. She also needs air circulation. For this, a ventilation pipe is installed.
Powder closet
When creating this project of a country house, a cesspool is not provided. All waste is collected in a tank under the toilet seat. It is best to include two containers of different sizes in the design. In the smaller one, you need to make several holes of different sizes and insert it into a large container, on the side of which there will be a round exit. A drain hose is connected to it.
Through the hose, the liquid goes into the ground or drainage system... The main role in this project of the country toilet is played by the container for the filler. Peat is most often used as a mixture. The filler helps to contain unpleasant odors. Once the tank is full, it should be taken out onto the compost heap.

When you make a drawing, it is important to take into account the convenience of removing the container. There are two possible options solutions to this problem. In the first one, the reservoir is removed when the seat is lifted. In the second, a small door is cut out at the back of the building. It allows you to easily remove the filled container.
Dry closet
You don't even need to build anything here. In fact, you are buying a ready-made country toilet project. All you need is to install the product in a convenient location. In this case, you can purchase both a ready-made structure and a whole booth.
Advice! The finished structure can be easily installed even in the house. All you need to do is take care of the drainage.
Shower and toilet under one roof
Now the projects of a country toilet combined with a shower are very popular. This is especially beneficial from a financial standpoint. In addition, such a project can significantly save free space on the site.

In the project, the toilet and shower will have one common wall. The result is savings in building materials. At the same time, the bathroom can work both on the basis of a tank with a mixture, and on the basis of a cesspool.
How the drawing is created
The main task of the drawing when creating a project for a country toilet is to detail the structure. The size, shape and type of building are clearly indicated on paper. At the same time, there are a number of standards that must be observed.
Firstly, the distance of a country toilet for a water supply location cannot be less than 30 meters. This must be specified in the project. Secondly, a residential or business building should not be closer than 15 meters. Of course, there are exceptions in the form of the same septic tank with a biological purification system.
Dimensions are of particular importance in the drawing. You are free to ask them. But there are certain standards that allow you to create a beautiful and comfortable building with a high guarantee.

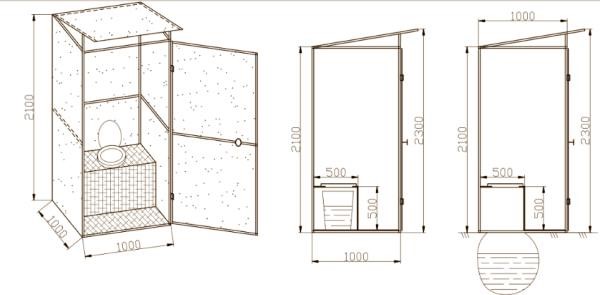
The height of the future suburban building should not exceed two and a half meters. At the same time, the minimum indicator is at the level of 2 meters. The length of the building is from 1.2 to 1.8 m. The width is from 1 to 1.2 m.

Many novice builders do not attach sufficient importance to the parameters of the cesspool. It is unacceptable. After all, it must also be included in the drawings. The design depth is 1.5-2 m, the diameter is from 2 to 2.5 m. If the groundwater is close to the surface, then the pit will have to be abandoned.
Country toilet add-on projects
When choosing a suitable country toilet project, the selection of material is of particular importance. It is he who to the greatest extent sets the parameters of the future building. There are several typical options, which will be discussed further.
Brick toilet
Benefits of this material can be listed indefinitely. It is resistant to atmospheric influences, retains heat and cool equally well, and is environmentally friendly. Moreover, it allows you to give the structure any shape.
The foundation of this project is the foundation. Without it, creating a brick country toilet is simply impossible. Separately, it is necessary to mention the quality of the masonry. This is the real art of laying bricks for centuries. From above, the structure is covered with a roof, a material for which, in most cases, slate serves.
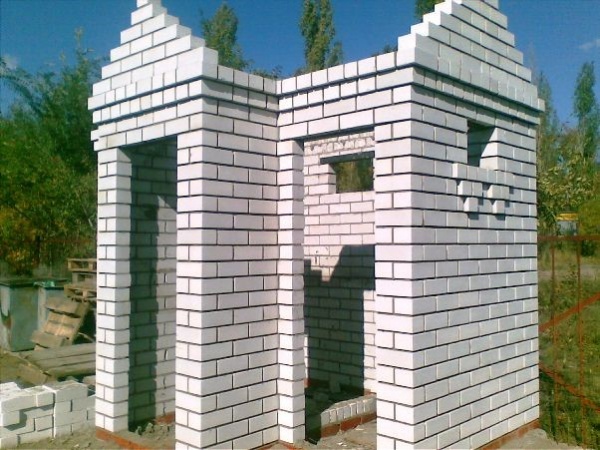
In the picture you can see an example of a related project. One design combines a toilet and shower. This is not only practical, but also allows you to greatly save on the cost of building materials.
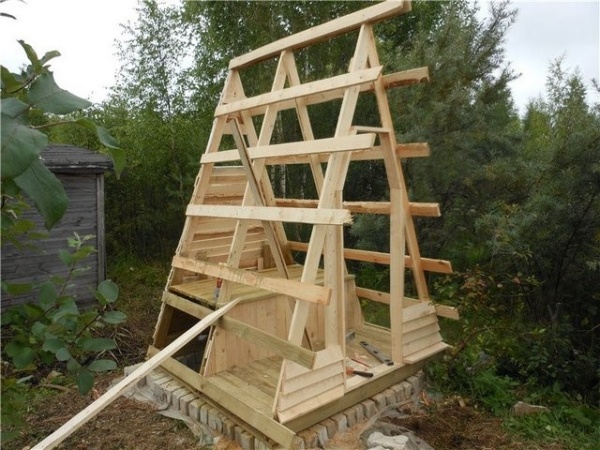
Wooden toilet
The project of a wooden country toilet is a classic. Its construction takes a minimum of time, but in order for the structure to serve you faithfully, it is necessary in the process of work to clearly follow the outlined plan.

The picture shows one of the most popular among summer residents option - a teremok. As you can see, it has a small interior space and small dimensions. This allows you to install it anywhere. Also worth noting is the aesthetic appearance.
Metal toilet
This version of the project will appeal to those who want to save time and money. When building, you can use sheets of metal left over from building a house. The only thing that needs to be taken care of is inner lining... Of course, you can do without it, but in winter it will be very problematic to be in such a structure.

The main advantage of the project is the absence of the need for any knowledge. Almost everyone is capable of building such a country toilet. This is the cheapest option imaginable. The only thing you need to pay attention to is the toilet seat. It is best made of wood for a comfortable sitting.
Types of wooden booths
It is the wooden cabins that are most popular among summer residents. The explanation is quite simple. The timber is inexpensive, but provides good thermal insulation and has a pleasant appearance. During construction, the following projects are most often used:
Outcome
As you can see, there are many different projects of country toilets. During construction, you yourself choose the material, type of building and interior arrangement. Any of the above options has its own advantages and disadvantages. Therefore, it is very important to weigh all the pros and cons of each project and make a choice in favor of the optimal one.
With summer approaching, gardeners are spending more and more time outside the city. Even if there is no house on your site yet, or even a makeshift, a toilet in the country house should be mandatory, because you will not all the time run to your neighbors or to the nearest forest or planting. Therefore, already now it is necessary to think about the construction of such a necessary premises. Our step-by-step instruction, and tips, photo and video materials will help you cope with this task, while not wasting extra money and time. Let's begin.
How to make a toilet in the country with your own hands: general information.
Of course, it may seem to many that this is a primitive work, not even worth attention. But this is far from the case, because the functioning must be correct, besides, it is necessary to comply with sanitary standards. Of course, basic conditions of convenience must be created, because it is not very comfortable to spend time over a hole in the floor, and if there are children on the site, or guests will come.
Of course, this is a temporary building, but if you do not live here for a long time, you can limit yourself to this. In case you spend a lot of time in the country, then you will have to build a more comfortable toilet. Of course, you need to know the sanitary standards, only after that start work.
Sanitary and hygienic standards for the construction of a toilet
You can do the work on arranging a latrine on the estate on your own, it is not necessary to hire trained workers. But, do not flatter yourself, you still have to work hard, and study some aspects too.

- Sufficient distance from the neighboring site.
- Choose the area for placement very carefully, otherwise you risk contaminating the environment, sewage can get into the groundwater, which in turn will lead you to big trouble and face a significant fine.
- Think about how you will clean the sump.
- You need to find out the level of groundwater, the hole should be above them, if they lie very high to the surface, then you need to completely isolate it.

Parameters:

Do not make your drawings if you have never done this work, just use the ready-made options, you can slightly correct them.
Use the builder level to place the building straight.

What materials are used in the construction of a closet "birdhouse":
- Two meters of roofing material;
- Four sand-cement blocks, or two concrete curbs;
- Door block 200 * 90 cm;
- Sand;
- Lining forty pieces measuring 8.7 * 300 cm;
- Seven edged boards: four, measuring 5 * 10 * 600 cm and three 3.2 * 9 * 600 cm;
- Profile steel sheet, galvanized with dimensions: 200 * 152 * 00.4 cm;
- One wooden bar: 5 * 5 * 60;
- Handles, latches, door hinges;
- Self-tapping screws and nails;
- Polyfoam for interior upholstery, thus the room is insulated.
- Paints and varnishes.

DIY step-by-step construction, a country toilet, in the form of a birdhouse:
- First of all, choose a place to build, equip a cesspool. The minimum size for the tank is 1 * 1 * 2 meters. Make the bottom, in the form of a pillow, pouring rubble or broken brick there.
The size of the cesspool directly affects the size of the aboveground, so make calculations before starting construction.

- We begin to build the foundation, from the curb part, it must be positioned in such a position that it does not come into contact with the edges of the pit, but is at a distance of no more than 20 centimeters. This element will serve as a kind of overlap. The concrete slab should not be more than 10-15 cm higher than the ground level. In the event that you use sand-cement instead of curb blocks, dig them into the corners, after which the entire structure will be installed on it.
- We put roofing material on the base, in about four layers, thus providing protection against moisture ingress.
- The frame is sheathed with ordinary boards, or clapboard, for the construction of the floor I use thick boards (at least 4-5 cm). It is best to choose very durable wood species such as oak, beech.

Construction of a nesting box toilet
Final stage of work:
- We cut a hole in the floor, at least 30 cm in diameter.
- We install doors to make the room brighter, a window is made in it, if desired, it can be glazed.
- We make a roof, the covering material can be completely different: roofing material, profile sheet, steel or tin sheet.
- We process the "birdhouse" with paints and varnishes.

- Of course, the ventilation system is also often equipped. It is done in order to take the unpleasant smell out of the pit, away from the booth itself. An ordinary pipe with a minimum diameter of 10 centimeters is used for such purposes. Another pipe is installed directly in the booth itself. It should rise above the roof by at least 20 centimeters. All elements of the wooden frame must be worked with a sealant, and later a deflector must be installed, which will help to remove air from the room.

Construction of a restroom according to drawings, on a personal plot, in the form of a hut:
This is a more sophisticated design than the first option. But, the extra spent energy more than compensates for the appearance of your future, the photo of which you will see below. Very often, the final project looks like a fairytale house, which will undoubtedly decorate any site. The beginning is standard, as in the first case, you need to choose a place, and then dig a cesspool. Take the dimensions from the previous drawing, they will be identical. In the corners of the pit, recesses are made into which concrete blocks are inserted. Be sure to do everything exactly and exactly.

Use a flat staff to control the horizontal. Lay it on two blocks, side by side, and put a level on this rail. The base should be no higher than 15 centimeters.
Step-by-step instructions for erecting a closet in the form of a hut, with your own hand:
The first stage of work, after the completion of the digging and arrangement of the pit, will be the installation of a base made of concrete, on roofing material (2-3 balls) or other material that protects against moisture.

- Further, the back and front parts are sheathed with clapboard, from the outside and inside.
- We mount the walls. We install it on the floor and fasten it together with scraps, boards.
- We make the crate using boards. Then we trim with material.
- The roof is being installed. This is done using long boards (minimum length 180 cm). We will fix the boards, using fasteners, and wooden rails.
- We lay the roof.

- Almost any finishing materials are chosen. The main thing is to follow the general style of buildings in the yard. For a fairy house, do not use new materials such as corrugated board or metal roofing, so as not to create cognitive dissonance.
- We make a ridge on the roof. You can make a figurine out of wood.
- We put handles and latches on the door.
- We paint or varnish the entire structure.

Do-it-yourself toilet in the country: we make drawings, and installation of a peat toilet:
A very popular type of closet device in a suburban area. It has a lot of advantages:
- There are no unpleasant odors, as peat absorbs them very well.
- It also absorbs moisture well, due to which it extends the service life of the pits.
- Due to the presence of bacteria colonies in the composition of peat that process waste, they can be used in the garden for useful purposes.

Features of factory designs:
Such units are very modern, they use the latest technologies in their assemblies. Most often they are arranged according to the type, separation of liquid and solid waste. Often a hose is used to remove the cleaned liquid waste.

The hard part remains at the bottom, and then it is very easy to remove it. Simply transfer to the compost pit, along with the container, and then return it back. Before that, it must be washed and again filled with a special peat substrate.
Average market prices for such products:

- a distance of at least 30 meters from water supply sources is taken, and with traditional geology (in middle lane) - from 50 to 80 meters;
- the distance from plantations of food crops and stagnant water bodies should also be from 30 meters;
- the distance from flowing water bodies (rivers and streams) is taken from 15 meters;
- from road surfaces and buildings - 5 meters;
- from the border of the site, bushes and barren trees - from 2 meters.
It must be borne in mind that these rules apply not only to objects on your own site, but also on the sites of neighbors. And you can't joke with this, as they say, because in case of violations on your part, the law will be on the side of your neighbors.
Therefore, it is very important to understand that a toilet at a summer cottage needs to be built with a cesspool in a deaf type,. Modern and improved cesspool products can help a lot. Sanitary barrels usually leave the city once a season, and by agreeing with neighbors, you can share the cost of calling among those who use the services.
Summer residents, who are able to independently make something on their site, did not bypass the cesspool. The video below shows how to make a rake with your own hands.
Do-it-yourself cesspool pit: video
Smell
The installation of a toilet with a flush system and a siphon is not allowed, even in those areas that have a constant water supply. Why? The fact is that due to water, an excess accumulation of moisture will occur, which can have a destructive effect on the bacteria that we really need that live in the pit. As a result, an almost emergency situation can occur and you will have to call a special service and make a serious cleaning.
However, the installation of a backlash closet does not exclude that unpleasant odors will not penetrate into the room. This can happen for rather trivial reasons: due to the blowing of the ventilation draft by the wind and its surges. But there is a solution to this problem as well. In order to avoid the aforementioned misunderstandings, you need or a breather. It is a forced draft ventilation, due to which a pressure is formed in the pit below atmospheric pressure.
It is not necessary to install a fan on the breather broach - it will give absolutely nothing. After all, an ordinary household fan cannot function for a long time in an aggressive environment. There are special fans designed for this purpose. However, they are quite expensive. Such fans must be explosion-proof and will need to be cleaned frequently.
In a house with heating, it will be quite simple to install a country closet. The boiler and furnace options are shown in the figures. How to do it? One of the most important links is the installation of a thermo-gradient backlash under the breather. You should also pay attention to the fact that the breather pipe must protrude at least 70 cm above the roof ridge and the chimney mouth. And in order for the hood to function well in the warm season (when there is no heating), you need to take a metal pipe and paint it black, which, as you know, attracts heat on sunny days.

There are also options for toilets for summer cottages without heating. What kind? To begin with, let's give an example: in the first "Khrushchevs", fairly large toilets were installed, and the drain was so strong that no brushes or other attributes were needed. Such a draining force was achieved due to the fact that the barrel was suspended practically from the ceiling, the height of which was 2.8 meters. On the side of the barrel was a chain with a pear, with the help of which the draining process was carried out. Thus, the height of the flow of falling water was about 2 meters.

The noise generated by the release of the water was very strong. Subsequently, they came up with models of compact toilet bowls, where the barrels were located at the back of the seating area.
At first, the shape of the toilet bowls was in the form of sinks with a tub, but with a small pressure of water, the contents were almost impossible to wash off. Then they came up with oblique descent toilets, which was much more convenient. This type of toilet is shown in the figure.

Not so long ago, your humble servant also decided to improve the toilet on a suburban area. I wanted to buy something with a siphon so that there was no unpleasant smell. A slanting toilet can flush without a good water pressure. But what if you make the pressure, as in "Khrushchev"? So water saving will be, and the quality of the discharge will remain at its best.
At first I thought to buy an inexpensive compact toilet without a dispenser, in which the water can be flushed as long as the button is pressed. Then it would be necessary to raise it higher. But then I thought that it would be inconvenient: to stretch high, water is given by the hour, so you need to buy an additional pressure storage tank.
As a result, he took a "sink" with a direct downward release. For water, I took a 50-liter barrel made of plastic and hung it from the ceiling. I decided to supply water for flushing with the help of two pieces of plastic corrugation through a ball valve with a handle so that it could be opened more sharply.
The result pleased me pleasantly, because the flush took only up to 3 liters of water. And if we calculate the number of flushes per day from a tank with a capacity of 50 liters, then it turns out from 15 to 25 flushes per day. In addition, the bacteria in the pit feel great in this situation!
It is noteworthy that the cabins described above can also hold tanks with a volume of up to 200 liters. However, it is not worth installing them, because frequent plums will oversaturate the pit with moisture, and its contents will begin to overflow and sour. I don't think anyone needs it.
Without cesspool
You can make a country closet without a cesspool in the form of a dry closet. But after all, natural or artificial bacteria are used for any sewage system, and it turns out that this "bio" is. Also, when purchasing a dry closet, you can buy completely non-bio. Therefore, it is necessary to better understand this topic and figure out how to receive and process wastewater bypassing the sewage system. In other words, how to install an autonomous toilet on your site.
Toilets-"autonomous" general use can carry out the processing of waste in two types, biological and chemical. It happens that all this is combined, depending on the connected cartridge. "Chemists" process wastewater in two ways:
- strong oxidizing agents of inorganic origin;
- organic abiogenic reagents (for example, formalin).
Also, "chemists" have a high absorption and carrying capacity, and are expensive. The contents of the cartridge are toxic, its disposal and refilling is carried out by specially trained people using special equipment and protective equipment. Consequently, under normal household conditions, chemical toilets are hardly used.
In dry closets, biocenosis is carried out thanks to specially grown crops. It turns out that the deaf cesspool, which uses the latest antiseptics, is also a dry closet. Below are the options that do not require pumping and without the accumulation of liquefied wastewater.
Interestingly, a type of toilet was used earlier, which has survived to this day and is successfully used now. This is the so-called. There is also a variety of it: powder closet. They are slightly different from each other, but they also have a lot in common. Most importantly, they use natural bacteria from peat-saturated swamps. These microorganisms have important properties. Which ones? They are inactive, they process a little waste (based on the net volume of the crop). However, their main advantage is their extraordinary vitality; it is also common for these bacteria to go into hibernation and wake up when favorable conditions occur.

It is accepted that in a composting or simple peat toilet there is a container with stone drainage for 40-200 liters. It will ensure the absorption of excess moisture, and then it will gradually be able to give it away. A breather is also needed to absorb harmful gases. Both are very important for a peat toilet, since without these two components the emergence of a stable culture is impossible, it can dry out, fall asleep, turn sour or even die.
The advantage of a peat dry closet is its ease of use. After visiting it, you just need to fill the peat crumb into the funnel. The contents of the collection should be periodically shaken out onto the compost heap. After 2-3 years, the matured, disinfected and fermented compost is suitable as fertilizer. However, composting dry closet does not tolerate overload, like a powder closet, and does not get rid of unpleasant odors. If, for example, a walk is expected in the country for several days, then after it it will be guaranteed that the dry closet will need to be cleaned and refilled.
The microflora-based autonomous toilets use advanced, genetically engineered bacteria of high efficiency. The most important thing is that they are completely harmless to people, they have been successfully used since the 80s of the last century and they have long been tested for "strength". The process of changing the culture cartridge is very simple, it is no more difficult than changing a diaper for an infant. But its contents need to be recycled, since it is not suitable for fertilization. If you spend 1-2 days a week in the country, then one cartridge of the cartridge is enough for the whole summer, and 2-3 replacements are needed for the season. I must say that there are quite a few varieties of cassettes and it is very important to be able to understand them so as not to acquire a fake.
For example, don't take an expensive cab (as shown in Figure 1 below). Of course, it is comfortable, warm, has anti-vandal protection, and is capable of taking heavy loads. But the shelf life of any cartridge based on bacteria is still limited, regardless of the nature of use. At the same time, the culture can lose its properties before its absorption capacity is depleted, and the price of the cassette is not small.

You should beware of purchasing a cheap handicraft product (as shown in Figure 2). In this case, an "alternative" low-quality and inexpensive bio toilet is taken (as shown in the picture below) and a booth is tinkered around it. As a result, a rapid degradation occurs, an unpleasant odor appears, and the cartridge changes for its own money. And if we take a full-fledged toilet for a dacha, then a dacha-household option is better suited (3). Its price is within reasonable limits, the resource for stocks is less, and it is designed for a family.
The same applies to biounitases. Public high-capacity, which can work both on chemistry and microflora (item 4), are quite costly. Special biounitases for summer cottages (item 5) have been introduced into the market, they are cheaper and per family. However, if only water is poured into their barrels, then they quickly deteriorate. The water is replaced with a special liquid, which is fed to the flush in very small doses, literally in drops. Therefore, it is important to ask in advance what the toilet bowl is flushed with and the cost of this flush itself.
Bucket toilets (pos. 6) are also used as a summer cottage, which are designed for 2-5 days of use with an amount of 3 to 5 people. They are well suited for short-term use. There are also chemical options that are conditionally disposable, more often they are used on trips and in the field. Toilets of this kind are rented, and after the expiration date of the absorber or upon return, they are given for refueling.
Another good option for giving is biounitase with a separate cartridge (pos. 7). Its main advantage is that it costs much less than a whole toilet. You can make a booth yourself or buy it. In general, you will get a rather comfortable mini-room where you can relieve yourself (pos. 8). For suburban area this is great because the cost of the toilet bowl and cartridges is much less than the price of a booth cesspool and zero cycle.
However, the distribution of dry closets is not widely distributed due to the fact that microorganisms created for small cartridges are not able to accept "gray" waste. Therefore, for a summer residence and a suburban area, which are visited from spring to autumn, a deaf cesspool is best suited. It is processed, although not very effective, but omnivorous bacteria that do not require large space for habitation.
You just can't do without such a structure as a toilet in the country. And if you decide to build a country toilet with your own hands, then you will have to make some efforts and efforts. The most difficult stage in construction will be digging a foundation pit. As for the aesthetic side of the building, it is rather a secondary issue, because the main thing is to correctly arrange a cesspool and create a reliable foundation for the aboveground structure.
Below we will consider in detail the following points:
| Choosing a place for the construction of a toilet and its structure. | |
 |
What you need to build a toilet. |
 |
Features of the cesspool device. |
 |
Construction of a country toilet house. |
 |
Using a dry closet in the country. |
 |
Biological toilet products. |
How to build a country toilet with your own hands: photos, drawings, video
It should be noted right away that it is better to do all the work once and then not return to this question. long years... It is especially important to build a capital structure if you spend a lot of time at your dacha. If you do not want to spoil the design of the site by installing an ordinary toilet, then you can always hide it in the far corner behind the country house or come up with original designthat would harmoniously blend into the landscape.
Choosing a place for placing a toilet and features of its design
As a rule, the toilet is installed closer to the far border. land plot, since there will be an unpleasant odor near the room, even a slight one. But sometimes they use another option, making a cesspool not far from the house, and to place the toilet, a free corner of the house is taken away, leading the sewer pipe into the pit. Basically, this design is used in cases where water was brought into the house and it is planned to install an insulating tank designed to collect waste.
Be that as it may, it is worth adhering to sanitary and epidemiological standards. They must be observed in order to protect yourself, the environment from negative consequencessuch as soil contamination or infectious diseases.
If you are planning to install a cesspool, it is important that it is at least 30 meters away from water sources. Moreover, its depth should not reach groundwater.
If you are going to install a septic tank, then place it no closer than 15 meters from the house.
If you intend to use an insulated container that cleans up as it fills, you can install it almost anywhere as waste will not penetrate the ground.
Also, an insulated tank is suitable in cases where the groundwater does not pass very deeply and it is impossible to make a cesspool in the ground.
Most often, the pits of the simplest toilet for a summer residence have an area of \u200b\u200babout 1 m 2. If the pit is round, then its diameter should be approximately 1 meter. Its depth is 1.5-2 meters, depending on how the groundwater is deposited.
Once you decide on the place for the pit, proceed to the choice of the toilet design. First of all, you must take into account the weight of the future structure - the choice of material that you are going to use for construction largely depends on it. Moreover, the house itself should not be made very heavy, because over time, under its weight, the soil may begin to sag and the building will be deformed and damaged.
Great as building materials wooden planks or bars or thin material - corrugated board and galvanized profiles.
If you decide to build a toilet booth from bricks or logs, then you should think about high-quality strengthening of the foundation. But there is no point in the construction of such structures, since they will not be warmer than light buildings. Unless you have a need for thermal insulation of a room with the help of insulation, which is of low weight, for example, foam. This building will be warm, light, windproof in winter and it will not be too hot in summer.
Having decided on the choice of material, you can start choosing the size of the booth. If you decide to build a country toilet with your own hands, then we offer you the following drawings.
As a rule, a standard toilet, as you noticed in the drawings presented above, is 2.3 meters high, 1 meter wide, and 1.3-1.5 meters long. But these sizes can vary, and should not be considered a dogma. Be that as it may, the room should be as comfortable as possible for all family members to be in it.What you need to build a suburban toilet with your own hands
Having chosen the design and dimensions of the toilet, you need to buy building materials. You can buy a metal or wooden "house" ready-made. If you decide to build it yourself, then be prepared for the fact that you will need the following materials:
- wooden blocks and boards;
- fasteners - screws and nails;
- metal corners for reinforcement timber frame;
- roof covering material - corrugated board or slate;
- door handle, latch or hook for closing;
- wooden or plastic toilet seat with a lid;
- foam for insulation and material for sheathing insulated walls: thin board, chipboard or plywood (if necessary).
To install a cesspool you will need:
- crushed stone, cement, sand;
- reinforcement for strengthening the foundation structure;
- a metal mesh-netting (designed to fit the pit) and metal pins or brackets for attaching it to the ground.
Also, instead of a mesh and plastering it with concrete, you can use a brick, which will be lined with the pit walls. Moreover, for the construction of the pit, concrete rings are often used, which have holes in the walls. Many summer residents prefer old rubber tires.
Another good environmentally friendly option would be a ready-made container - a septic tank. You can find them the most different sizes, so you will choose the one you need, depending on the length of your stay outside the city and on the number of family members.
Of course, when building a country toilet with your own hands, you cannot do without special toolsso prepare in advance:
- bayonet or shovel with a short and long handle;
- a hand drill that will help when digging a pit;
- perforator (if there is stony soil on the site);
- screwdriver or hammer;
- grinder - "grinder" with discs for metal and stone;
- jigsaw;
- marking tool - tape measure, ruler, square, pencil, building level or marker.
How to make a cesspool with your own hands?
Of course, it is worth starting with marking and digging a hole, which can have a round or square shape (depending on which design scheme for the country toilet was chosen).
If you plan to install a two-chamber plastic septic tank, then the pit is dug so that the inlet pipe is in the toilet cubicle, since a toilet seat will be installed on it. The neck of the second chamber remains outside the room, as it is required to adjust the pumping of fecal matter.
Bucks can be different shapes, since the shape and dimensions of the pit depend on this. The size of the pit must be made 20 cm larger than the capacity, since it is necessary to compact the soil around it as best as possible.
If the walls of the pit are finished with brick or concrete, it can be made in a square or round shape.
After you dig a hole of the required depth, at the bottom it is necessary to arrange drainage from stones, large rubble, and fragments of bricks.
Then a concrete solution is applied to the walls by throwing it on. It is left to dry completely. The total layer thickness can be approximately 50-80 mm.
When the first sketched layer is set, the walls are plastered to a perfectly even state with the same concrete mortar. Then wait until the plaster hole dries.
The pit is covered either with a ready-made reinforced concrete slab, or you can make it yourself. It will act as a foundation and a platform around the toilet.
Planks are laid on the pit itself. They should extend beyond its limits by about 700-800 mm and be recessed into the ground to the level with the ground. They are treated with antiseptic agents. It is quite possible to replace such a wooden substrate with concrete posts.
Two holes are left on the surface for the cesspool and the installation of the toilet seat. Formwork is installed around them.
A dense polyethylene film is spread over the entire area of \u200b\u200bthe foundation.
On top of it, a reinforcing grid is laid, which along the entire perimeter is enclosed in the formwork of the future foundation.
With regard to the height of the formwork of the holes, it should be exactly the same as the formwork of the entire foundation structure. When leveling the surface, formwork boards will act as beacons.
The concrete solution is mixed, then poured onto the site, carefully leveled and left to dry. For the strength and durability of the concrete layer after initial setting, you can “iron” the wet surface with dry cement.
After the site has matured, you can install a toilet booth on it. A hatch will be needed for the hole that is intended for pumping out waste. You can buy it in a store or do it yourself. The hatch cover should be easy to close and open.
Another good option is the round pit shape made from car tires. But do not forget that this type of pits cannot be used for a regular user. Such a toilet can only be operated in a summer cottage, and then, if the owners come sporadically, for example, on weekends, otherwise they will have to resort to pumping out waste very often.
For making a pit from car tires a round pit is pulled out by 150-200 mm more than the diameter of the tires.
Drainage is laid at the bottom of the pit, having a thickness of 15-20 cm.
Further, exactly in the center of the pit, tires are laid to the ground surface. As it is laid around the tires, the drainage layer of sand and gravel is poured and well rammed. This process is carried out to the top.
When the tires are stowed, it is recommended to arrange around the pit strip foundation... For this, a trench, about 500 mm deep, is pulled out along the entire perimeter of the future structure, where concrete is poured.
The bottom of the trench is compacted and then covered with 50-70 mm sand. It also needs to be tamped and covered with a layer of rubble of exactly the same thickness.
Waterproofing is laid from dense polyethylene.
Then you can weld a grating from the reinforcement, install it and mount the formwork 100-150 mm above the ground level, and then fill it with concrete. Make a brick foundation, then plaster it with cement.
After the solution hardens, remove the formwork from the cement foundation, and align the brick from above. Further, roofing material is laid on its surface. It will separate the concrete from the wood.Then the foundation is installed finished structure country toilet, or it is built independently.
For the convenience of construction, the base-frame, consisting of powerful bars, is first fixed on the foundation, and the rest of the structural elements are further mounted on it, depending on the model of the building that you choose.
It is worth noting another option for arranging a cesspool - metal barrels with a cut bottom. They are installed on top of each other and then act in the same way as in the above case. A mixture of sand with crushed stone or gravel mixture is compacted around the pipe.
It would seem that this method is simple to implement, but it has many more disadvantages than advantages. Metal barrels under negative impact both outside and inside will quickly begin to corrode, and this toilet will not last long.
Country toilet do it yourself: building a house, photo
After the pit and the site for installing the toilet are ready, you can proceed with the installation of the house according to the diagram drawn up earlier.
It should be said right away that the houses for the country toilet can have a variety of shapes. Many make them even in the form of a fabulous hut, and those around them may not immediately understand what kind of room fit so harmoniously into landscape design... Such a structure can be made with your own hands, having an idea of \u200b\u200b\\ u200b \\ u200bthe scheme for its assembly.
In the photo you will see an option, partially made of logs, which give the structure a decorative effect, masking the purpose of the building.
In the diagram, you see the basis for building a house from a log, only boards are used instead of logs. It is perfectly visible how the walls of the structure are being assembled and the roof slopes rise. The interior space has been distributed and the location of the toilet seat has been chosen.
The next step will be roof lathing, roofing and wall decoration using the selected material (both wood and metal can be used).
The house can be installed on a pit or used as a room for a dry closet.
This version of the structure of the toilet was called "hut". In this case, the house is erected in the form of a triangle, and its side walls are the roof. The form is extremely simple, so the construction process will not cause you any difficulties.This design is simple to build, as well as easy to use - it is very stable and spacious enough inside.
In the photo you will see the entire internal structure, the place of installation of the toilet seat and the lathing of the wall-roof. Finishing of the front and rear wall started. You can put the "hut" house on a well-equipped cesspool, as in the above case, or use it as a room for a dry closet.
In this photo you see a house for a country toilet of a traditional form, which is found in many areas. However, you can decorate even such a seemingly uncomplicated design according to your preference. For example, a toilet in this area was made to look like a Japanese house. This is evidenced by the hieroglyphs on the plate, which is suspended on chains, an additional roof and japanese lantern at the entrance. Furthermore, inner space is also designed in the same style.
Such an attitude to the design suggests that even from such a structure as a toilet, you can make a real work of art if you put in a little more effort.
An approximate construction scheme is shown in the photo. It clearly shows the cesspool, the installation of the structure of the toilet and the hatch for cleaning. This design is quite simple in the device and it is not difficult to build it. However, for it to be reliable, it is necessary to achieve the rigidity of the ligaments of each of the parts with each other. The internal space arranged above the cesspool may look like this during the construction of the walls. That is, a base of bars is installed directly on the foundation, on which the frame of the structure is subsequently fixed.
Upon completion of the finishing of the country toilet from the inside, the room will have a cozy and neat look, such as you see in the photo.
If you wish, you can come up with a different design of the toilet, but it is necessary to carry out the interior decoration from warm materials... We do not recommend using for decoration ceramic tiles, since it is a cold material, and in winter the tiles will also become slippery.
Dry closet in a suburban area
If you cannot build a country toilet with your own hands, or you have no desire or time to get involved with construction work, then use a dry closet. This option will save you the trouble of digging a hole and installing a house.
A bio toilet is nothing more than an autonomous toilet that does not require either connection to drainage lines or a separate room. It consists of two chambers, the upper of which acts as a toilet bowl, and the other is used for biological processing of waste. The lower chamber contains active substances that decompose feces, turning them into a homogeneous, odorless mass. The action of the bioactive liquid is enough for 10 days, after which the chamber is cleaned, the contents are poured into the soil or the central sewer.
The choice of disposal method depends on the substances used in the dry closet. They are of three types: chemical, composting and microorganic. Each of them is ideal for a specific type of dry closet.
For composting, peat is used as an active substance. It is highly absorbent - 1 kg of peat can absorb 10 liters of liquid. The odorless compost produced by active processes is perfect for fertilizing a vegetable garden.
As a rule, in the compost with this dry closet there are ventilation pipes that remove unpleasant odors during processing.
The work of the dry closet is based on the use chemical substances... It has an indicator that indicates that the container needs cleaning. Recycled waste is discharged into the sewer, and you do not harm the environment. For such models there is special means with non-freezing property.
The third type is a dry closet, in which microorganisms are responsible for the waste recycling process, turning them into compost. The material obtained in this way is environmentally friendly and absolutely safe for animals and soil, so it will not be difficult to dispose of it.
If necessary, you can install a dry closet in a regular room in the yard, and in winter bring it into the house, having allocated a convenient place for these needs.
What biological agents are used for toilets
Owners of country houses with toilets with cesspools, special means are offered (they are similar to those used in dry closets).
As you can see, there are many ways to solve the problem of a toilet in the country - you can always choose the most suitable option.


